BioThings CLI
Introduction
The BioThings CLI (Command Line Interface) provides a set of conveniance command line tools for developers to create and test data plugins locally. Compared to the option of setting up a local Hub running in docker containers, the CLI further lowers the entry barrier by NOT requiring docker or any external databases installed locally. It is particularly suitable for data plugin developers to build and test their data plugin independantly. When a data plugin is ready, they can then pass the data plugin to a running BioThings Hub to build the data plugin into a BioThings API.
This tutorial aims to provide a comprehensive guide to the BioThings CLI, covering its essential commands and functionalities. We will explore a range of topics including installation, initial setup, and core features such as data plugin dump, upload, inspect, and other utility commands. Additionally, we will delve into practical applications of the CLI, demonstrating how to work with the local API server for data inspection and parser debugging.
Prerequisites
To use the BioThings CLI, you need to have Python installed on your system, specifically version 3.7 or higher.
Ensure that your Python version meets this requirement by running:
python --version
If you need to install or upgrade Python, visit the official Python website at https://www.python.org/downloads/ for the latest version.
In addition to Python 3.7 or higher, having Git installed on your system is essential for using the BioThings CLI, particularly if you need to clone repositories or manage version-controlled code.
To check if Git is installed on your system, run:
git --version
If Git is not installed, you can download and install it from the official Git website:
For Windows and macOS: Visit Git’s official download page.
For Linux: Use your distribution’s package manager (e.g., apt-get install git for Ubuntu, yum install git for Fedora).
After installing Git, you can proceed with the setup and usage of the BioThings CLI.
Setting Up
Clone the tutorials repository on our BioThings group.
git clone https://github.com/biothings/tutorials.git
cd tutorials
git checkout pharmgkb_v5
Now we will need to install the requirements to run our BioThings CLI. We will first create a virtual environment and then install a BioThings Hub CLI environment.
python -m venv .venv
source ./.venv/bin/activate
pip install "biothings[cli]"
Run/Test a data plugin
Let’s check out our command line inputs. Here is a quick summary of every command we will be using in this tutorial.
biothings-cli dataplugin dump: Download source data files to localbiothings-cli dataplugin list: Listing dumped files or uploaded sourcesbiothings-cli dataplugin upload: Convert downloaded data from dump step into JSON documents and upload the to the source databasebiothings-cli dataplugin serve: serve command runs a simple API server for serving documents from the source database.biothings-cli dataplugin clean: Delete all dumped files and drop uploaded sources tables
If you have any further questions on what other options are available in our
biothings-cli. You can check out more using the --help or -h flag
on any attribute. Examples:
biothings-cli --helpbiothings-cli dataplugin --helpbiothings-cli dataplugin dump -h
The BioThings CLI can only be used for a manifest based plugin. Looking at our manifest file, we are using a JSON based manifest with multiple uploaders. Check out our manifest section to know more about the different types of manifest files that can be used with our Hub.
{
    "version": "0.3",
    "requires": [
        "pandas",
        "numpy"
    ],
    "dumper": {
        "data_url": [
            "https://s3.pgkb.org/data/annotations.zip",
            "https://s3.pgkb.org/data/drugLabels.zip",
            "https://s3.pgkb.org/data/occurrences.zip"
        ],
        "uncompress": true
    },
    "uploaders": [
        {
            "name": "annotations",
            "parser": "parser:load_annotations",
            "mapping": "parser:custom_annotations_mapping",
            "on_duplicates": "error"
        },
        {
            "name": "druglabels",
            "parser": "parser:load_druglabels",
            "on_duplicates": "error"
        },
        {
            "name": "occurrences",
            "parser": "parser:load_occurrences",
            "on_duplicates": "error"
        }
    ]
}
version specifies the manifest version (it’s not the version of the datasource itself) and tells the CLI what to expect from the manifest.
parser uses
pandasandnumpylibrary, we declare that dependency in requires section.the dumper section declares where the input files are, using data_url key. In the end, we’ll use 3 different files so a list of URLs is specified there. A single string is also allowed if only one file (ie. one URL) is required. Since the input file is a ZIP file, we first need to uncompress the archive, using
uncompress : true. We will see the uncompressed contents shortly after dumping.the uploaders section tells the CLI how to upload JSON documents to local SQLite database. parser has a special format,
module_name:function_name. For example the first parsing function is namedload_annotationsand can be found in parser.py module."on_duplicates" : "error"tells the CLI to raise an error if we have documents with the same_id(this would mean we have a bug in our parser).
Now we will run the dump process using the dump command:
biothings-cli dataplugin dump
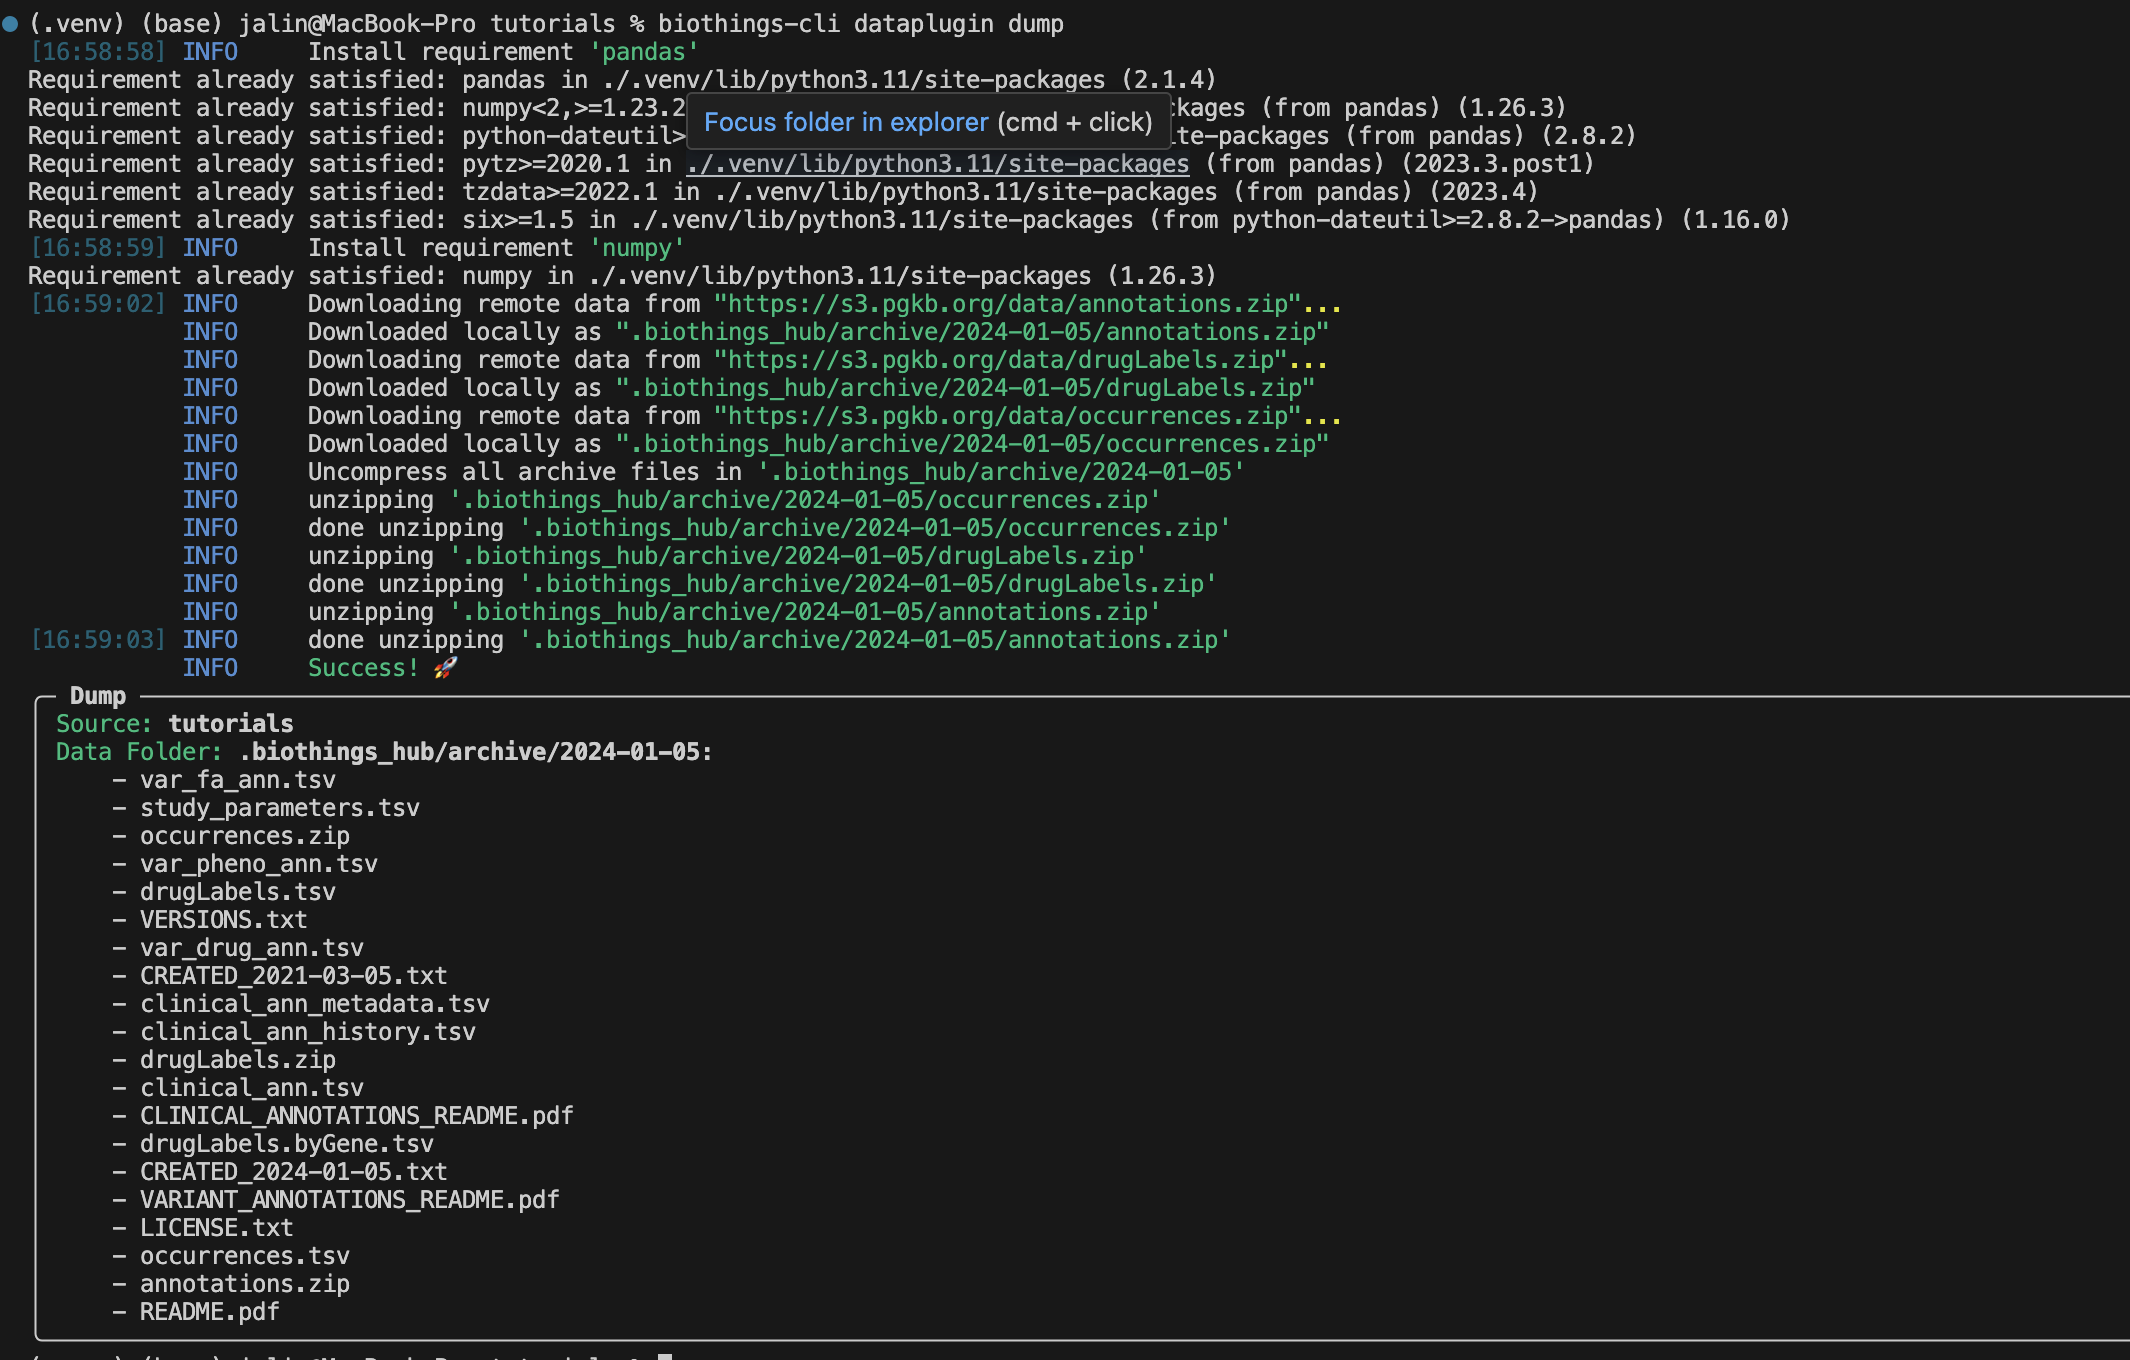
There should be a successful dump along with the dump contents in the
.biothings_hub/archive/<DATE_TIME> directory.
Note
Remember since we set uncompress as true in the manifest the
.biothings_hub/archive/<DATE_TIME> will contain both the zip files
and the uncompressed contents.
In our .biothings_hub directory, there should be a SQLite database that was
created called biothings_hubdb. Let’s take a look at the contents using
biothings-cli dataplugin list --hubdb.
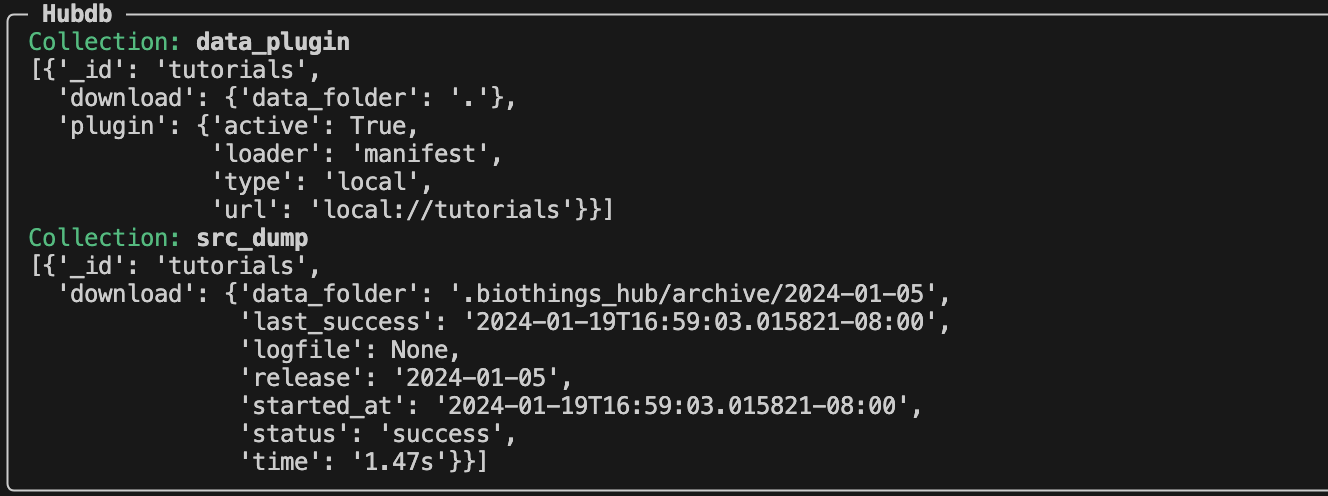
We can see two collections/tables that have been created during our dump.
The data_plugin collection contains the information of our “tutorial” dataplugin. The each entry within the data_plugin contains:
_id: name of the plugin
download.data_folder: where the plugin is located
plugin.active: if the plugin is still being used
plugin.loader: type of plugin, at the moment, we can only using manifest type plugins for the cli, but more features will be updated in the future to include other types
plugin.type: local vs remote repository
plugin.url: plugin source folder
The src_dump collection contains the information of our dumps:
_id: name of the dataplugin
download.data_folder: location of the dumped contents
download.last_success: datetime of last successful dump
download.logfile: location of generated log files
download.release: name of release
download.started_at: datetime of when the dump was started
download.status: status of the dump
download.time: how long the dump process took
Now that our dumper has been populated, we can continue to the upload process.
Let’s take a look at the upload command.

Since our data is small, we do not need to use the --batch-limit tag for
testing. Instead, we can directly run:
biothings-cli dataplugin upload
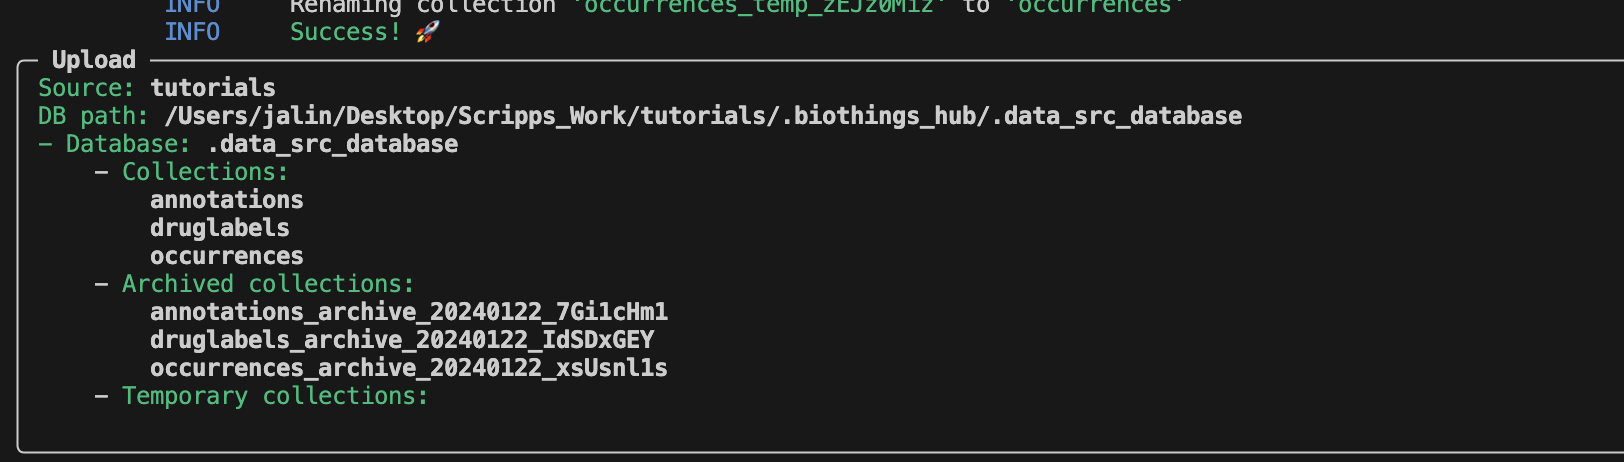
After a successful upload, the SQLite database
.biothings_hub/.data_src_database is created with three different
collections. Each collection matches the corresponding uploader in our manifest
file: annotations, druglabels, occurences.
To view our data, we will need to use the serve command.
biothings-cli dataplugin serve
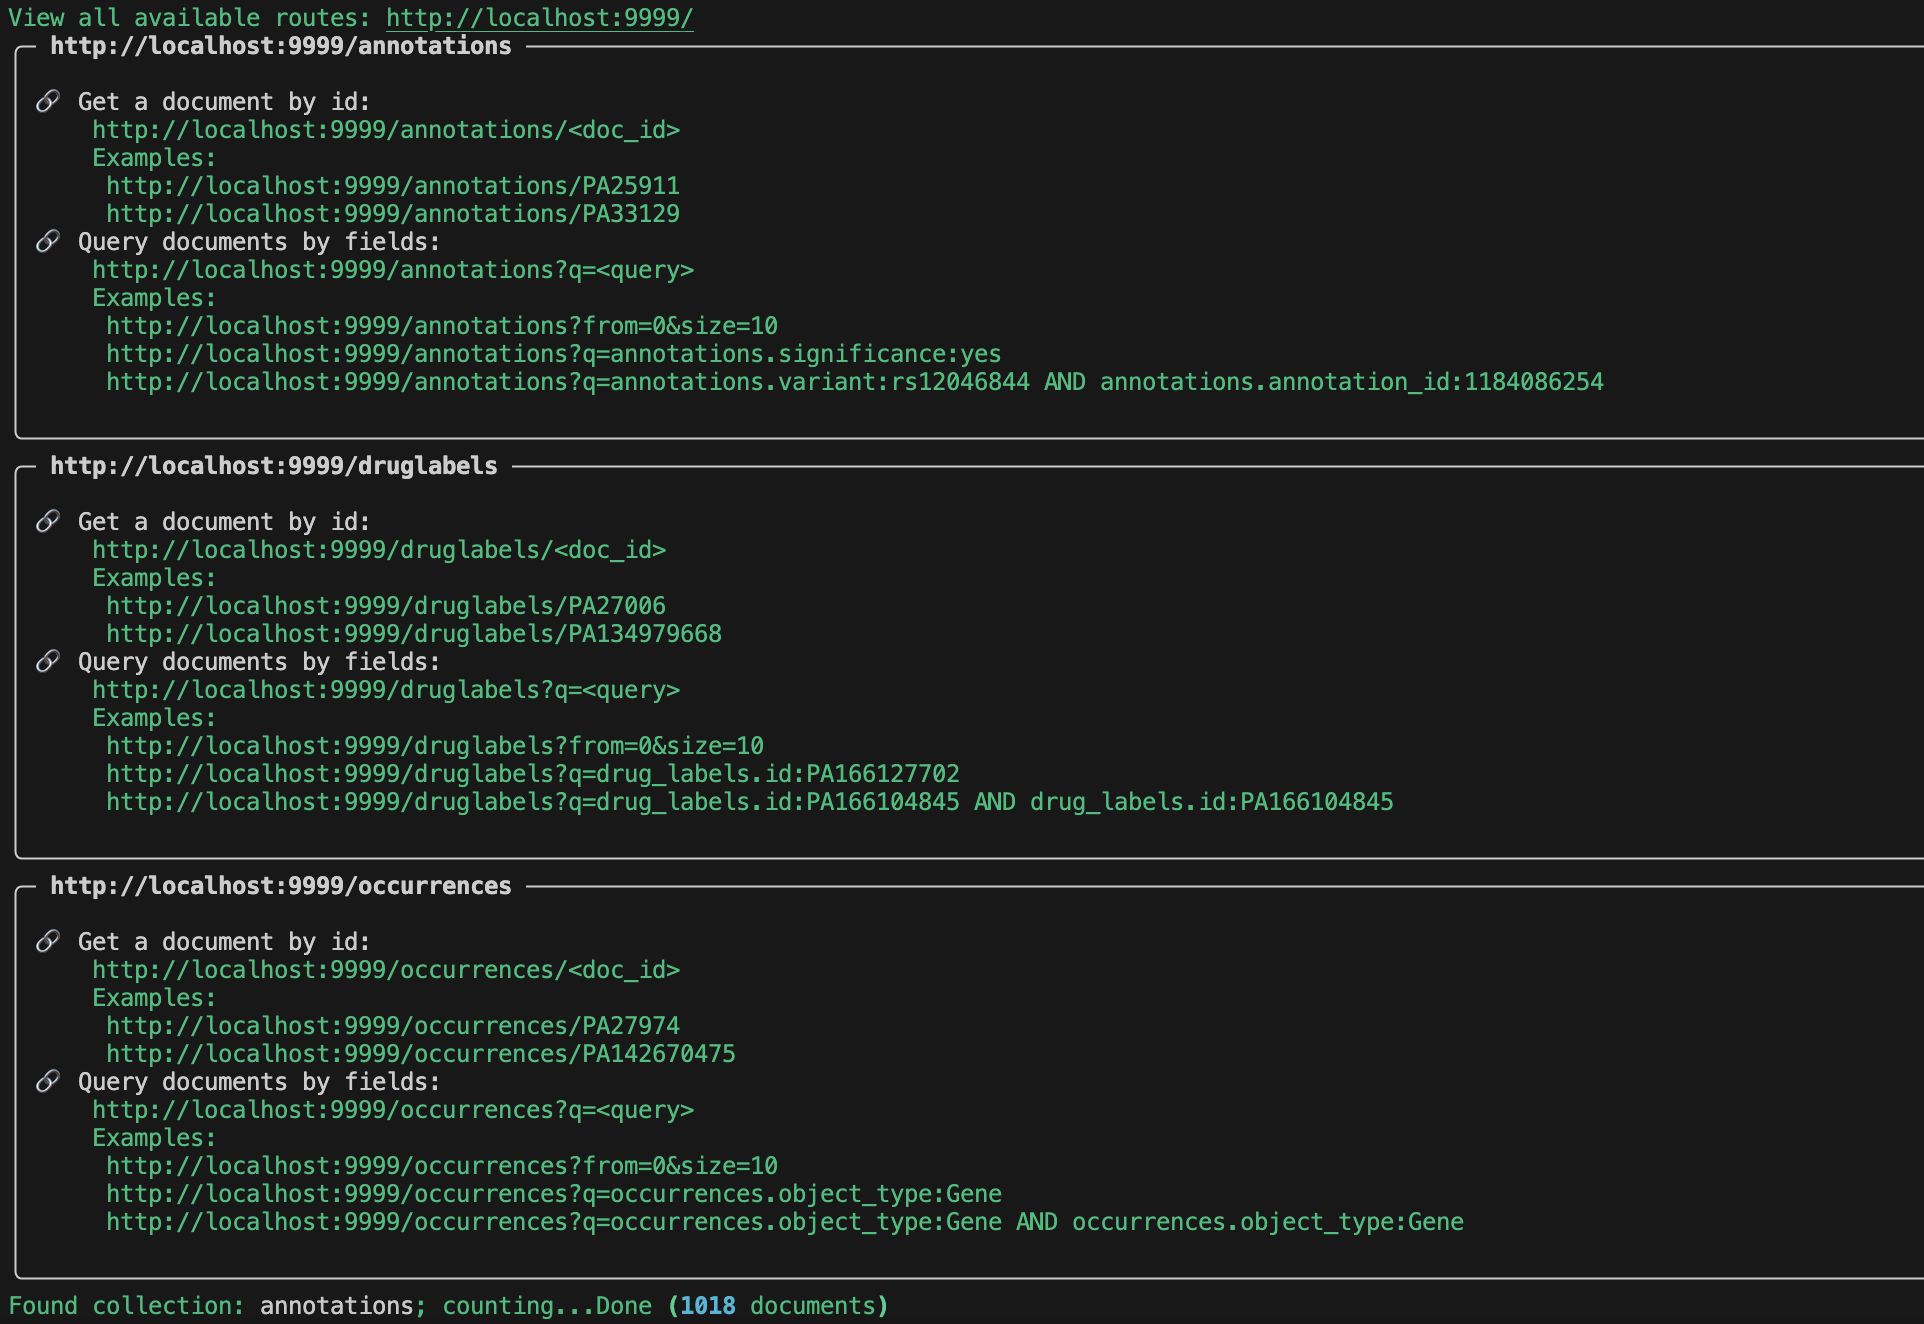
Once we have served the data, there should be 3 endpoints that are created.
Go to http://localhost:9999/ to view all of the available endpoints.
For each endpoint we can query by id:
or field:
Try out a few of the examples for yourself listed in the serve output!
Note
You may have noticed that we are able to serve occurences and druglabels without registering a mapping. The reason is because BioThings CLI does not check for correct mappings. If you want to know if your mapping is correctly registered, you will have to use our BioThings Studio.
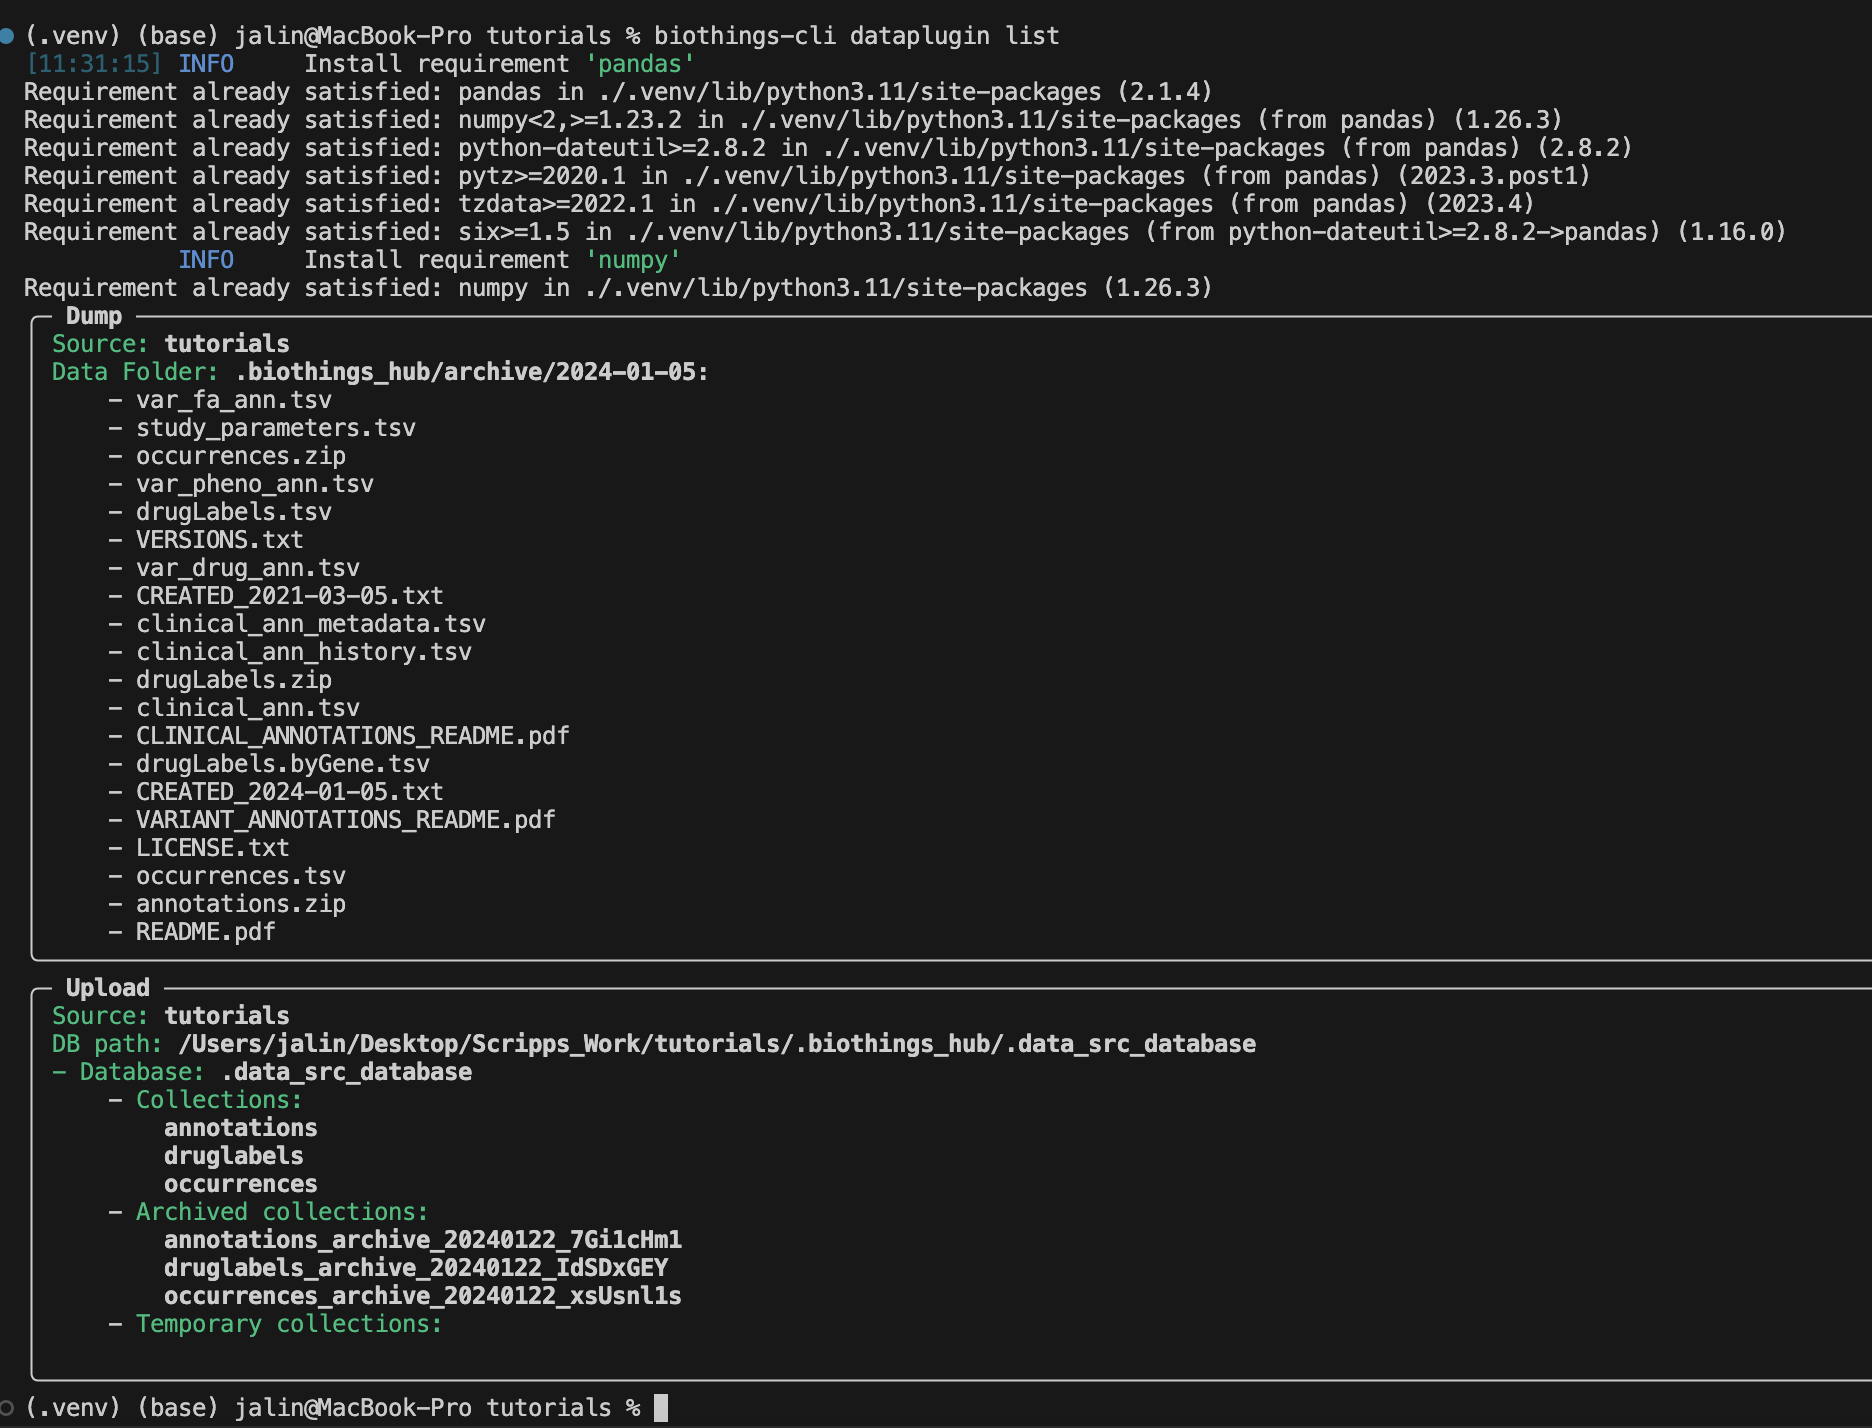
To review we can use the biothings-cli dataplugin list command. Using
this command we can see all of our dump and upload information.
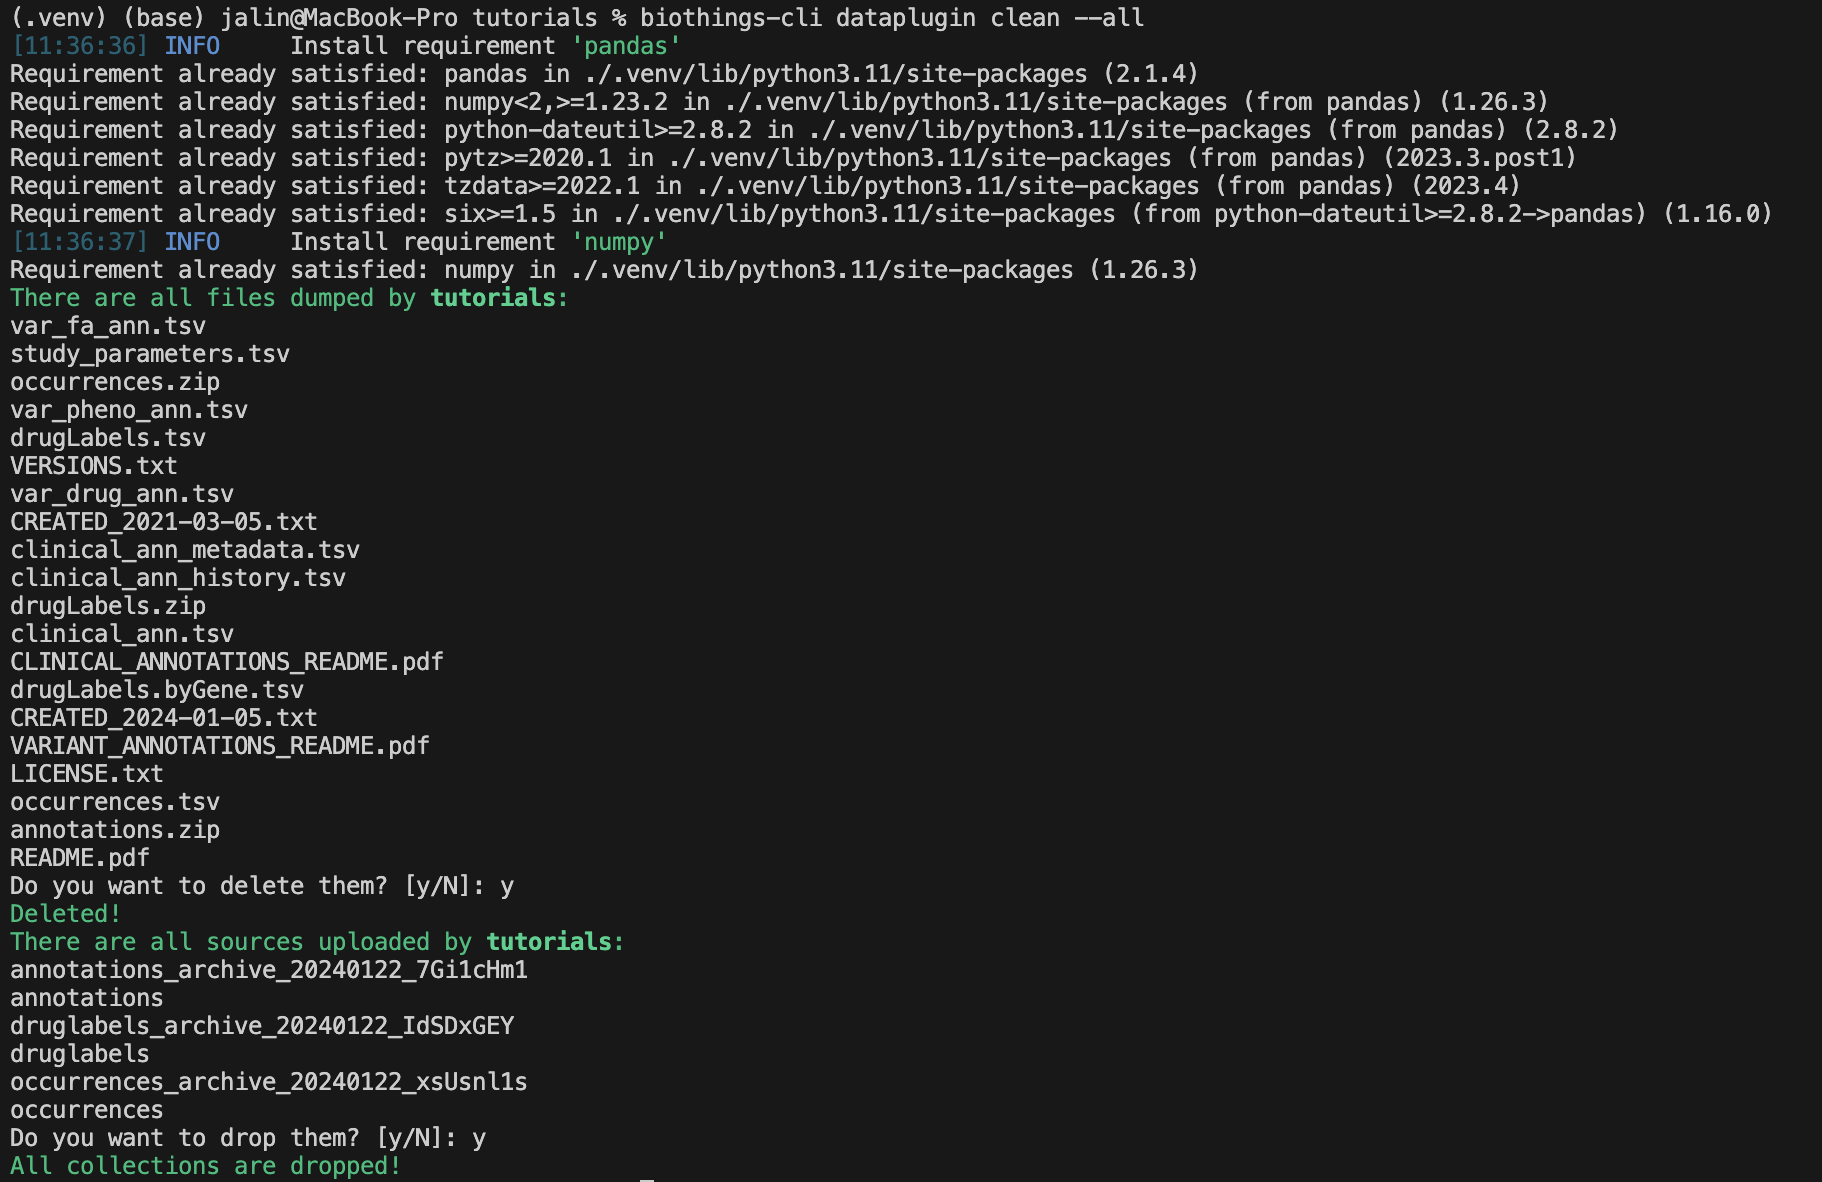
Once we are finished with our plugin we can delete our unused data with
biothings-cli dataplugin clean --all. This will delete all the dumped files
and drop all the uploaded source data.
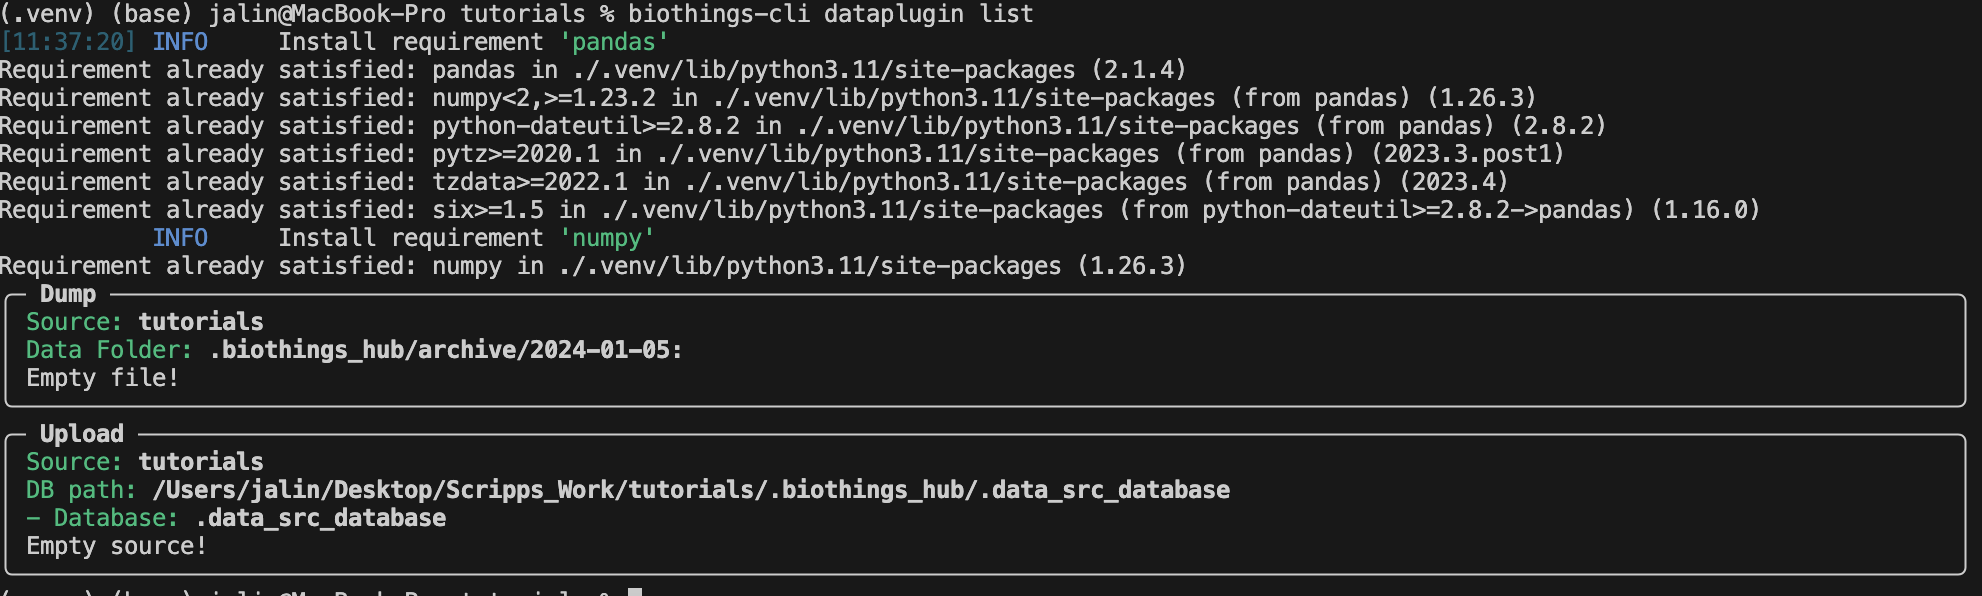
We can check if all the data is deleted using
biothings-cli dataplugin list.
In Summary
We have successfully set up a BioThings CLI environment and created a test environment from a flat file using only the CLI. Here is what we have achieved:
Create a data plugin: by defining a data plugin, we pointed the BioThings CLI to where the remote data is and which parser functions to process the remote data
Dump remote data: we used the BioThings CLI to dump the data locally
Parse remote data: we also generated an uploader to run the parser and store resulting JSON documents into a SQLite database
Run the test API: we served the resulting data with a simple API server from the source database.
Next Steps
Deploy to production:
After you successfully created and tested your data plugin locally, you are ready to host your data plugin as a BioThings API in the production environment (e.g. AWS cloud environment).
Please contact the Manager of one of our managed BioThings Hubs. The rest of the deployment process will be handled by the managed Hub.
Managing multiple plugins:
If you need to manage multiple data plugins locally, there are different options to organize them:
Option 1: Create a new directory for every plugin and use the
biothings-cli dataplugincommand to manage one data plugin at a time as we described in the tutorial above.Option 2: Create a parent directory and organize multiple data plugins in subdirectories. You can then run the
biothings-cli dataplugin-hubcommand at the parent directory as a controller to manage all data plugins, with almost identical subcommands (e.g.dump,uploadetc.) described above.Option 3: Follow our BioThings Studio Tutorial to install a full-featured web UI to manage multiple data plugins, which is the same interface we use to manage a BioThings dataplugin hub in our production environment.