A. Tutorial
This tutorial will guide you through BioThings Studio by showing, in a first part, how to convert a simple flat file to a fully operational BioThings API. In a second part, this API will enrich for more data.
Note
You may also want to read the developer’s guide for more detailed informations.
Note
The following tutorial uses a docker-compose file to run the BioThings Studio and Hub. This file is available here
1. What you’ll learn
Through this guide, you’ll learn:
how to run a docker-compose to run your favorite API
how to run that image inside a Docker container and how to access the BioThings Studio application
how to integrate a new data source by defining a data plugin
how to define a build configuration and create data releases
how to create a simple, fully operational BioThings API serving the integrated data
how to use multiple datasources and understand how data merge is done
2. Prerequisites
Using BioThings Studio requires a Docker server up and running, some basic knowledge about commands to run and use containers. Images have been tested on Docker >=17.
You can install your own Docker server (on recent Ubuntu systems, sudo apt-get install docker.io
is usually enough). You may need to point Docker images directory to a specific hard drive to get enough space,
using -g option:
# /mnt/docker points to a hard drive with enough disk space
sudo echo 'DOCKER_OPTS="-g /mnt/docker"' >> /etc/default/docker
# restart to make this change active
sudo service docker restart
Alternatively, if you have a Mac or Windows, you can install Docker Desktop. It will install the docker server for you. Once you have Docker Desktop installed, go to settings->resources->advanced. You should give at least 80% of your resources to Docker for each category. This will prevent your Docker from crashing if you are running a large datasource or build.
3. Installation
BioThings Studio is available as a docker-compose file at our github repository. Clone the repository to your local.
A BioThings Studio instance exposes several services on different ports:
8080: BioThings Studio web application port
7022: BioThings Hub SSH port
7080: BioThings Hub REST API port
7081: BioThings Hub REST API port, read-only access
9200: ElasticSearch port
27017: MongoDB port
8000: BioThings API, once created, it can be any non-priviledged (>1024) port
9000: Cerebro, a webapp used to easily interact with ElasticSearch clusters
Note
Ports 8080, 7022, 7080, 9200, 27017, 8000, 9000 are exposed by default in the docker-compose.yml file.
$ docker compose up -d --build
We can follow the starting sequence using docker logs command:
$ docker logs -f biothings
 ARG
 SSH keys not yet created, creating
 Generating SSH Keys for BioThings Hub...
 SSH Key has been generated, Public Key:
Please refer to Filesystem overview and Services check for more details about Studio’s internals.
We can now access BioThings Studio using the dedicated web application (see webapp overview).
4. Getting start with data plugin
In this section we’ll dive in more details on using the BioThings Studio and Hub. We will be integrating a simple flat file as a new datasource within the Hub, declare a build configuration using that datasource, create a build from that configuration, then a data release and finally instantiate a new API service and use it to query our data.
The whole source code is available at https://github.com/biothings/tutorials/tree/master, each branch pointing to a specific step in this tutorial.
4.1. Input data
For this tutorial, we will use several input files provided by PharmGKB, freely available in their download section, under “Annotation data”:
annotations.zip: contains a file
var_drug_ann.tsvabout variant-gene-drug annotations. We’ll use this file for the first part of this tutorial.drugLabels.zip: contains a file
drugLabels.byGene.tsvdescribing, per gene, which drugs have an impact of themoccurrences.zip: contains a file
occurrences.tsvlisting the literature per entity type (we’ll focus on gene type only)
The last two files will be used in the second part of this tutorial when we’ll add more datasources to our API.
These files will be downloaded by the Hub when we trigger the dumper. These files will go into a folder named data_folder by default.
This will be explained in more detail in the Data Plugin section.
4.2. Parser
In order to ingest this data and make it available as an API, we first need to write a parser. Data is pretty simple, tab-separated files, and we’ll
make it even simpler by using pandas python library. The first version of this parser is available in branch pharmgkb_v1 at
https://github.com/biothings/tutorials/blob/pharmgkb_v1/parser.py. After some boilerplate code at the beginning for dependencies and initialization,
the main logic is the following:
def load_annotations(data_folder):

  results = {}
  for rec in dat:

      if not rec["Gene"] or pandas.isna(rec["Gene"]):
          logging.warning("No gene information for annotation ID '%s'", rec["Annotation ID"])
          continue
      _id = re.match(".* \((.*?)\)",rec["Gene"]).groups()[0]
      # We'll remove space in keys to make queries easier. Also, lowercase is preferred
      # for a BioThings API. We'll use an helper function `dict_convert()` from BioThings SDK
      process_key = lambda k: k.replace(" ","_").lower()
      rec = dict_convert(rec,keyfn=process_key)
      results.setdefault(_id,[]).append(rec)

  for _id,docs in results.items():
      doc = {"_id": _id, "annotations" : docs}
      yield doc
Our parsing function is named load_annotations, it could be named anything else, but it has to take a folder path data_folder
containing the downloaded data. This path is automatically set by the Hub and points to the latest version available. More on this later.
infile = os.path.join(data_folder,"var_drug_ann.tsv")
assert os.path.exists(infile)
It is the responsibility of the parser to select, within that folder, the file(s) of interest. Here we need data from a file named var_drug_ann.tsv.
Following the moto “don’t assume it, prove it”, we make that file exists.
Note
In this case, an assertion isn’t necessary as code will fail anyway if the file doesn’t exist. But it’s a good practice to make sure
the file exists before trying to open it. Also, it’s a good practice to use os.path.join() to build the path to the file, as it will
automatically use the right path separator depending on the operating system.
dat = pandas.read_csv(infile,sep="\t",squeeze=True,quoting=csv.QUOTE_NONE).to_dict(orient='records')
results = {}
for rec in dat:
   ...
We then open and read the TSV file using pandas.read_csv() function. At this point, a record rec looks like the following:
{'Alleles': 'A',
 'Annotation ID': 608431768,
 'Chemical': 'warfarin (PA451906)',
 'Chromosome': 'chr1',
 'Gene': 'EPHX1 (PA27829)',
 'Notes': nan,
 'PMID': 19794411,
 'Phenotype Category': 'dosage',
 'Sentence': 'Allele A is associated with decreased dose of warfarin.',
 'Significance': 'yes',
 'StudyParameters': '608431770',
 'Variant': 'rs1131873'}
Keys are uppercase, for a BioThings API, we like to have them as lowercase. More importantly, we want to remove spaces in those keys as querying the API in the end will be hard with spaces. We’ll use a special helper function from BioThings SDK to process these.
process_key = lambda k: k.replace(" ","_").lower()
rec = dict_convert(rec,keyfn=process_key)
Finally, because there could be more than one record by gene (ie. more than one annotation per gene), we need to store those records as a list, in a dictionary indexed by gene ID. The final documents are assembled in the last loop.
   ...
   results.setdefault(_id,[]).append(rec)

for _id,docs in results.items():
     doc = {"_id": _id, "annotations" : docs}
     yield doc
Note
The _id key is mandatory and represents a unique identifier for this document. The type must be a string. The _id key is used when data from multiple datasources are merged together, that process is done according to its value (all documents sharing the same _id from different datasources will be merged together). Due to the indexing limitation, the length of the _id key should be kept no more than 512.
Note
In this specific example, we read the whole content of this input file in memory, then store annotations per gene. The data itself is small enough to do this, but memory usage always needs to be cautiously considered when we write a parser.
Note
In this case, the final documents are assembled within a generator function, which is a good practice to save memory. You may see within our Biothings github organization that we have plugins where we return a dictonary or a list of documents. This is also fine, but it is recommended to use a generator function when possible.
4.3. Data plugin
Parser is ready, it’s now time to glue everything together and build our API. We can easily create a new datasource and integrate data using BioThings Studio, by declaring a data plugin. Such plugin is defined by:
a folder containing a manifest.json file, where the parser and the input file location are declared
all necessary files supporting the declarations in the manifest, such as a python file containing the parsing function for instance.
This folder must be located in the plugins directory (by default /data/biothings_studio/plugins, where the Hub monitors changes and
reloads itself accordingly to register data plugins. Another way to declare such plugin is to register a github repository
that contains everything useful for the datasource. This is what we’ll do in the following section.
Note
Whether the plugin comes from a github repository or directly found in the plugins directory doesn’t really matter. In the end, the code
will be found in that same plugins directory, whether it comes from a git clone command while registering the github URL or
from folder(s) and file(s) manually created in that location. However, when developing a plugin, it’s easier to directly work on local files first
so we don’t have to regurlarly update the plugin code (git pull) from the webapp, to fetch the latest code. That said, since the plugin
is already defined in github in our case, we’ll use the github repo registration method.
The corresponding data plugin repository can be found at https://github.com/biothings/tutorials/tree/pharmgkb_v1. The manifest file looks like this:
{
    "version": "0.2",
    "requires" : ["pandas"],
    "dumper" : {
        "data_url" : ["https://s3.pgkb.org/data/annotations.zip",
                      "https://s3.pgkb.org/data/drugLabels.zip",
                      "https://s3.pgkb.org/data/occurrences.zip"],
        "uncompress" : true
    },
    "uploader" : {
        "parser" : "parser:load_annotations",
        "on_duplicates" : "error"
    }
}
version specifies the manifest version (it’s not the version of the datasource itself) and tells the Hub what to expect from the manifest.
parser uses
pandaslibrary, we declare that dependency in requires section.the dumper section declares where the input files are, using data_url key. In the end, we’ll use 3 different files so a list of URLs is specified there. A single string is also allowed if only one file (ie. one URL) is required. Since the input file is a ZIP file, we first need to uncompress the archive, using uncompress : true.
the uploader section tells the Hub how to upload JSON documents to MongoDB. parser has a special format, module_name:function_name. Here, the parsing function is named load_annotations and can be found in parser.py module. ‘on_duplicates’ : ‘error’ tells the Hub to raise an error if we have documents with the same _id (it would mean we have a bug in our parser).
For more information about the other fields, please refer to the plugin specification.
Let’s register that data plugin using the Studio. First, copy the repository URL:
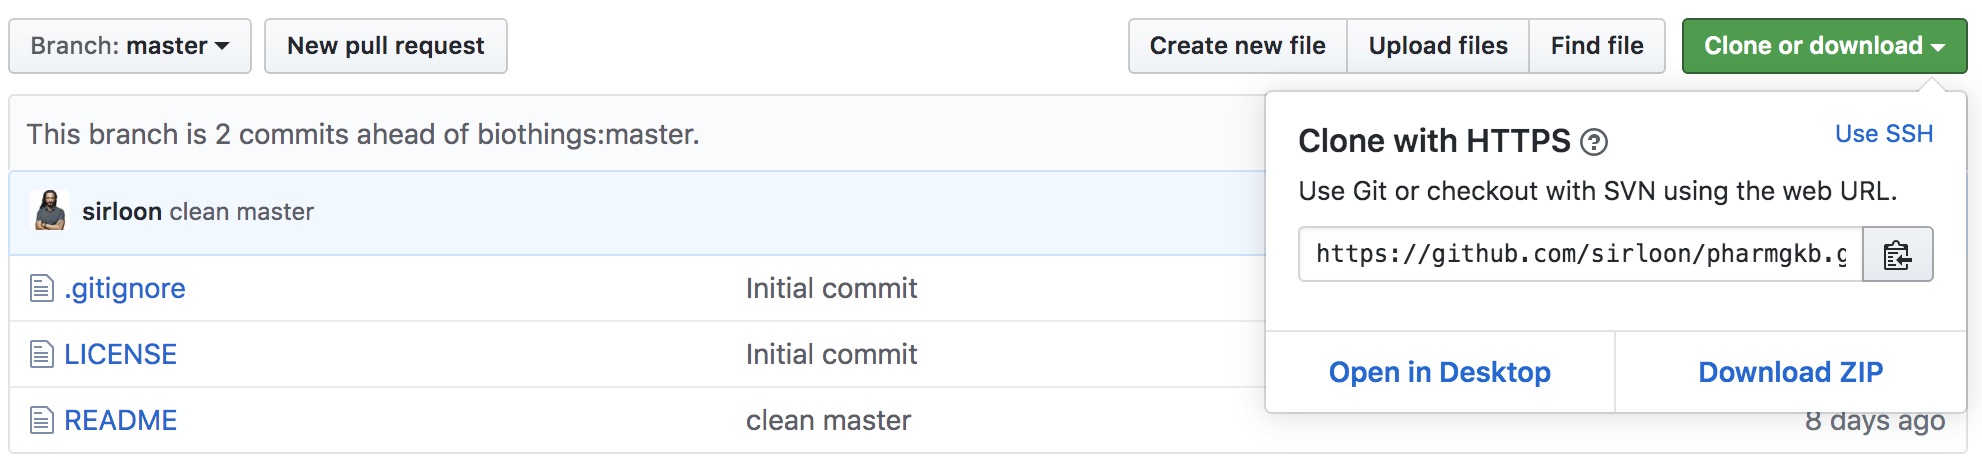
Now go to the Studio web application at http://localhost:8080, click on the  tab, then
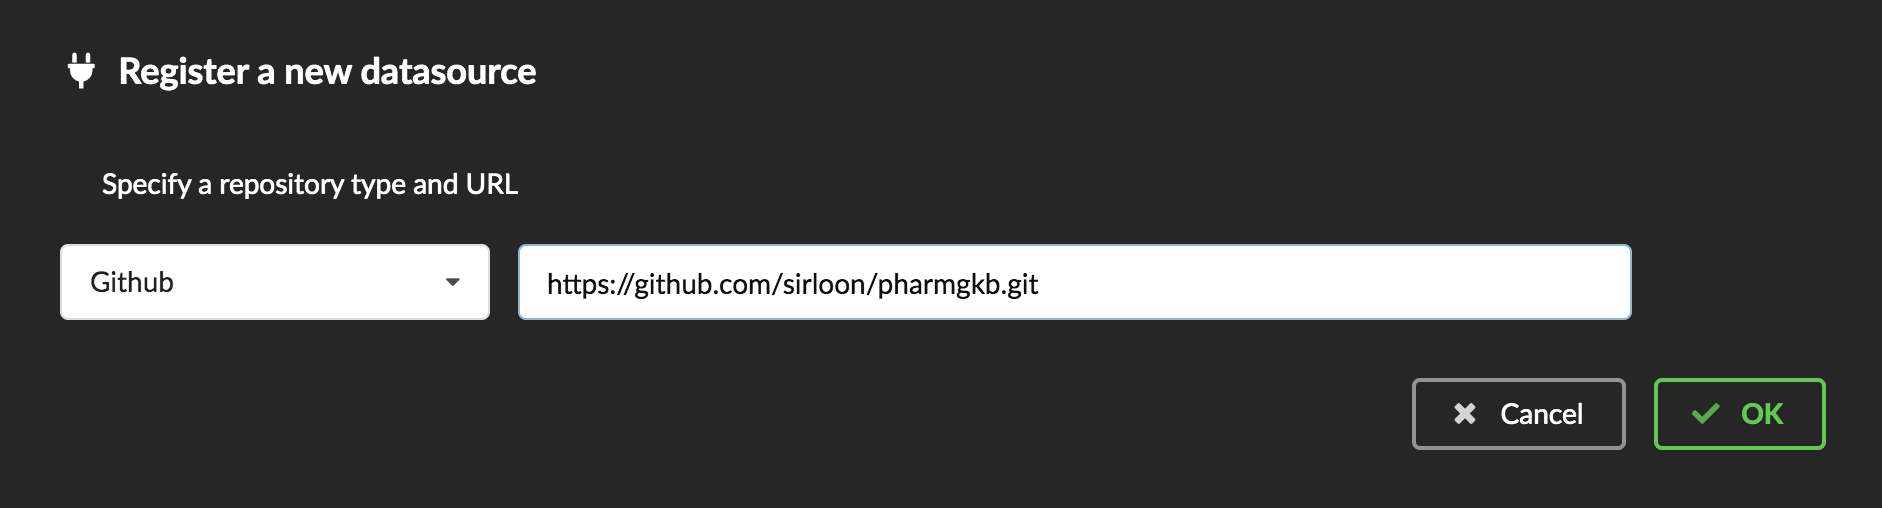
  icon, this will open a side bar on the left. Click on New data plugin, you will be asked to enter the github URL.
Click “OK” to register the data plugin.
icon, this will open a side bar on the left. Click on New data plugin, you will be asked to enter the github URL.
Click “OK” to register the data plugin.
Interpreting the manifest coming with the plugin, BioThings Hub has automatically created for us:
a dumper using HTTP protocol, pointing to the remote file on the CGI website. When downloading (or dumping) the data source, the dumper will automatically check whether the remote file is more recent than the one we may have locally, and decide whether a new version should be downloaded.
and an uploader to which it “attached” the parsing function. This uploader will fetch JSON documents from the parser and store those in MongoDB.
At this point, the Hub has detected a change in the datasource code, as the new data plugin source code has been pulled from github locally inside the container. In order to take this new plugin into account, the Hub needs to restart to load the code. The webapp should detect that reload and should ask whether we want to reconnect, which we’ll do!
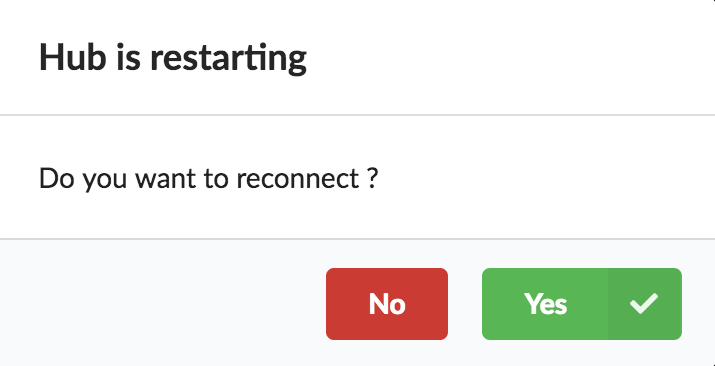
Once you reconnect, you will have to do a hard refresh on your webpage, for example, cmd + shift + r on a Mac or ctrl + shift + r on a Windows/Linux.
Since we fetch source code from branch master, which doesn’t contain any manifest file. We need to switch to another branch (this tutorial is organized using branches,
and also it’s a perfect opportunity to learn how to use a specific branch/commit using BioThings Studio…)
Let’s click on tutorials link, then  . In the textbox on the right, enter
 pharmgkb_v1 then click on Update.
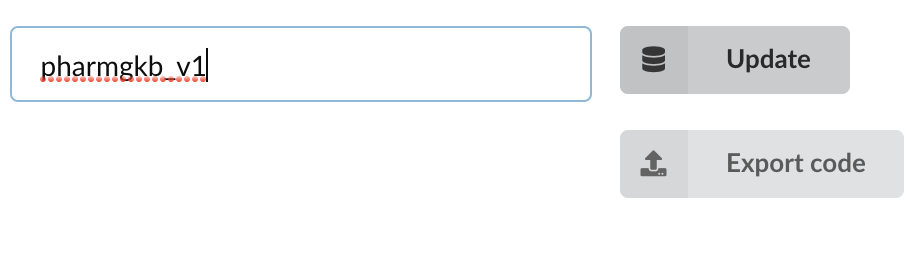
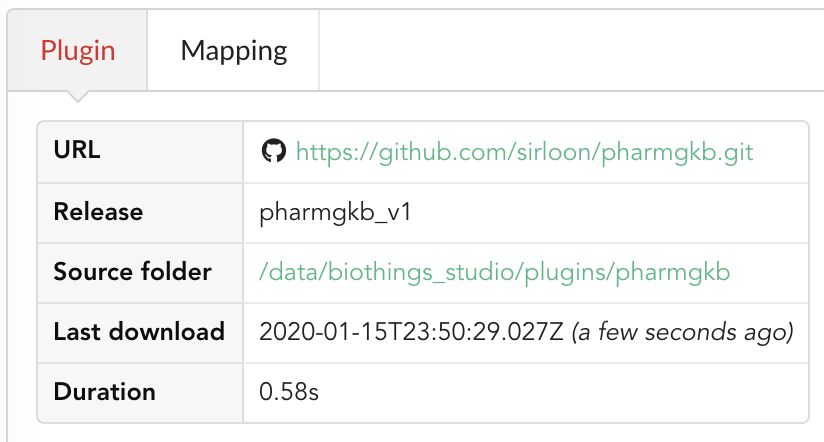
BioThings Studio will fetch the corresponding branch (we could also have specified a commit hash for instance), source code changes will be detected and the Hub will restart. The new code version is now visible in the plugin tab
Note
Remember to do a hard refresh again before continuing as the hub will attempt to restart.
If we click back on PharmGKB appears fully functional, with different actions available:
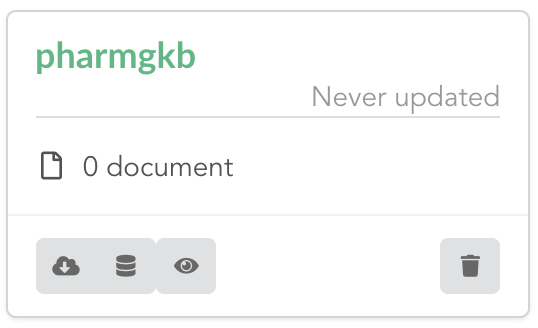
 is used to trigger the dumper and (if necessary) download remote data
 will trigger the uploader (note it’s automatically triggered if a new version of the data is available)
 can be used to “inspect” the data, more of that later
Let’s open the datasource by clicking on its title to have more information. Dumper and Uploader tabs are rather empty since
none of these steps have been launched yet. Without further waiting, let’s trigger a dump to integrate this new datasource.
Either go to Dump tab and click on  or click on to go back to the sources list and click on at the bottom of the datasource.
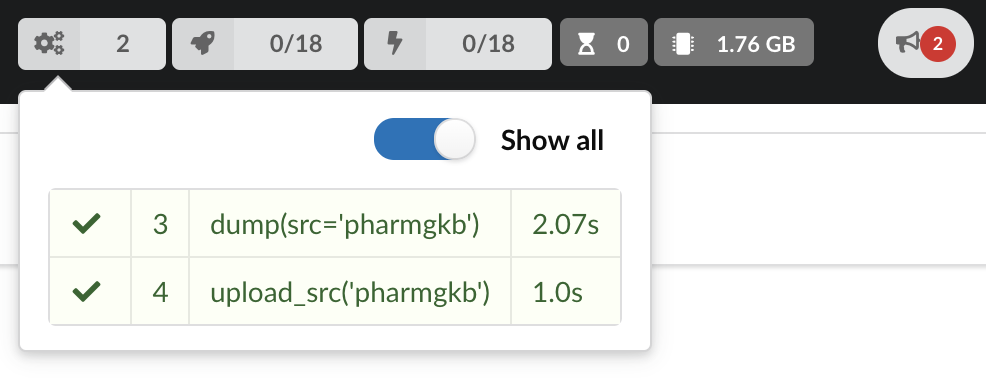
The dumper is triggered, and after few seconds, the uploader is automatically triggered. Commands can be listed by clicking at the top the page. So far we’ve run 3 commands to register the plugin, dump the data and upload the JSON documents to MongoDB. All succeeded.
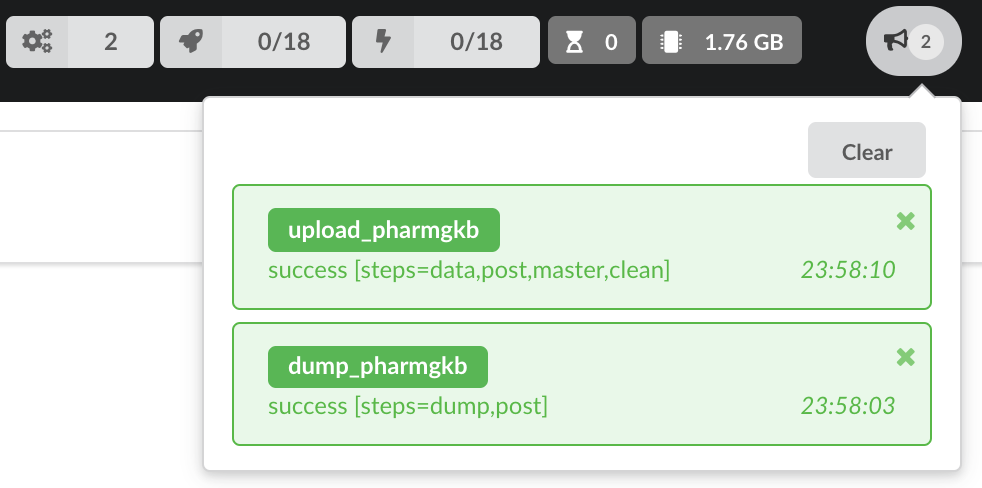
We also have new notifications as shown by the speakerphone icon number on the left. Let’s have a quick look:
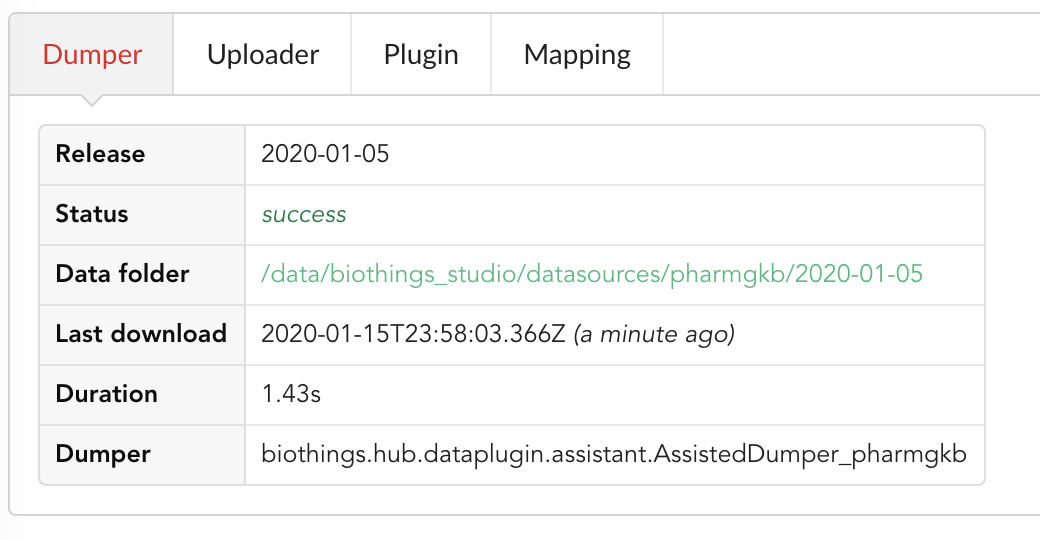
Going back to the source’s details, we can see the Dumper has been populated. We now know the release number, the data folder, when the last download was, how long it tooks to download the file, etc…
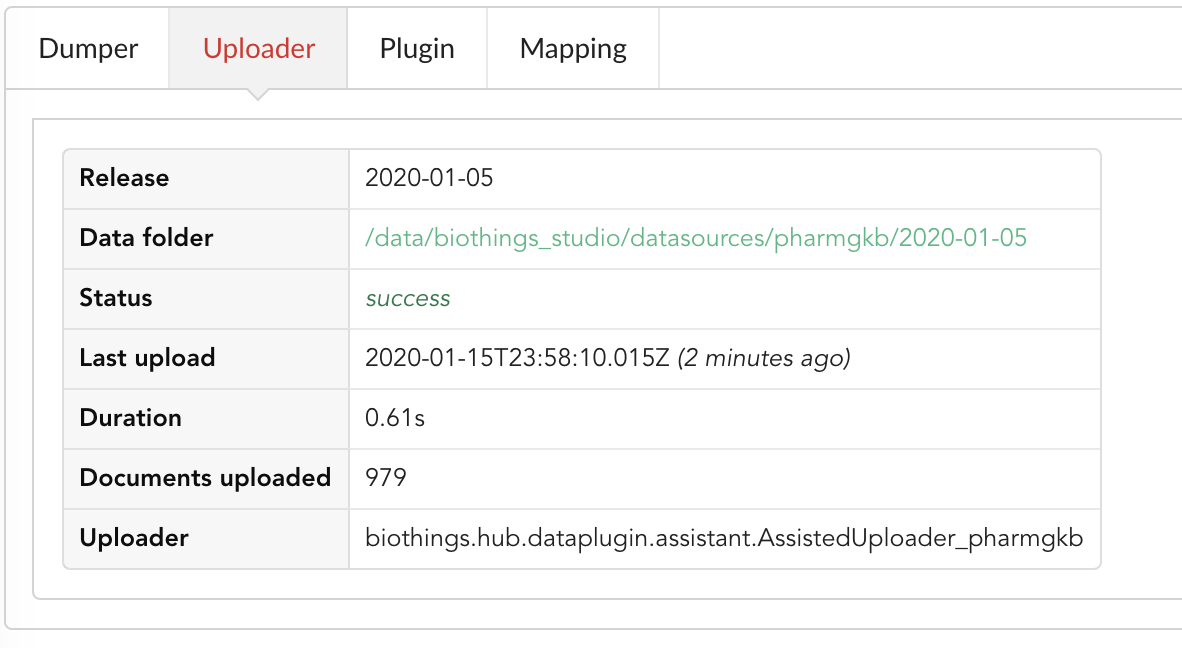
Same for the Uploader tab, we now have 979 documents uploaded to MongoDB. Exact number may change depending on when the source file that is downloaded.
4.4. Inspection and mapping
Now that we have integrated a new datasource, we can move forward. Ultimately, data will be sent to ElasticSearch, an indexing engine. In order to do so, we need to tell ElasticSearch how the data is structured and which fields should be indexed (and which should not). This step consists of creating a “mapping”, describing the data in ElasticSearch terminology. This can be a tedious process as we would need to dig into some tough technical details and manually write this mapping. Fortunately, we can ask BioThings Studio to inspect the data and suggest a mapping for it.
In order to do so, click on Mapping tab, then click on  .
.
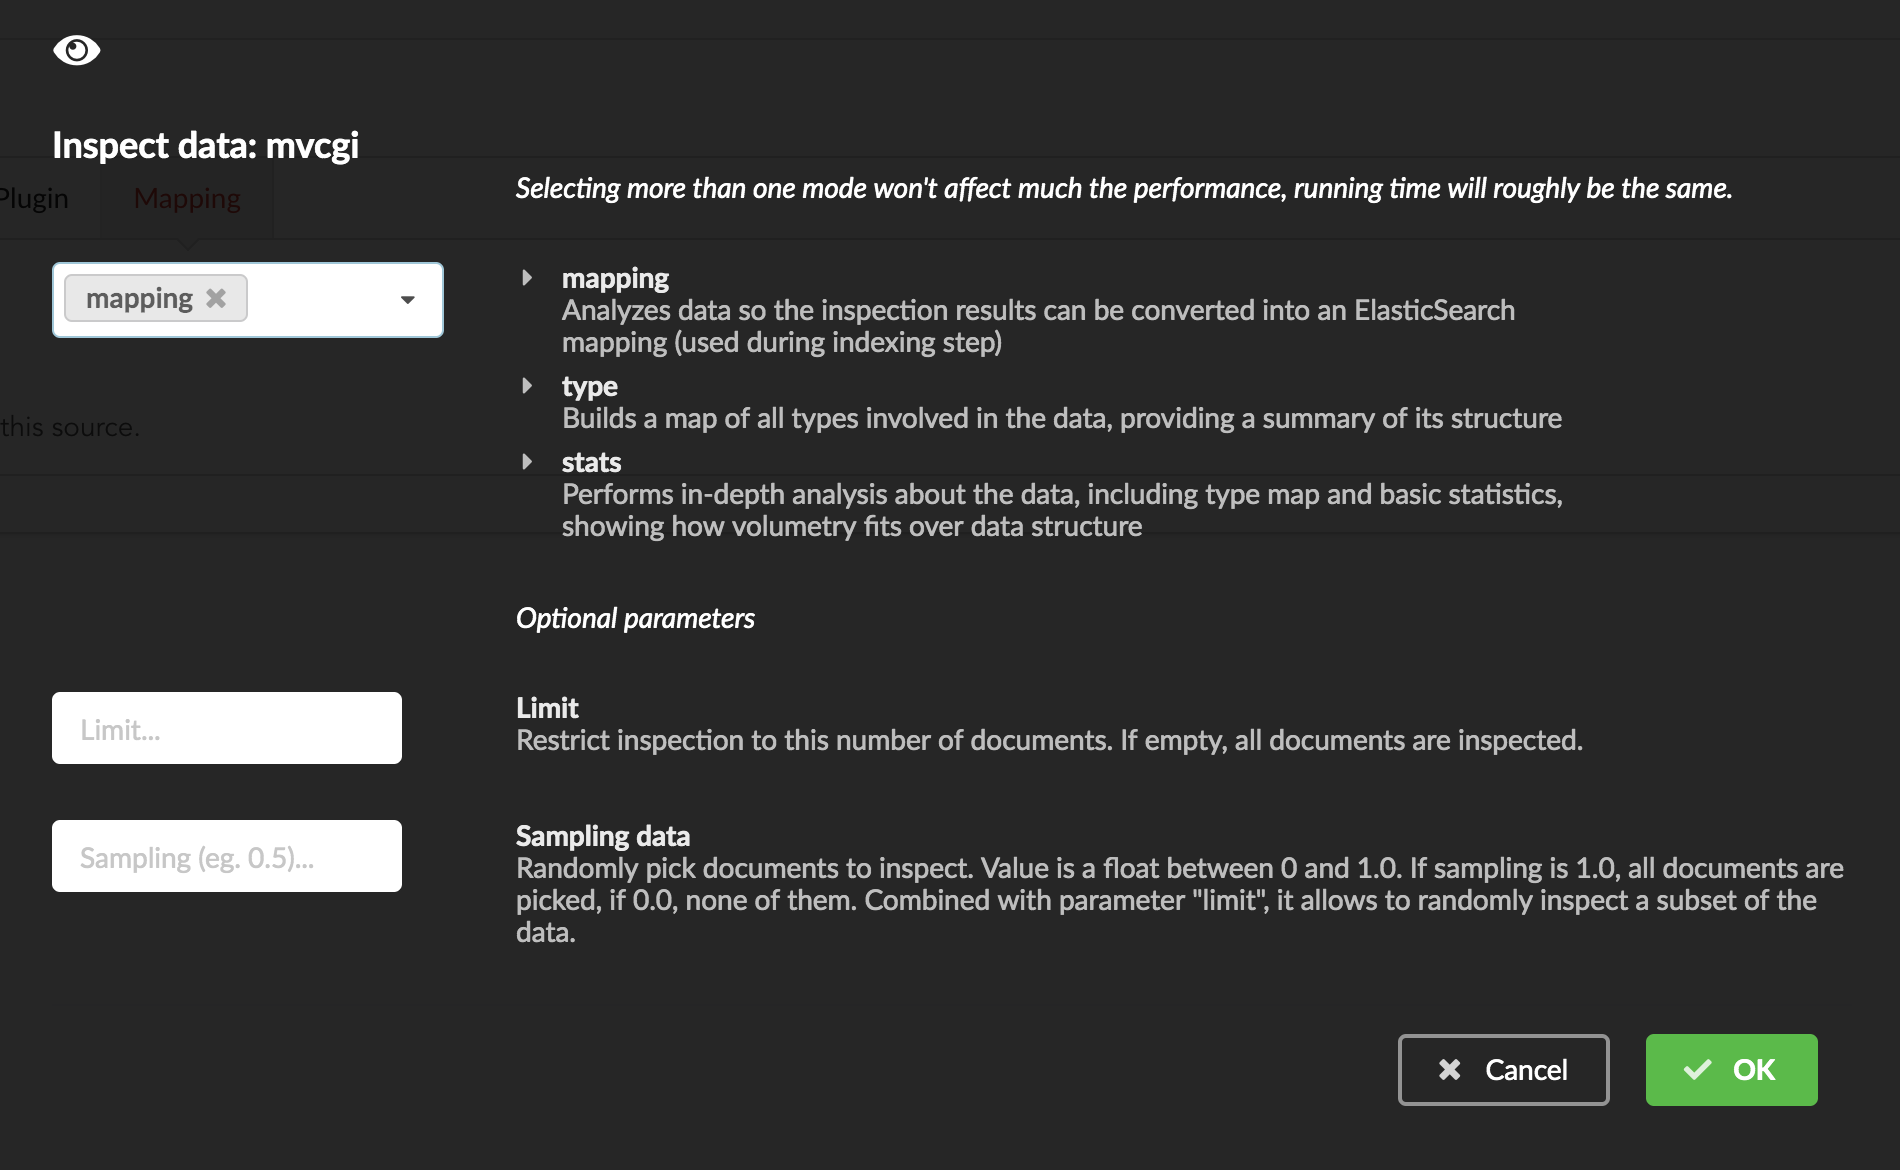
We can inspect the data for different purposes:
Mode
type: inspection will report any types found in the collection, giving detailed information about the structure of documents coming from the parser. Note results aren’t available from the webapp, only in MongoDB.stats: same as type but gives numbers (count) for each structures and types found. Same as previous, results aren’t available in the webapp yet.mapping: inspect the date types and suggest an ElasticSearch mapping. Will report any error or types incompatible with ES.
Here we’ll stick to mode mapping to generate that mapping. There are other options used to explore the data to inspect:
Limit: limit the inspected documents.
Sample: randomize the documents to inspect (1.0 = consider all documents, 0.0 = skip all documents, 0.5 = consider every other documents)
The last two options can be used to reduce the inspection time of huge data collection, or you’re absolutely sure the same structure is returned for any documents output from the parser.
Since the collection is very small, inspection is fast. But… it seems like we have a problem
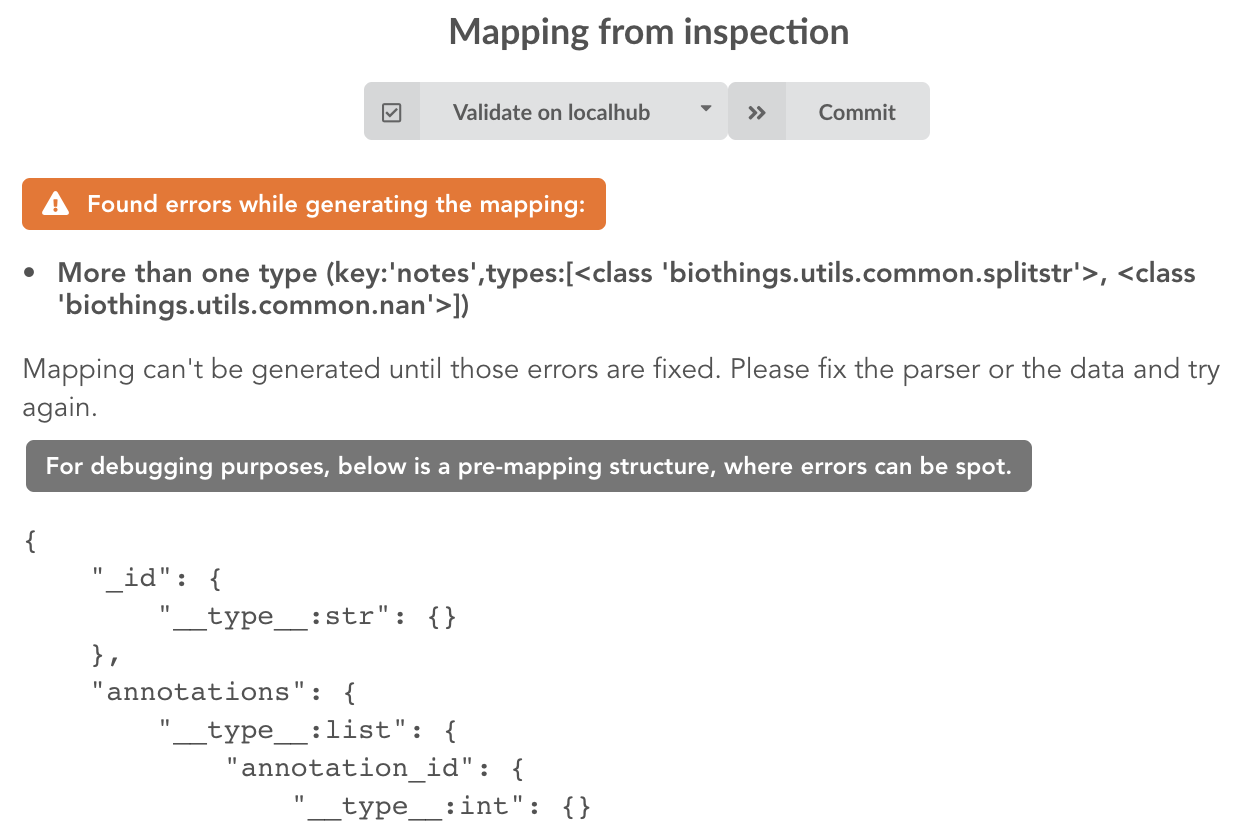
More than one type was found for a field named notes. Indeed, if we scroll down on the pre-mapping structure, we can see the culprit:
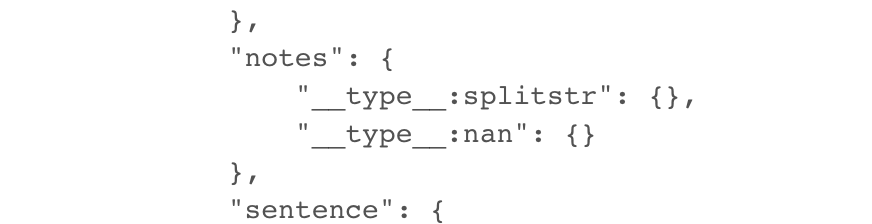
This result means documents sometimes have notes key equal to NaN, and sometimes equal to a string (a splittable string, meaning there are spaces in it).
This is a problem for ElasticSearch because it wouldn’t index the data properly. And furthermore, ElasticSearch doesn’t allow NaN values anyway. So we need
to fix the parser. The fixed version is available in branch pharmgkb_v2 (go back to Plugin tab, enter that branch name and update the code).
The fix consists in removing key/value from the records, whenever a value is equal to NaN.
rec = dict_sweep(rec,vals=[np.nan])
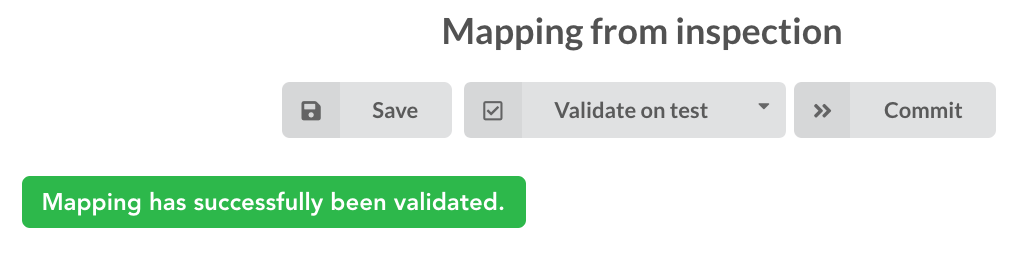
Once fixed, we need to re-upload the data, and inspect it again. This time, no error, our mapping is valid:
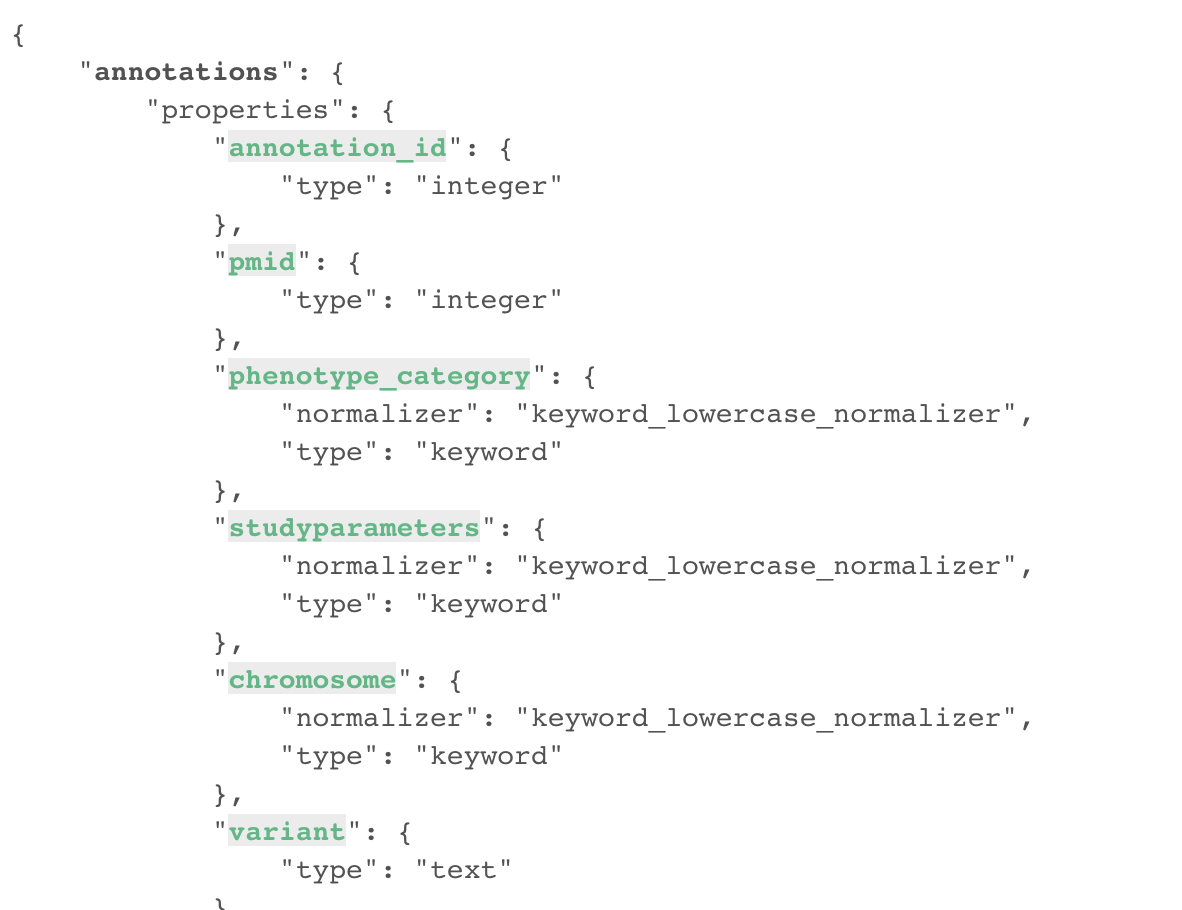
For each highlighted field, we can decide whether we want the field to be searchable or not, and whether the field should be searched by default when querying the API. We can also change the type for that field, or even switch to “advanced mode” and specify your own set of indexing rules. Let’s click on “gene” field and make it searched by default. Let’s also do the same for field “variant”.
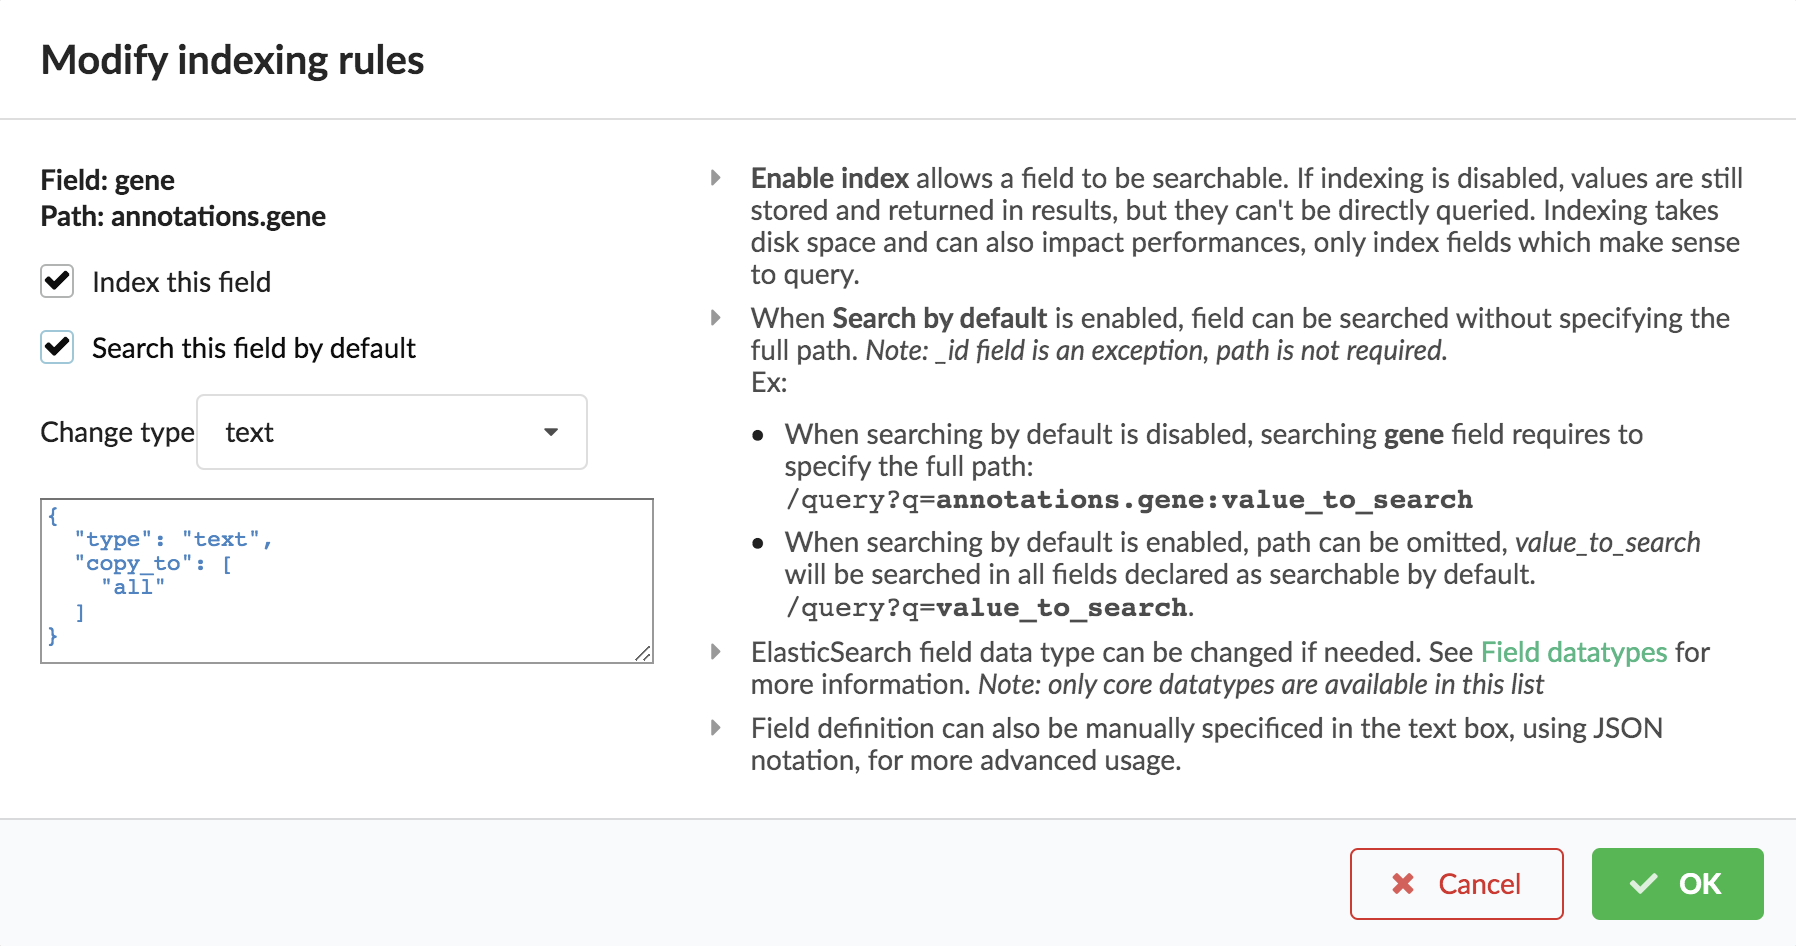
Indeed, by checking the “Search by default” checkbox, we will be able to search for instance gene symbol “ABL1” with /query?q=ABL1
instead of /query?q=annotations.gene:ABL1. Same for “variant” field where we can specify a rsid.
After this modification, you should see  at the top of the mapping, let’s save our changes clicking on
  . Also, before
moving forwared, we want to make sure the mapping is valid, let’s click on
. Also, before
moving forwared, we want to make sure the mapping is valid, let’s click on  . You should see this success message:
Note
“Validate on localhub” means Hub will send the mapping to ElasticSearch by creating a temporary, empty index to make sure the mapping syntax and content are valid. It’s immediately deleted after validation (whether successful or not). Also, “localhub” is the default name of an environment. Without further manual configuration, this is the only development environment available in the Studio, pointing to embedded ElasticSearch server.
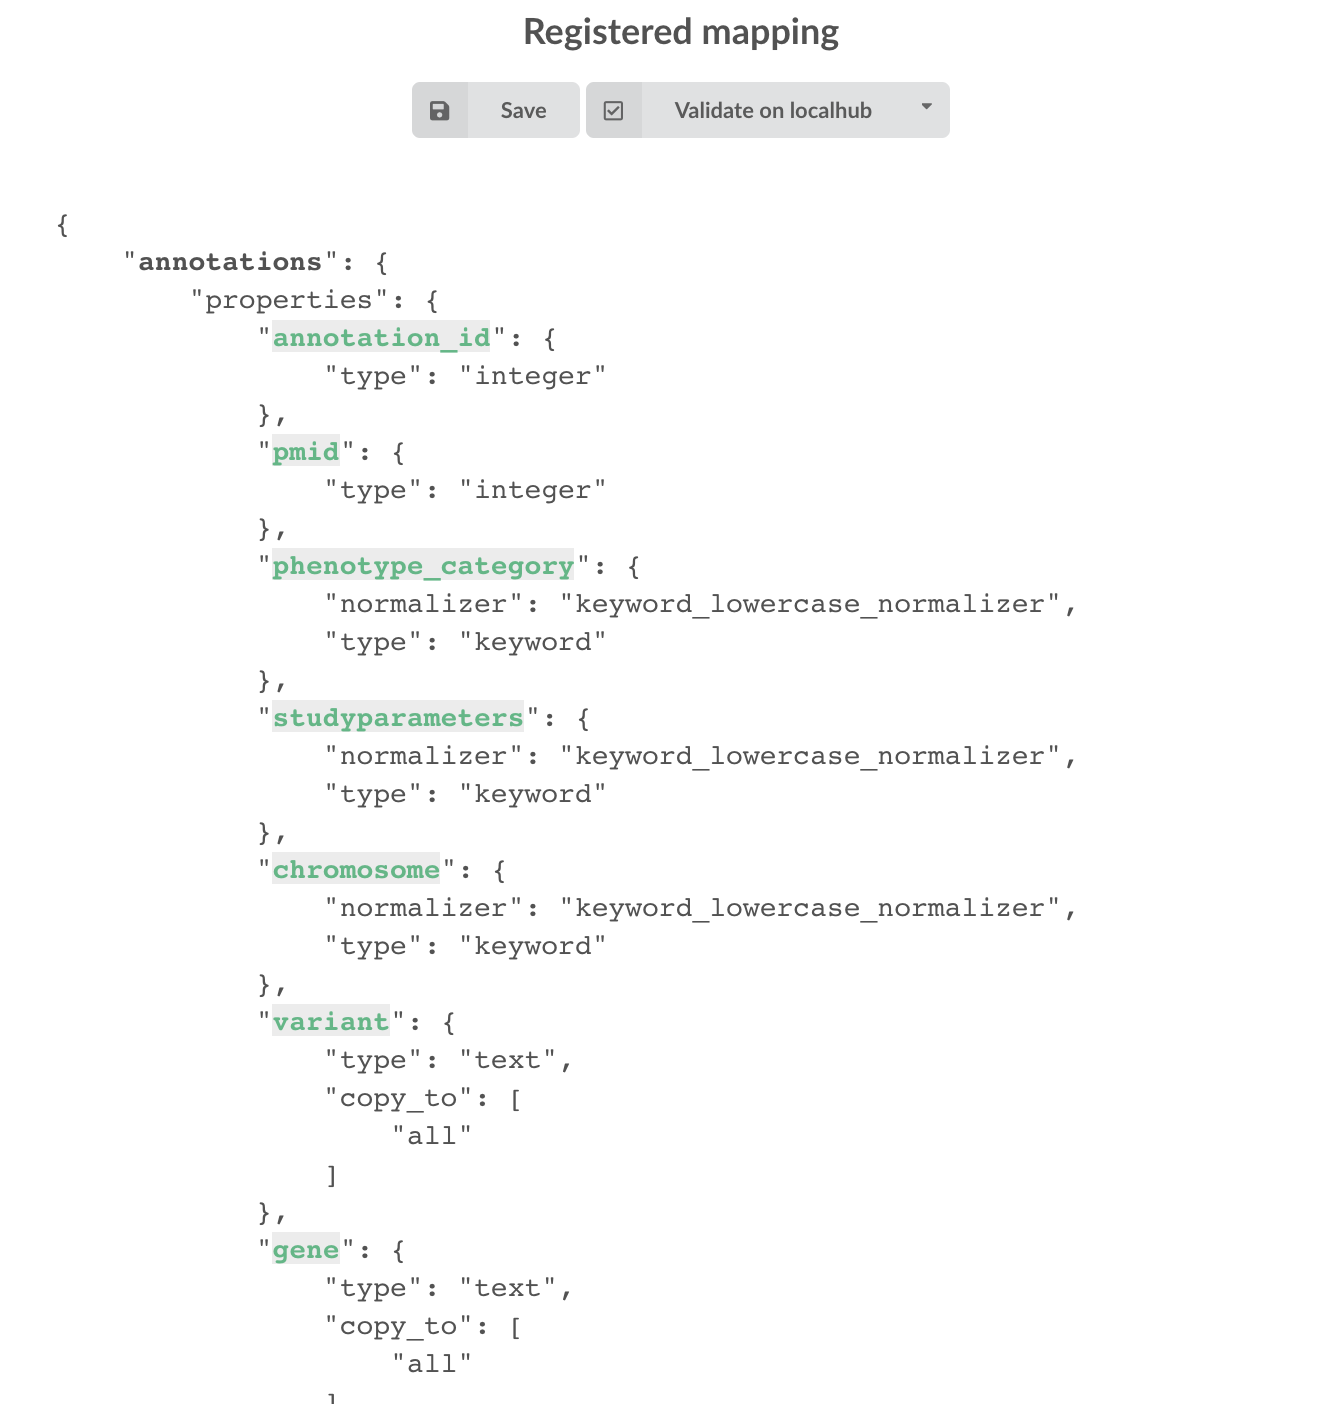
Everything looks fine, the last step is to “commit” the mapping, meaning we’re ok to use this mapping as the official, registered mapping that will actually be used by ElasticSearch. Indeed the left side of the page is about inspected mapping, we can re-launch the
inspection as many times as we want, without impacting active/registered mapping (this is usefull when the data structure changes). Click on
 then “YES”, and you now should see the final, registered mapping on the right:
4.5. Build
Once we have integrated data and a valid ElasticSearch mapping, we can move forward by creating a build configuration. A build configuration
tells the Hub which datasources should be merged together, and how. Click on  then and finally, click on
  .
.
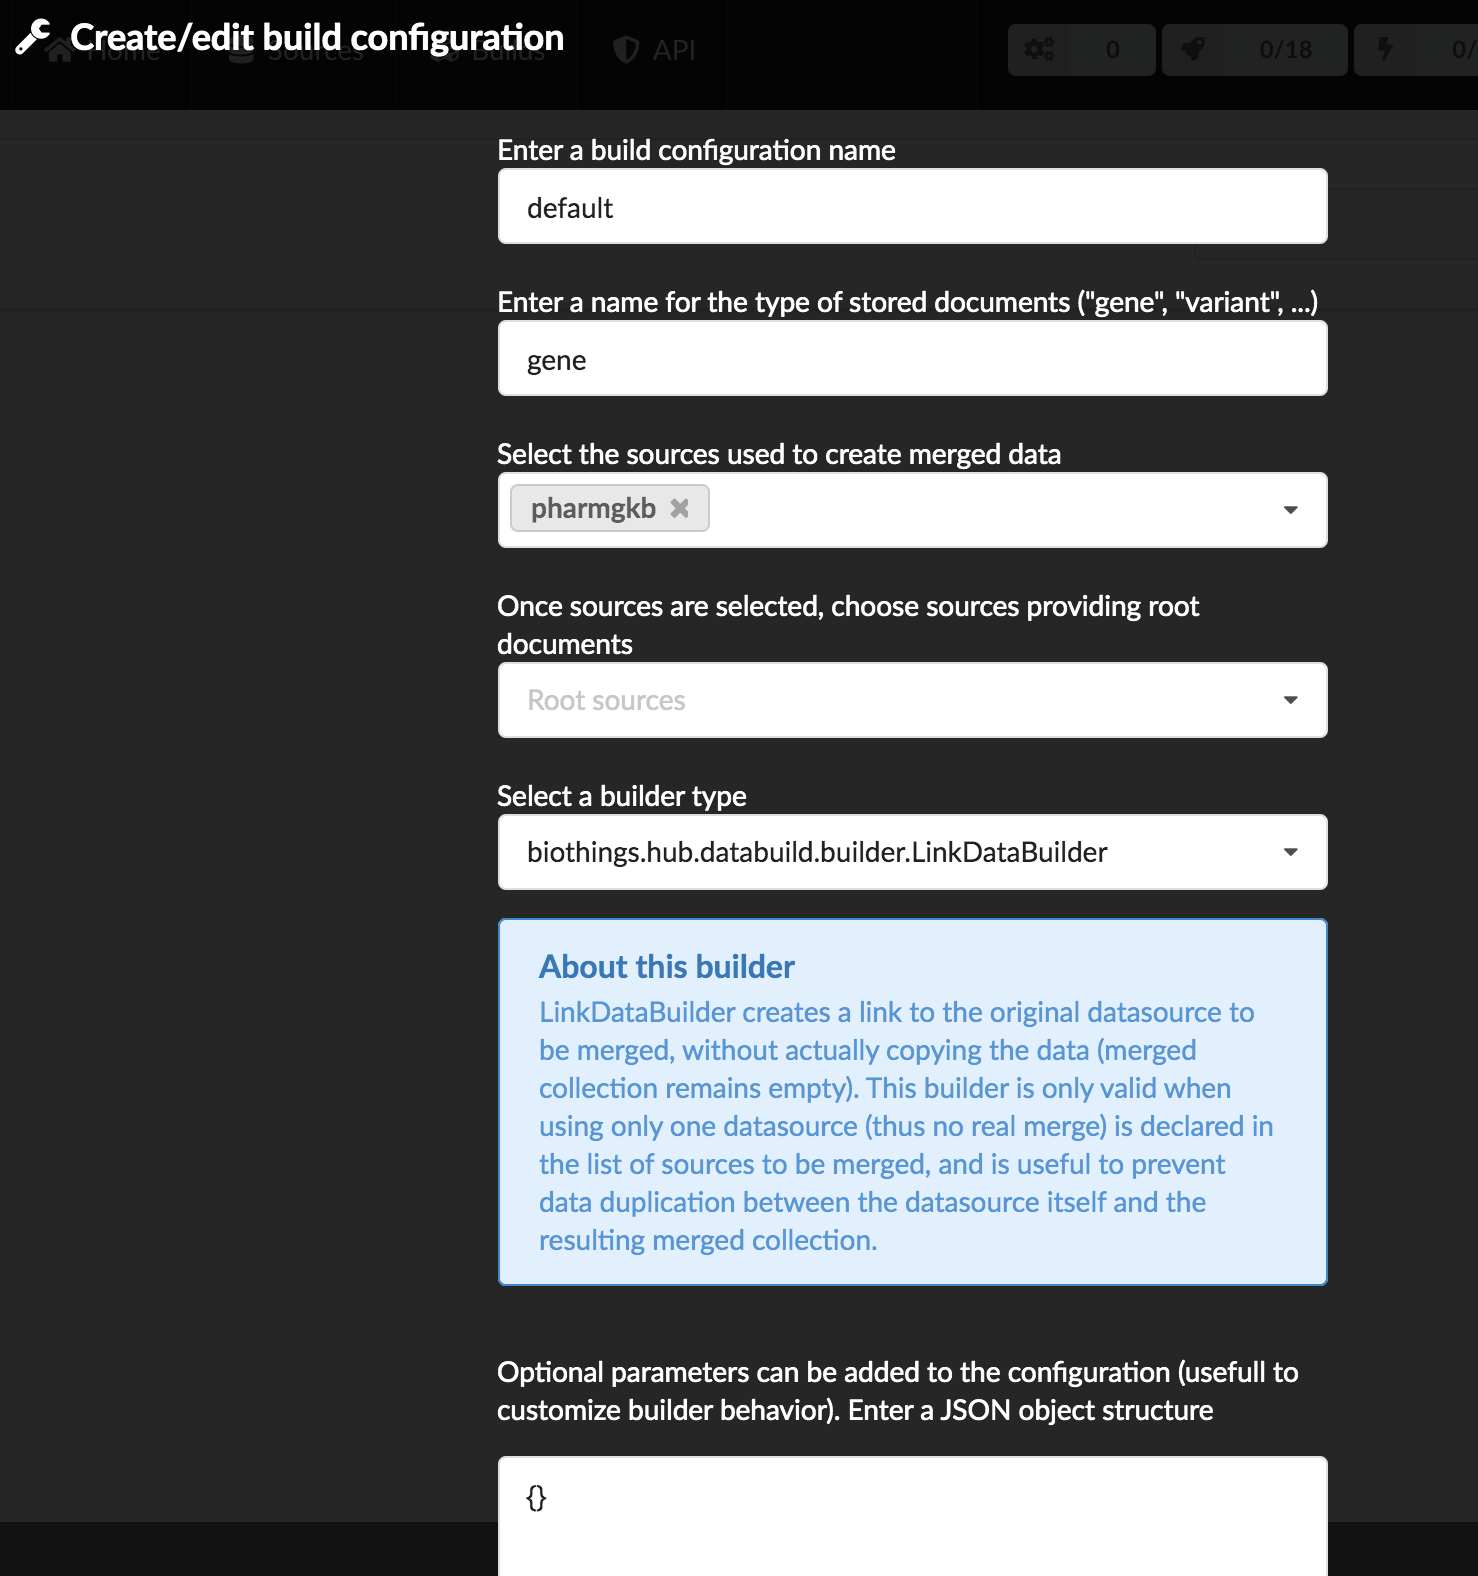
enter a name for this configuration. We’re going to have only one configuration created through this tutorial so it doesn’t matter, let’s make it “default”
the document type represents the kind of documents stored in the merged collection. It gives its name to the annotate API endpoint (eg. /gene). This source is about gene annotations, so “gene” it is…
open the dropdown list and select the sources you want to be part of the merge. We only have one, “pharmgkb”
in root sources, we can declare which sources are allowed to create new documents in the merged collection. If a root source is declared, data from other sources will only be merged if documents previously exist with same IDs (documents coming from root sources). If not, data is discarded. Finally, if no root source is declared, any data sources can generate a new document in the merged data. In our case, we can leave it empty (no root sources specified, all sources can create documents in the merged collection).
selecting a builder is optional, but for the sake of this tutorial, we’ll choose
LinkDataBuilder. This special builder will fetch documents directly from our datasources pharmgkb when indexing documents, instead of duplicating documents into another connection (called target or merged collection). We can do this (and save time and disk space) because we only have one datasource here.the other fields are for advanced usage and are out-of-topic for this tutorial
Click “OK” and open the menu again, you should see the new configuration available in the list.
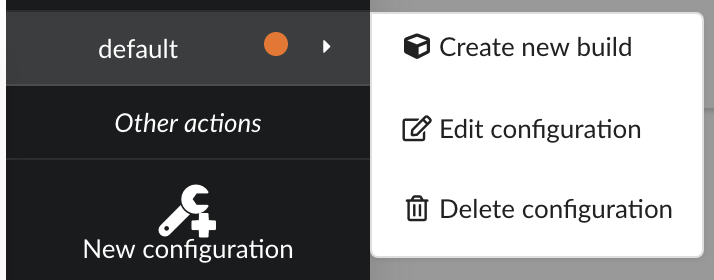
Click on it and create a new build.
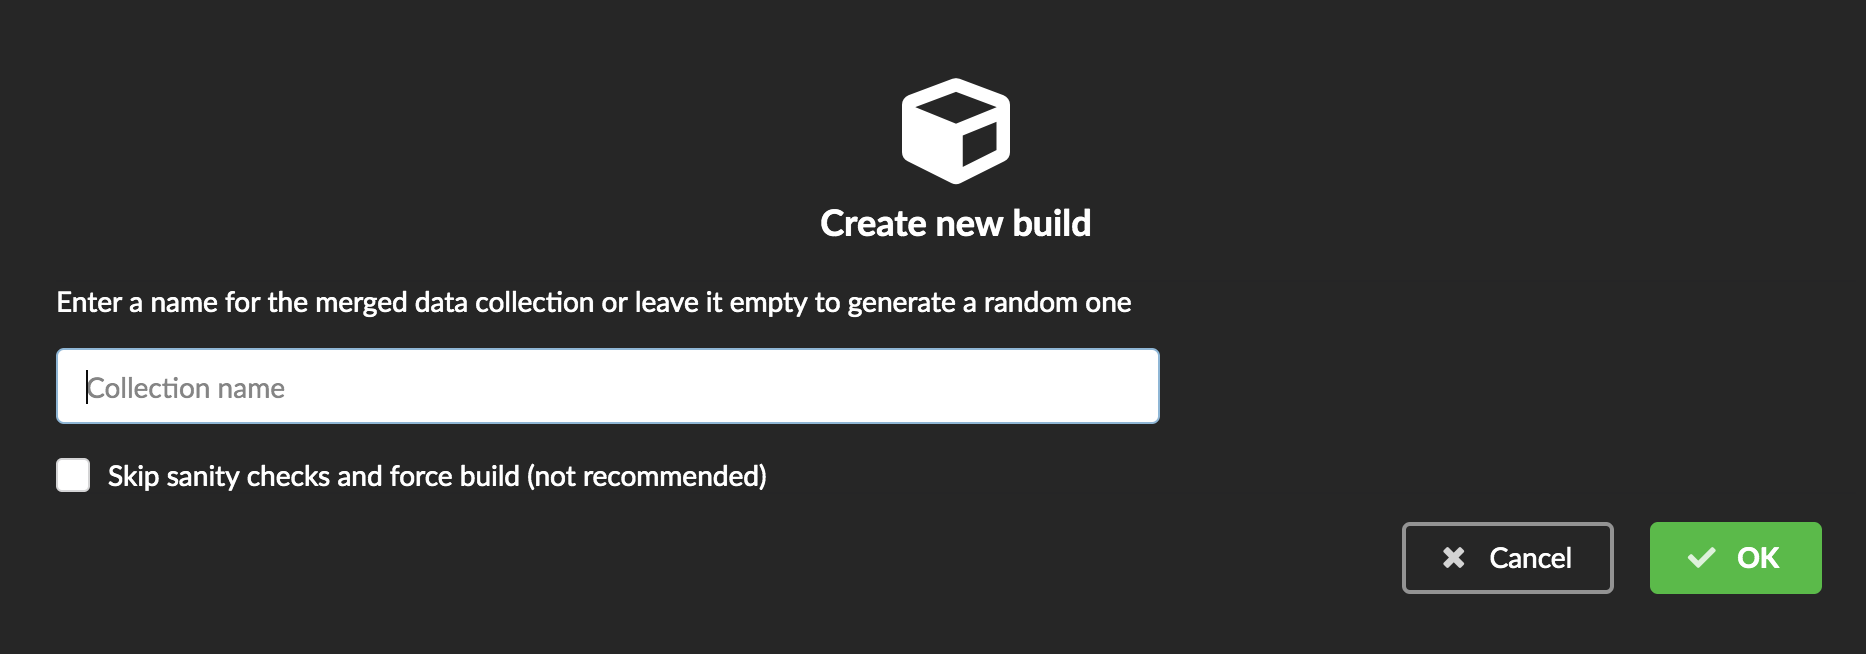
You can give a specific name for that build, or let the Hub generate one for you. Click “OK”, after a few seconds, you should see the new build displayed on the page.
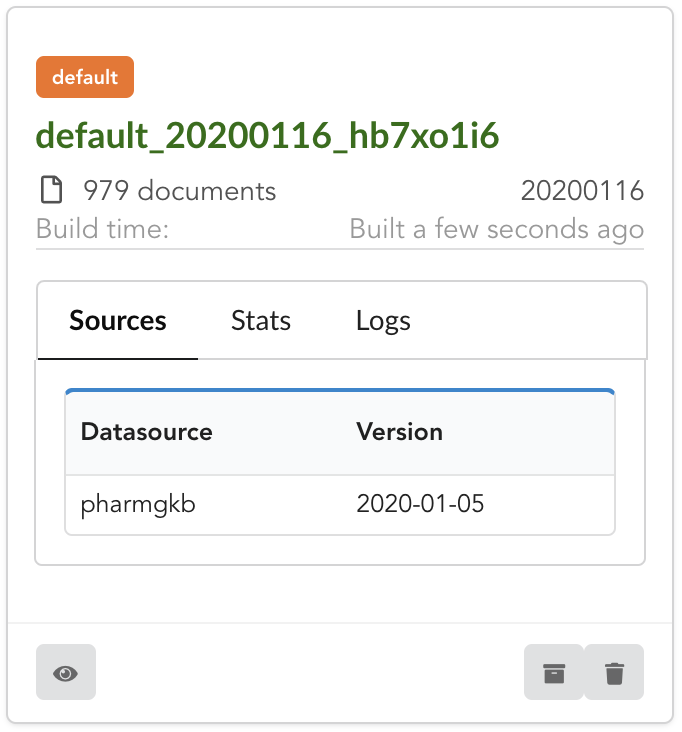
Open it by clicking on its name. You can explore the tabs for more information about it (sources involved, build times, etc…). The “Release” tab is the one we’re going to use next.
4.6. Data release
If not there yet, open the new created build and go the “Release” tab. This is the place where we can create new data releases. Click on  .
.
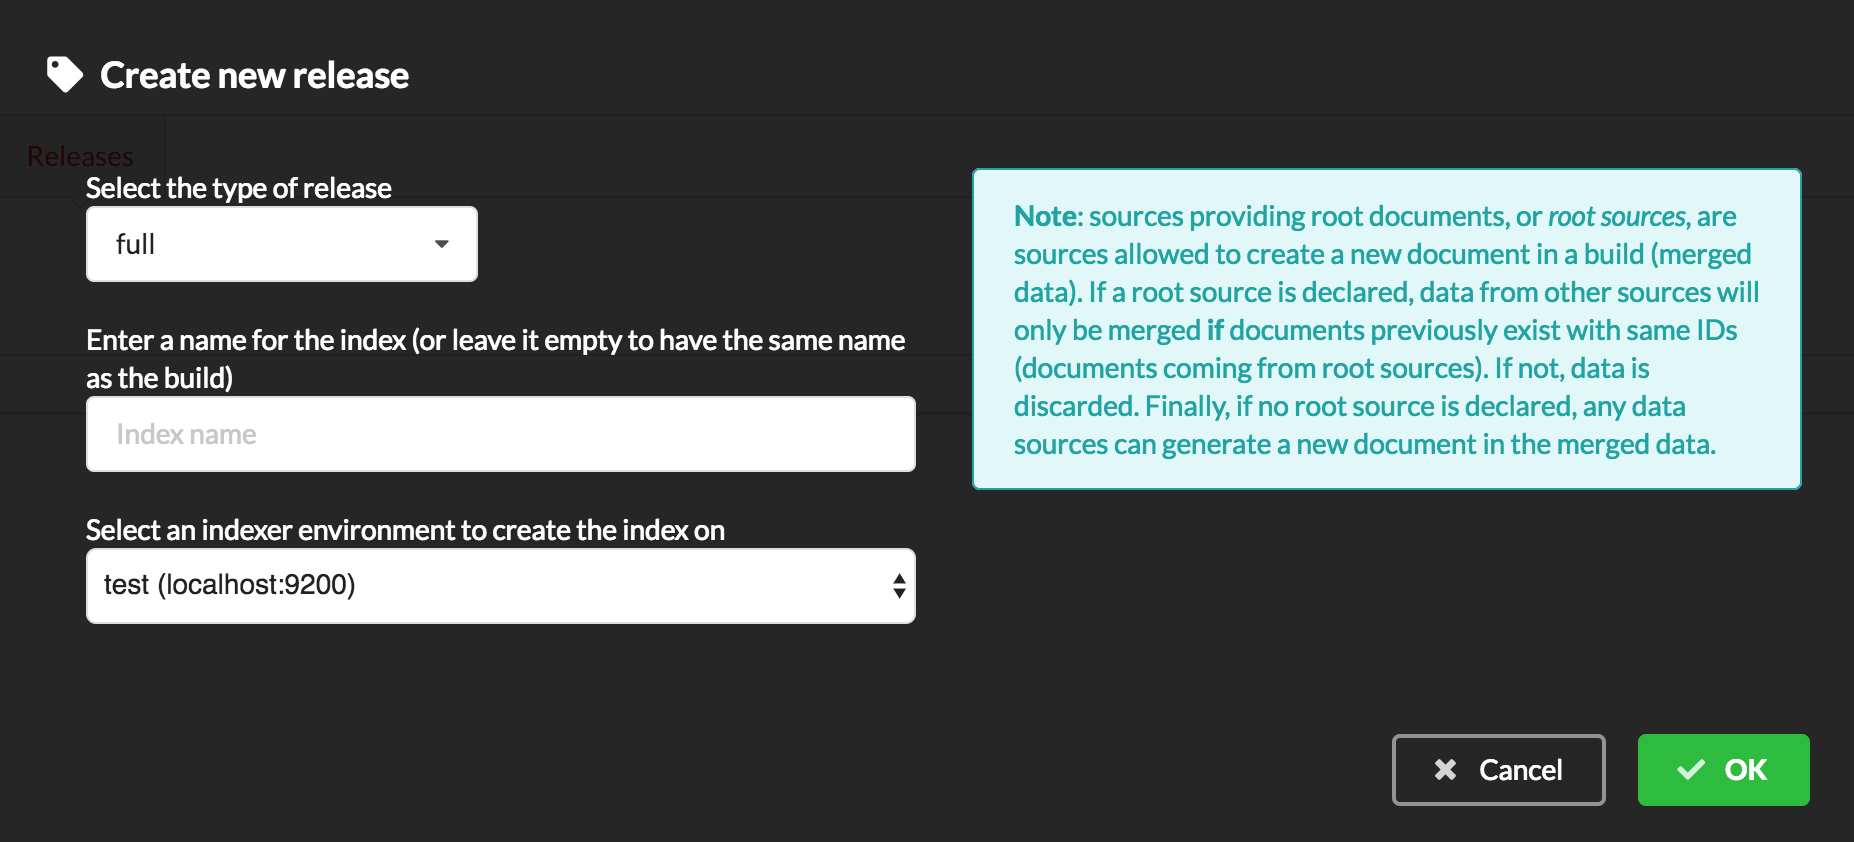
Since we only have one build available, we can’t generate an incremental release, so we’ll have to select full this time. Click “OK” to launch the process.
Note
Should there be a new build available (coming from the same configuration), and should there be data differences, we could generate an incremental release. In this case, Hub would compute a diff between previous and new builds and generate diff files (using JSON diff format). Incremental releases are usually smaller than full releases, usually take less time to deploy (applying diff data) unless diff content is too big (there’s a threshold between using an incremental and a full release, depending on the hardware and the data, because applying a diff requires you to first fetch the document from ElasticSearch, patch it, and then save it back).
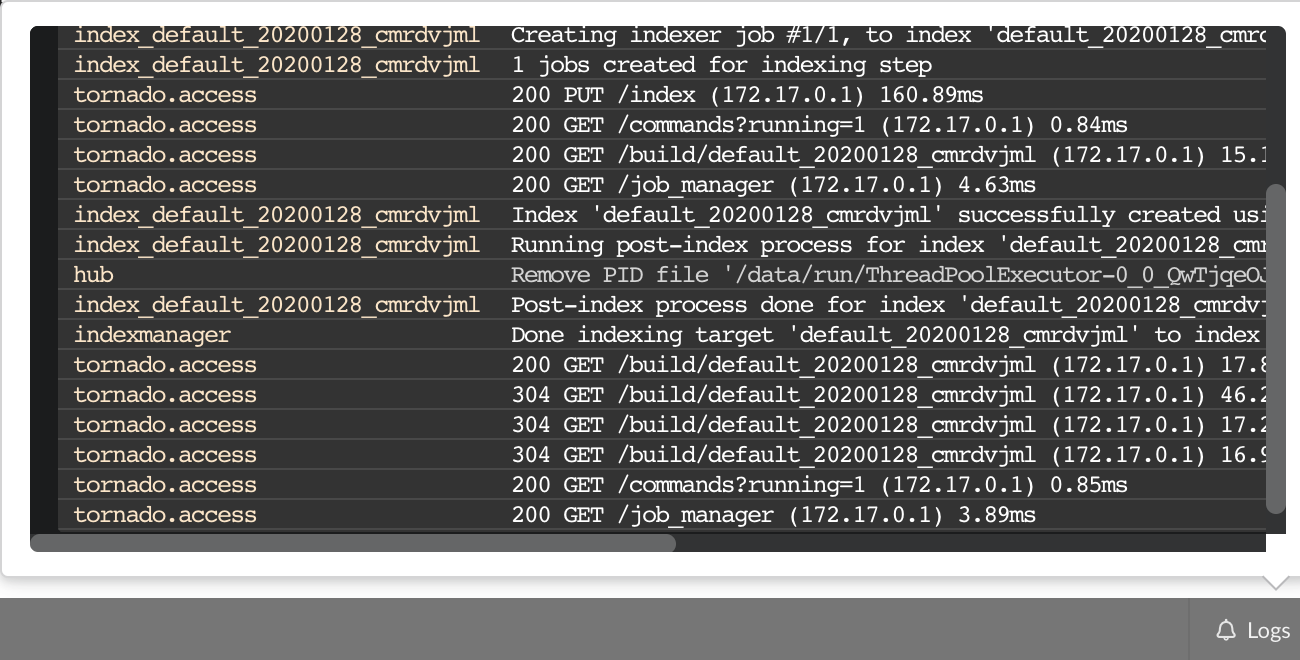
Hub will directly index the data on its locally installed ElasticSearch server (localhub environment). After few seconds, a new full release is created.
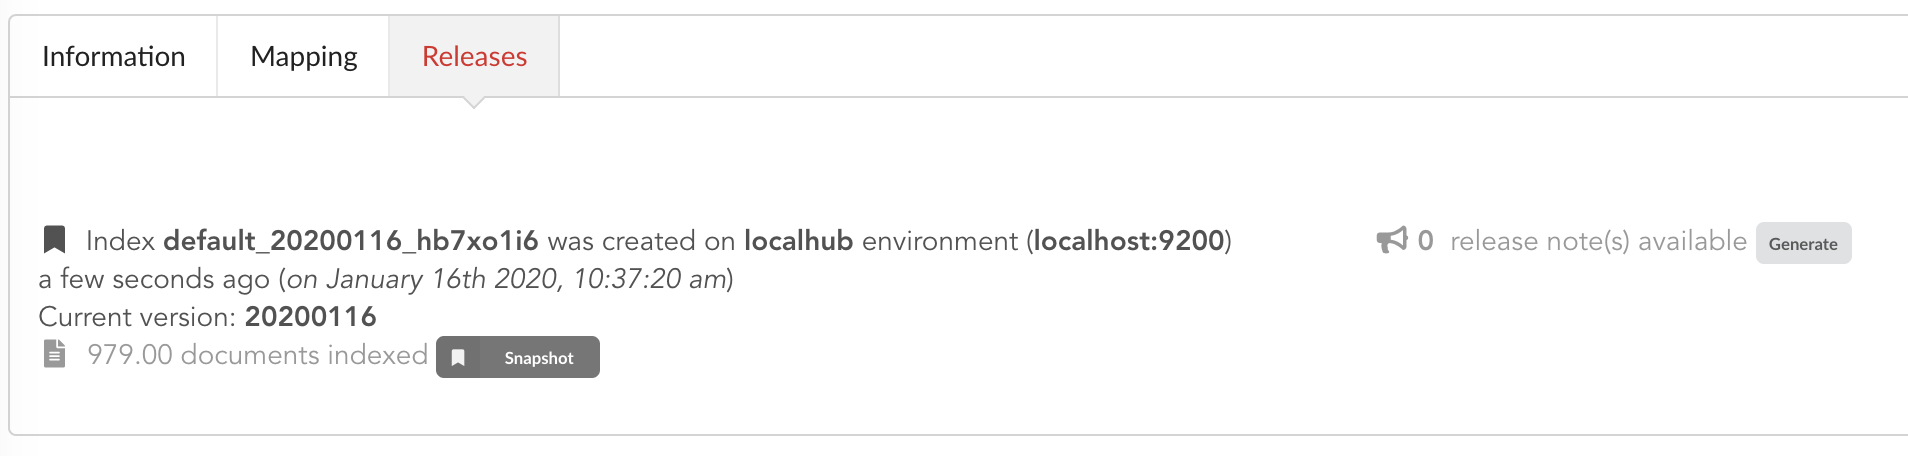
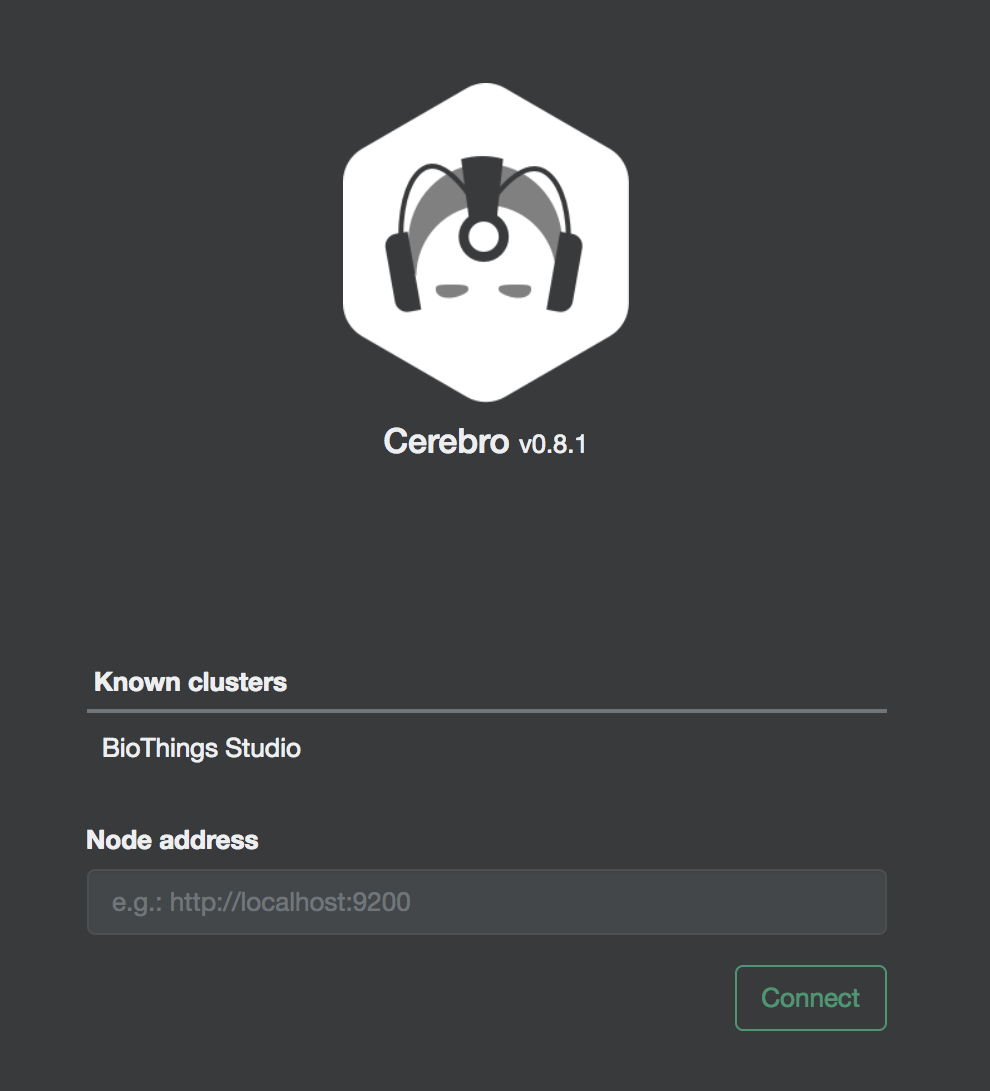
We can easily access ElasticSearch server using the application Cerebro, which comes pre-configured with the studio. Let’s access it through http://localhost:9000/#/connect (assuming ports 9200 and 9000 have properly been mapped, as mentioned earlier). Cerebro provides an easy-to-manage ElasticSearch and check/query indices.
Click on the pre-configured server named BioThings Studio.
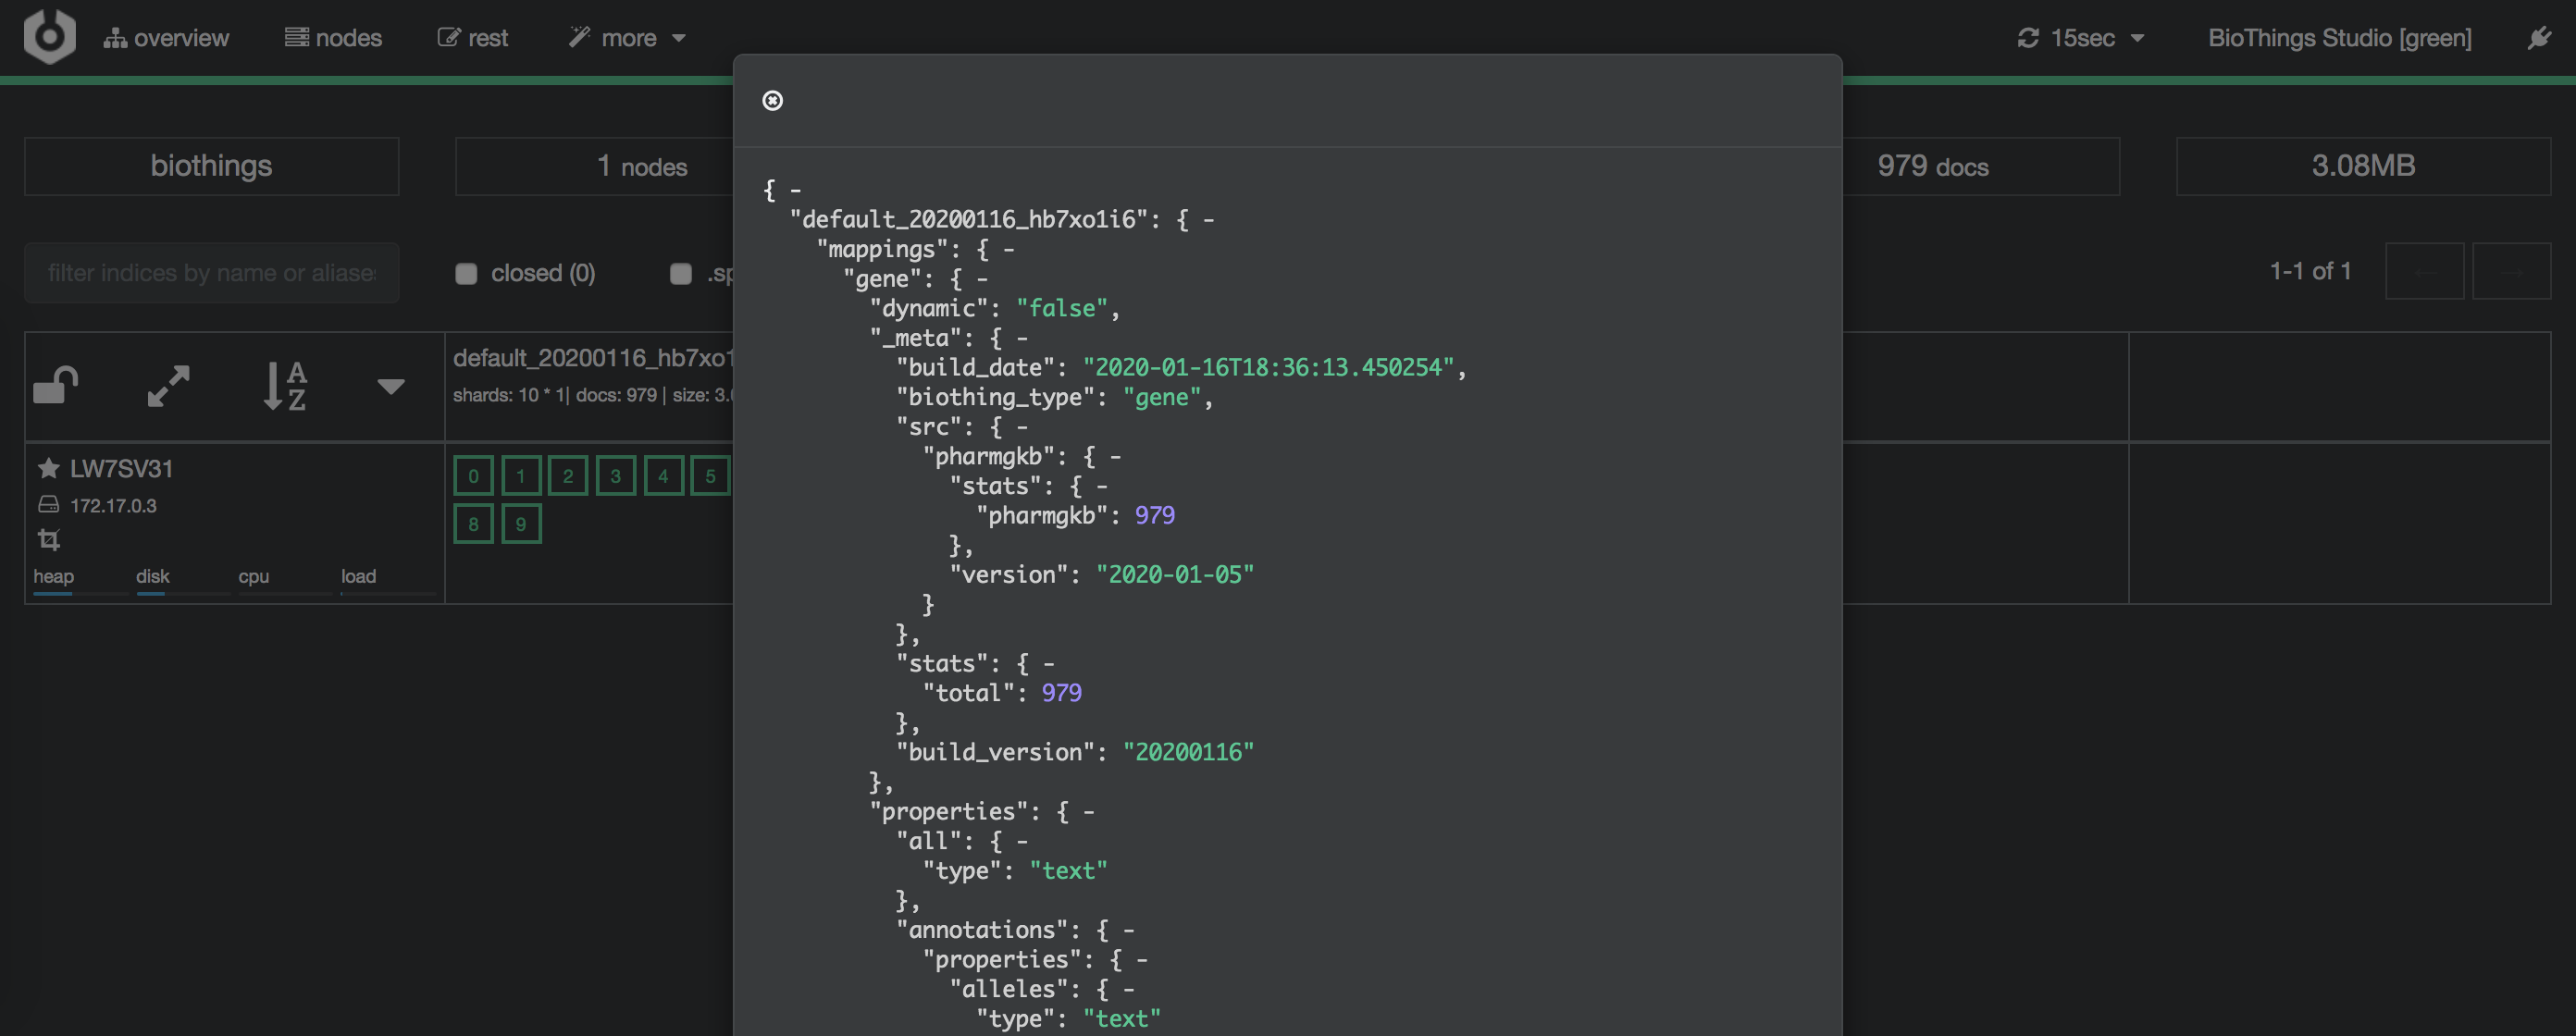
Clicking on an index gives access to different information, such as the mapping, which also contains metadata (sources involved in the build, releases, counts, etc…)
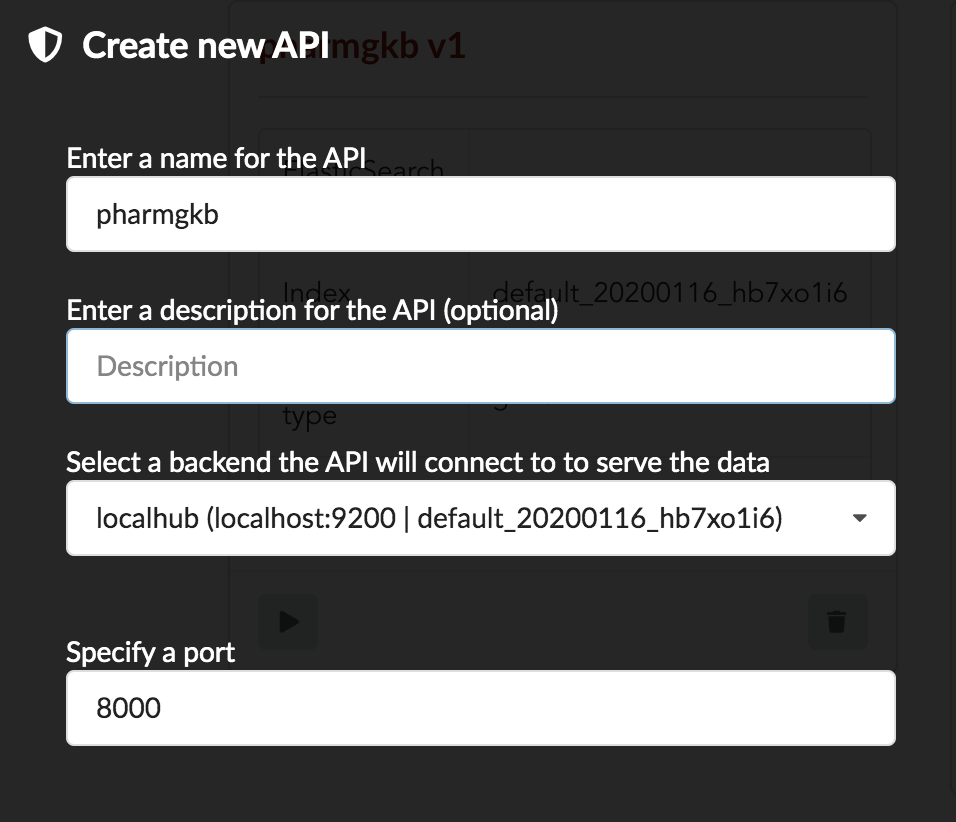
4.7. API creation
At this stage, a new index containing our data has been created on ElasticSearch, it is now time for final step. Click on  then and finally
We’ll name it pharmgkb and have it running on port 8000.
Note
Spaces are not allowed in API names
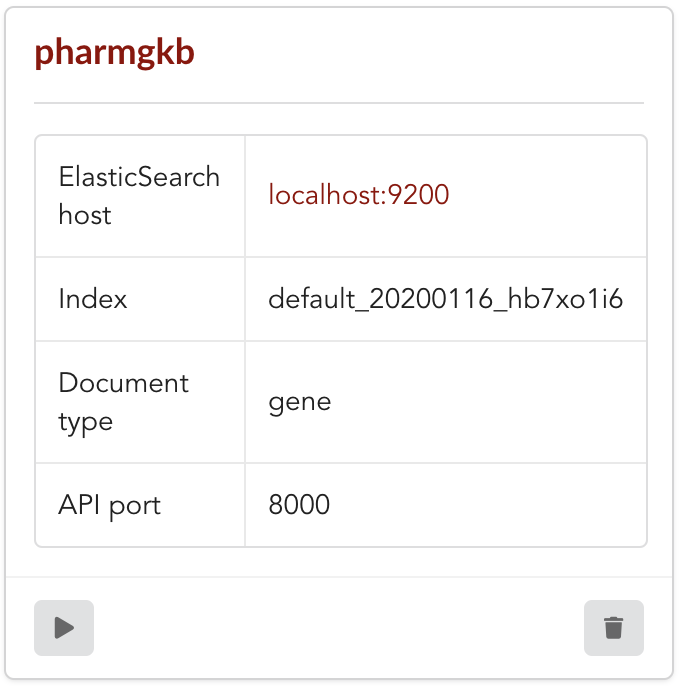
Once form is validated a new API is listed.
To turn on this API instance, just click on  , you should then see a
  label on the top right corner, meaning the API
can be accessed:
label on the top right corner, meaning the API
can be accessed:
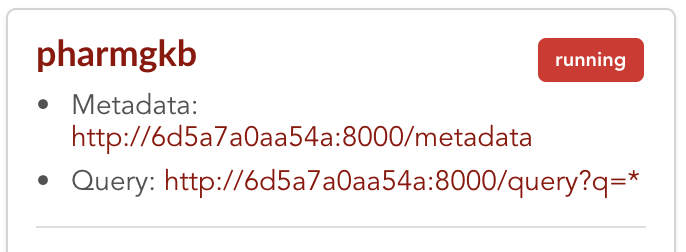
Note
When running, queries such /metadata and /query?q=* are provided as examples. They contain a hostname set by Docker though (it’s the Docker instance’s hostname), which probably
means nothing outside of Docker’s context. In order to use the API you may need to replace this hostname by the one actually used to access the
Docker instance.
4.8. Tests
Assuming API is accessible through http://localhost:8000, we can easily query it with curl for instance. The endpoint /metadata gives
information about the datasources and build date:
$ curl localhost:8000/metadata
{
  "biothing_type": "gene",
  "build_date": "2020-01-16T18:36:13.450254",
  "build_version": "20200116",
  "src": {
    "pharmgkb": {
      "stats": {
        "pharmgkb": 979
      },
      "version": "2020-01-05"
    }
  },
  "stats": {
    "total": 979
  }
}
Let’s query the data using a gene name (results truncated):
$ curl localhost:8000/query?q=ABL1
{
  "max_score": 7.544187,
  "took": 70,
  "total": 1,
  "hits": [
    {
      "_id": "PA24413",
      "_score": 7.544187,
      "annotations": [
        {
          "alleles": "T",
          "annotation_id": 1447814556,
          "chemical": "homoharringtonine (PA166114929)",
          "chromosome": "chr9",
          "gene": "ABL1 (PA24413)",
          "notes": "Patient received received omacetaxine, treatment had been stopped after two cycles because of clinical intolerance, but a major molecular response and total disappearance of the T315I clone was obtained. Treatment with dasatinib was then started and after 34-month follow-up the patient is still in major molecular response.",
          "phenotype_category": "efficacy",
          "pmid": 25950190,
          "sentence": "Allele T is associated with response to homoharringtonine in people with Leukemia, Myelogenous, Chronic, BCR-ABL Positive as compared to allele C.",
          "significance": "no",
          "studyparameters": "1447814558",
          "variant": "rs121913459"
        },
        {
          "alleles": "T",
          "annotation_id": 1447814549,
          "chemical": "nilotinib (PA165958345)",
          "chromosome": "chr9",
          "gene": "ABL1 (PA24413)",
          "phenotype_category": "efficacy",
          "pmid": 25950190,
          "sentence": "Allele T is associated with resistance to nilotinib in people with Leukemia, Myelogenous, Chronic, BCR-ABL Positive as compared to allele C.",
          "significance": "no",
          "studyparameters": "1447814555",
          "variant": "rs121913459"
        }
      ]
    }
  ]
}
Note
We don’t have to specify annotations.gene, the field in which the value “ABL1” should be searched, because we explicitely asked ElasticSearch
to search that field by default (see fieldbydefault)
Finally, we can fetch a variant by its PharmGKB ID:
$ curl "localhost:8000/gene/PA134964409"
{
  "_id": "PA134964409",
  "_version": 1,
  "annotations": [
    {
      "alleles": "AG + GG",
      "annotation_id": 1448631680,
      "chemical": "etanercept (PA449515)",
      "chromosome": "chr1",
      "gene": "GBP6 (PA134964409)",
      "phenotype_category": "efficacy",
      "pmid": 28470127,
      "sentence": "Genotypes AG + GG is associated with increased response to etanercept in people with Psoriasis as compared to genotype AA.",
      "significance": "yes",
      "studyparameters": "1448631688",
      "variant": "rs928655"
    }
  ]
}
Most of the time, the API testing is not necessary. Unless you are specifically testing out a custom api feature.
You can learn more about customizing api web components in the Biothings Web. In our use case, you can just query the Elasticsearch instance directly.
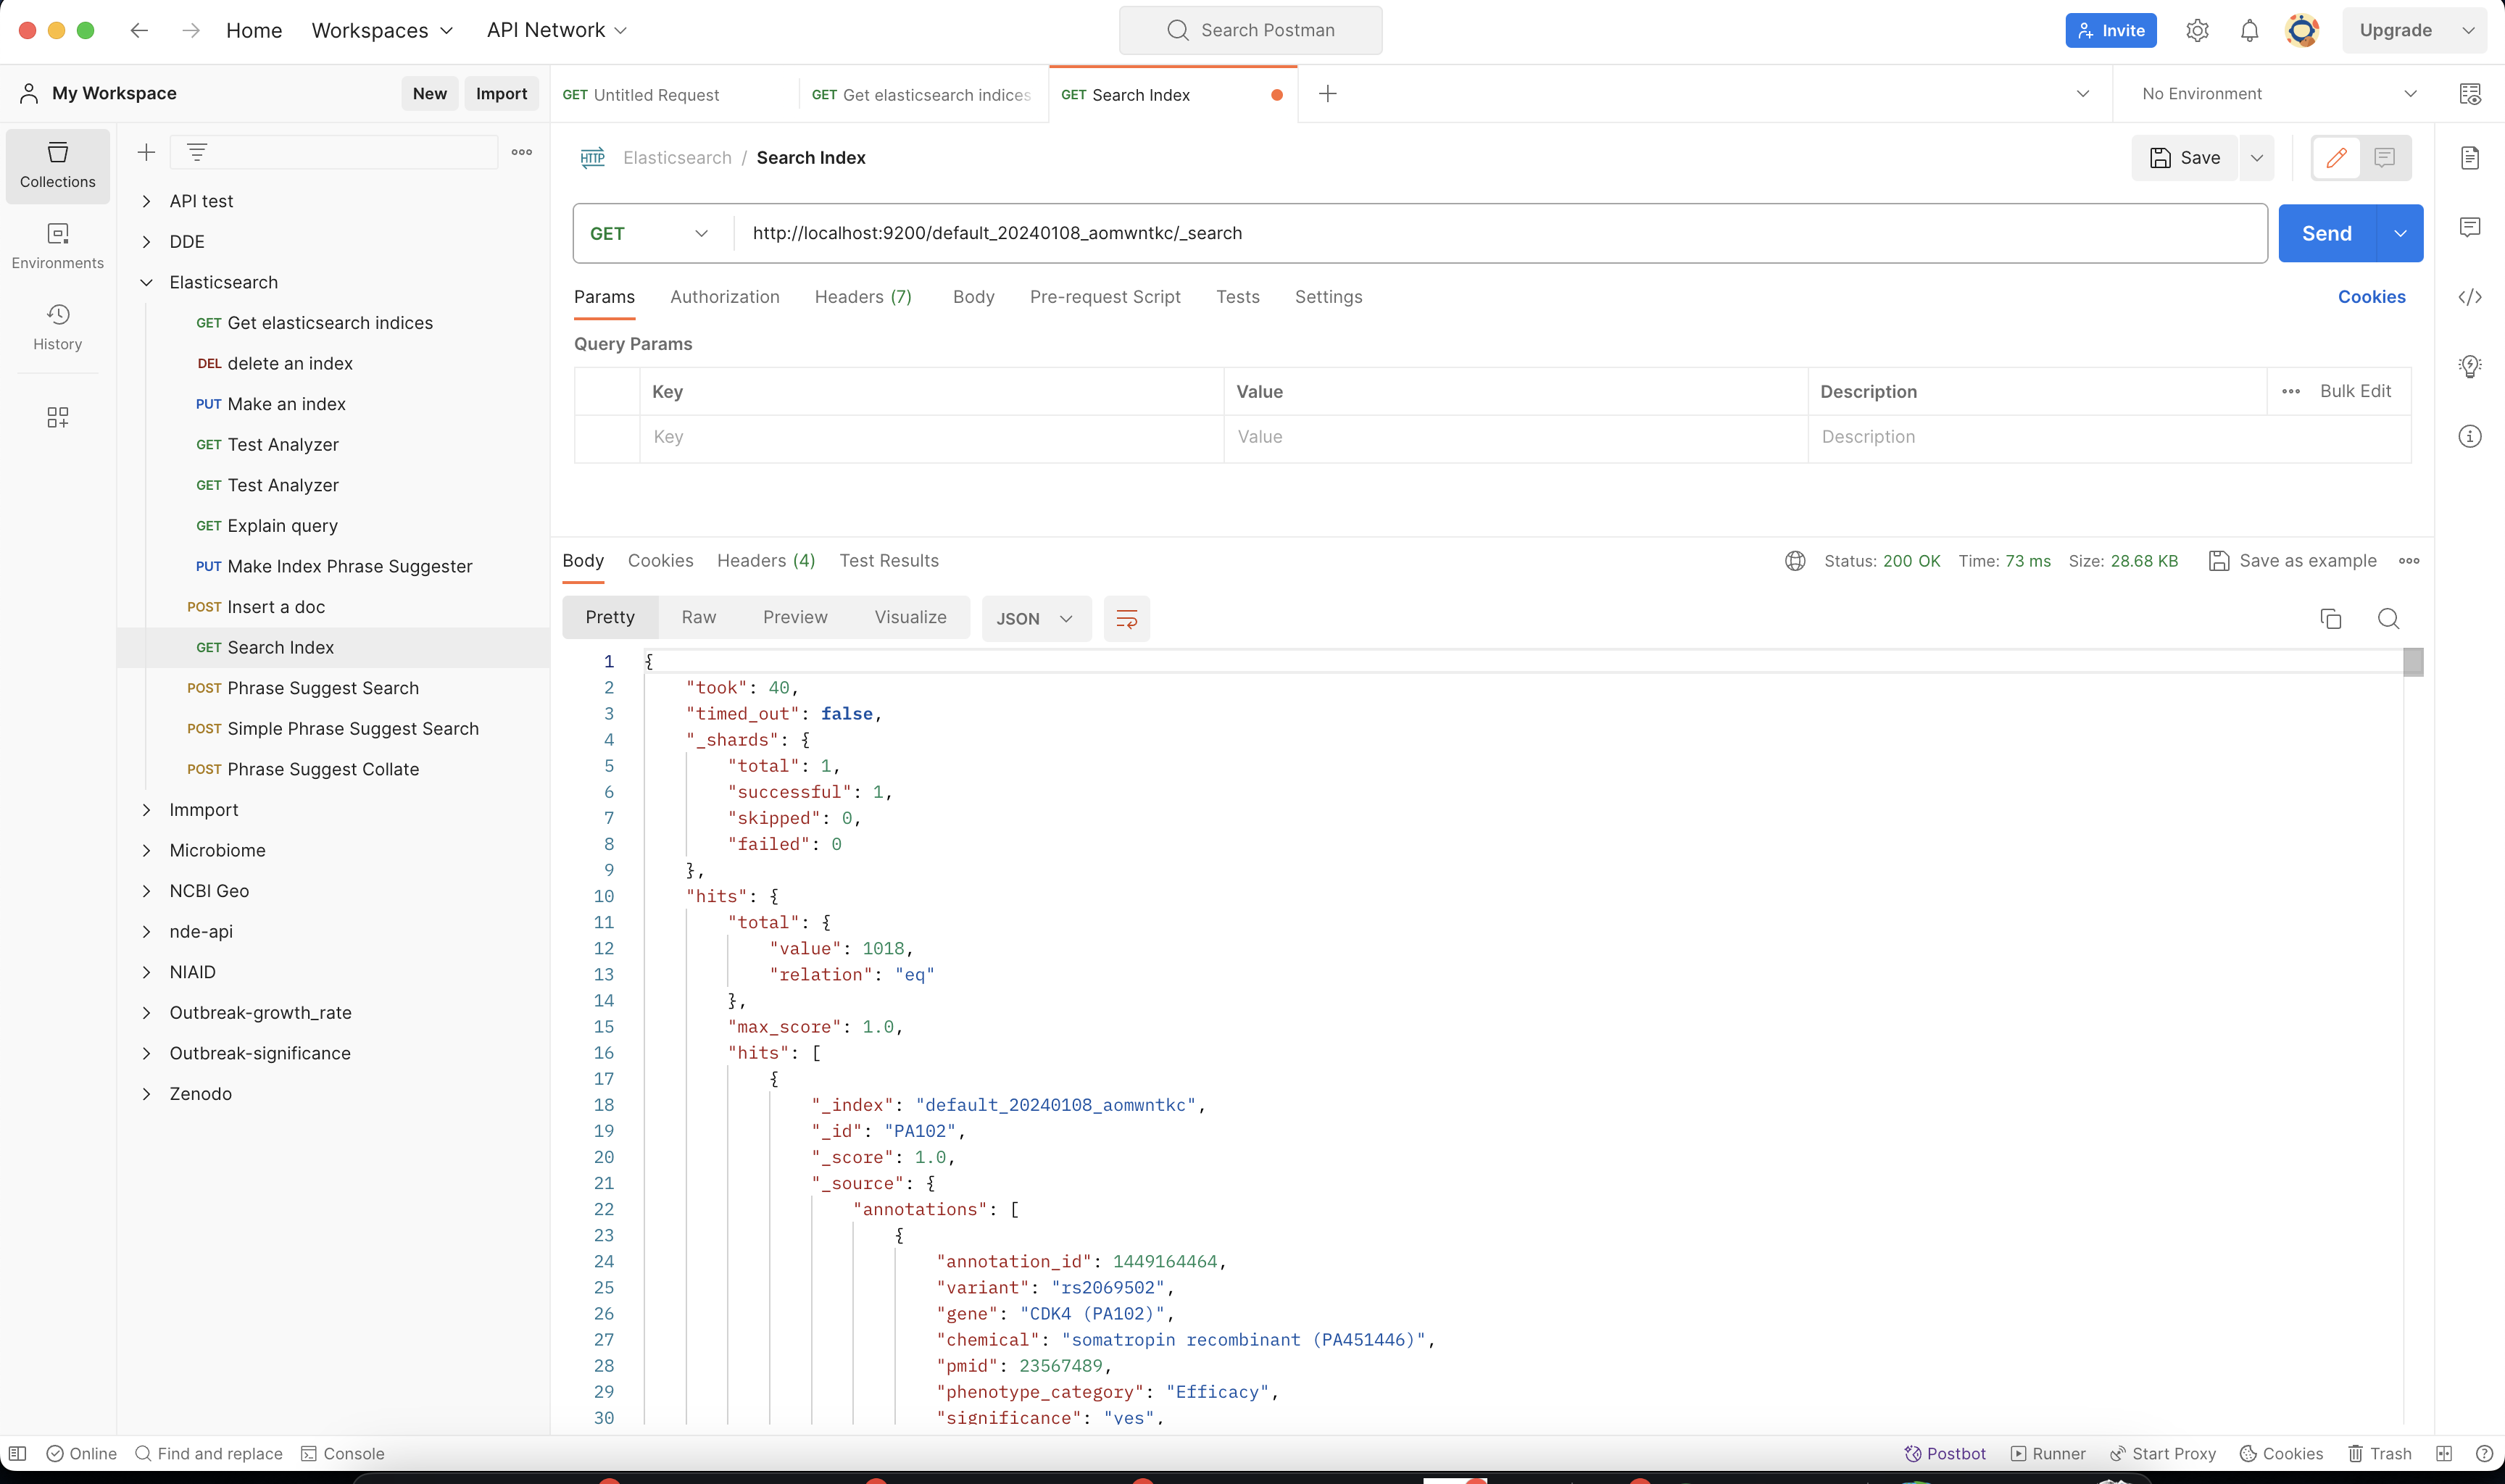
In this example, we will be using postman, to query the Elasticsearch Index.
Once you have postman installed you can make this query http://localhost:9200/MY_BUILD_NAME/_search. Check a few of the hits to make sure if your parser has correctly formatted the data.
You can also make more detailed search queries in the elasticsearch index if needed.
4.9. Conclusions
We’ve been able to easily convert a remote flat file to a fully operational BioThings API:
by defining a data plugin, we told the BioThings Hub where the remote data was and what the parser function was
BioThings Hub then generated a dumper to download data locally on the server
It also generated an uploader to run the parser and store resulting JSON documents
We defined a build configuration to include the newly integrated datasource and then trigger a new build
Data was indexed internally on local ElasticSearch by creating a full release
Then we created a BioThings API instance pointing to that new index
The next step is to enrich that existing API with more datasources.
4.10. Multiple sources data plugin
In the previous part, we generated an API from a single flat file. This API serves data about gene annotations, but we need more: as mentioned earlier in Input data, we also downloaded drug labels and publications information. Integrating those unused files, we’ll be able to enrich our API even more, that’s the goal of this part.
In our case, we have one dumper responsible for downloading three different files, and we now need three different uploaders in order to process these files. With above data plugin (4.3), only one file is parsed. In order to proceed
further, we need to specify multiple uploaders on the manifest.json file, the full example can be found in branch pharmgkb_v5 available at https://github.com/biothings/tutorials/tree/pharmgkb_v5.
Note
You can learn more about data plugin in the section B.4. Data plugin architecture and specifications
5. Regular data source
5.1. Data plugin limitations
The data plugin architecture provided by BioThings Studio allows to quickly integrate a new datasource, describing where the data is located, and how the data should be parsed. It provides a simple and generic way to do so, but also comes with some limitations. Indeed, in many advanced use cases, you need to use a custom data builder instead of LinkDataBuilder (that you used at the point 4.5). But you can not define a custom builder on the data plugin.
Luckily, BioThings Studio provides an easy to export python code that has been generated during data plugin registration. Indeed, code is generated from the manifest file, compiled and injected into Hub’s memory. Exporting the code consists in writing down that dynamically generated code. After successful export,we have a new folder stays in hub/dataload/sources and contains exported python files - that is a Regular data source (or a regular dumper/uploader based data sources) Following below steps, you will learn about how to deal with a regular data source.
5.2. Code export
Note
You MUST to update above pharmgkb data plugin to the version pharmgkb_v2.
Let’s go back to our datasource, Plugin tab. Clicking on  brings the following form:
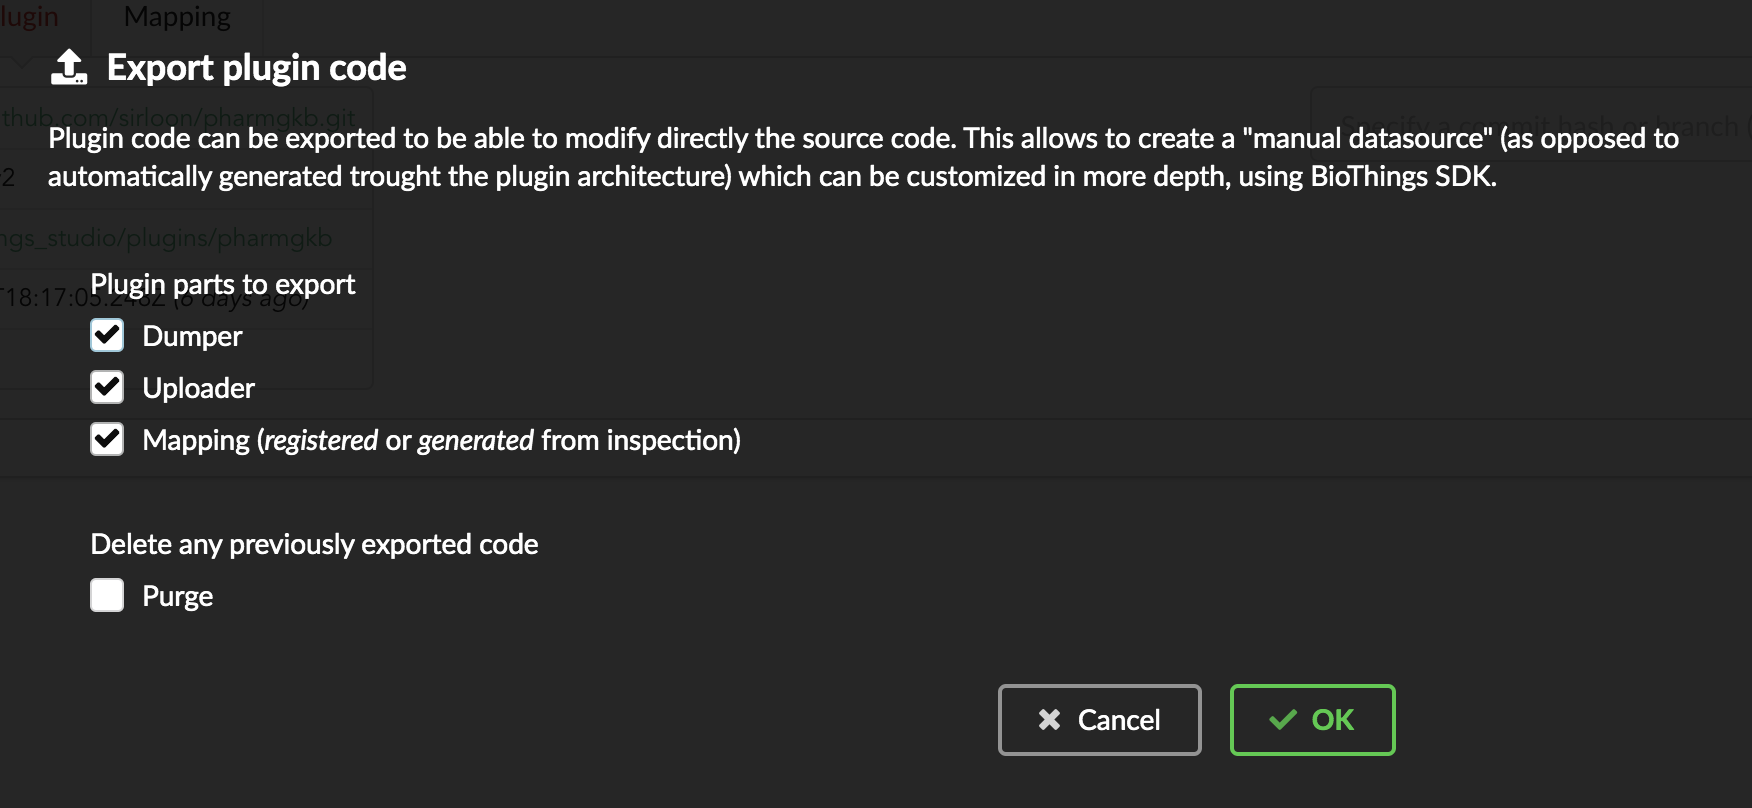
We have different options regarding the parts we can export:
Dumper: exports code responsible for downloading the data, according to URLs defined in the manifest.Uploader: exports code responsible for data integration, using our parser code.Mapping: any mapping generated from inspection, and registered (commit) can also be exported. It’ll be part of the uploader.
We’ll export all these parts, let’s validate the form. Export results are displayed (though quickly as Hub will detect changes in the code and will want to restart)

We can see the relative paths where code was exported. A message about ACTIVE_DATASOURCES is also displayed explaining how to activate our newly exported datasource. That said,
BioThings Studio by default monitors speficic locations for code changes, including where code is exported, so we don’t need to manually activate it. That’s also the reason why
Hub has been restarted.
Once reconnected, if we go back on , we’ll see an error!
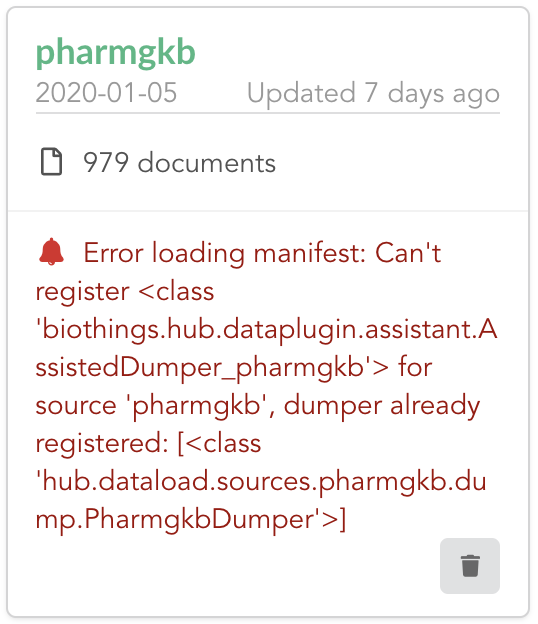
Our original data plugin can’t registered (ie. activated) because another datasource with the same name is already registered. That’s our new exported datasource! When the Hub starts,
it first loads datasources which have been manually coded (or exported), and then data plugins. Both our plugin and exported code is active, but the Hub can’t know which one to use.
Let’s delete the plugin, by clicking on  , and confirm the deletion.
Hub will restart again (reload page if not) and this time, our datasource is active. If we click on tutorials, we’ll see the same details as before except the Plugin tab which
disappeared. So far, our exported code runs, and we’re in the exact same state as before, the Hub even kept our previously dumped/uploaded data.
Let’s explore the source code that has been generated through out this process. Let’s enter our docker container, and become user biothings (from which everything runs):
$ docker exec -ti biothings /bin/bash
$ sudo su - biothings
Paths provided as export results (hub/dataload/sources/*) are relative to the started folder named biothings_studio. Let’s move there:
$ cd ~/biothings_studio/hub/dataload/sources/
$ ls -la
total 0
-rw-rw-r-- 1 biothings biothings   0 Jan 15 23:41 __init__.py
drwxrwxr-x 2 biothings biothings  45 Jan 15 23:41 __pycache__
drwxr-xr-x 1 biothings biothings  75 Jan 15 23:41 ..
drwxr-xr-x 1 biothings biothings  76 Jan 22 19:32 .
drwxrwxr-x 3 biothings biothings 154 Jan 22 19:32 tutorials
A tutorials folder can be found and contains the exported code:
$ cd tutorials
$ ls
total 32
drwxrwxr-x 3 biothings biothings   154 Jan 22 19:32 .
drwxr-xr-x 1 biothings biothings    76 Jan 22 19:32 ..
-rw-rw-r-- 1 biothings biothings 11357 Jan 22 19:32 LICENSE
-rw-rw-r-- 1 biothings biothings   225 Jan 22 19:32 README
-rw-rw-r-- 1 biothings biothings    70 Jan 22 19:32 __init__.py
drwxrwxr-x 2 biothings biothings   142 Jan 22 19:45 __pycache__
-rw-rw-r-- 1 biothings biothings   868 Jan 22 19:32 dump.py
-rw-rw-r-- 1 biothings biothings  1190 Jan 22 19:32 parser.py
-rw-rw-r-- 1 biothings biothings  2334 Jan 22 19:32 upload.py
Some files were copied from data plugin repository (LICENSE, README and parser.py), the others are the exported ones: dump.py for the dumper, upload.py
for the uploader and the mappings, and __init__.py so the Hub can find these components upon start. We’ll go in further details later, specially when we’ll add more
uploaders.
For conveniency, the exported code can be found in branch pharmgkb_v3 available at https://github.com/biothings/tutorials/tree/pharmgkb_v3. One easy way to follow
this tutorial without having to type too much is to replace folder tutorials with a clone from Git repository. The checked out code is exactly the same as code after export.
$ cd ~/biothings_studio/hub/dataload/sources/
$ rm -fr tutorials
$ git clone https://github.com/biothings/tutorials.git
$ cd tutorials
$ git checkout pharmgkb_v3
5.3. More uploaders
Now that we have exported the code, we can start the modifications. The final code can be found on branch https://github.com/biothings/tutorials/tree/pharmgkb_v4.
Note
We can directly point to that branch using git checkout pharmgkb_v4 within the datasource folder previously explored.
First we’ll write two more parsers, one for each addition files. Within parser.py:
at the beginning,
load_annotationsis the first parser we wrote, no changes requiredload_druglabelsfunction is responsible for parsing file nameddrugLabels.byGene.tsvload_occurrencesfunction is parsing fileoccurrences.tsv
Writing parsers is not the main purpose of this tutorial, which focuses more on how to use BioThings Studio, so we won’t go into further details.
Next is about defining new uploaders. In upload.py, we currently have one uploader definition, which looks like this:
class PharmgkbUploader(biothings.hub.dataload.uploader.BaseSourceUploader):

    name = "pharmgkb"
    __metadata__ = {"src_meta": {}}
    idconverter = None
...
The important pieces of information here is name, which gives the name of the uploader we define. Currently uploader is named pharmgkb.
That’s how this name is displayed in the “Upload” tab of the datasource. We know we need three uploaders in the end so we need to adjust names. In order to do so, we’ll define
a main source, pharmgkb, then three different other “sub” sources: annotations, druglabels and occurrences. For clarity, we’ll put these uploaders in three different files.
As a result, we now have:
file
upload_annotations.py, originally coming from the code export. Class definition is:
class AnnotationsUploader(biothings.hub.dataload.uploader.BaseSourceUploader):

  main_source = "pharmgkb"
  name = "annotations"
Note
We renamed the class itself, pharmgkb is now set as field main_source. This name matches the dumper name as well, which is how the Hub knows how dumpers and uploaders relates
to each others. Finally, the sub-source named annotation is set as field name.
doing the same for
upload_druglabels.py:
from .parser import load_druglabels

class DrugLabelsUploader(biothings.hub.dataload.uploader.BaseSourceUploader):

  main_source = "pharmgkb"
  name = "druglabels"

  def load_data(self, data_folder):
      self.logger.info("Load data from directory: '%s'" % data_folder)
      return load_druglabels(data_folder)

  @classmethod
  def get_mapping(klass):
      return {}
Note
In addition to adjusting the names, we need to import our dedicated parser, load_druglabels. Following what the Hub did during code export, we “connect” that parser to this
uploader in method load_data. Finally, each uploader needs to implement class method get_mapping, currently an empty dictionary, that is, no mapping at all. We’ll fix this soon.
finally,
upload_occurences.pywill deal with occurences uploader. Code is similar as previous one.
from .parser import load_occurrences

class OccurrencesUploader(biothings.hub.dataload.uploader.BaseSourceUploader):

    main_source = "pharmgkb"
    name = "occurrences"

    def load_data(self, data_folder):
        self.logger.info("Load data from directory: '%s'" % data_folder)
        return load_occurrences(data_folder)

    @classmethod
    def get_mapping(klass):
        return {}
The last step to activate those components is to expose them through the __init__.py:
from .dump import PharmgkbDumper
from .upload_annotations import AnnotationsUploader
from .upload_druglabels import DrugLabelsUploader
from .upload_occurrences import OccurrencesUploader
Upon restart, the “Upload” tab now looks like this:
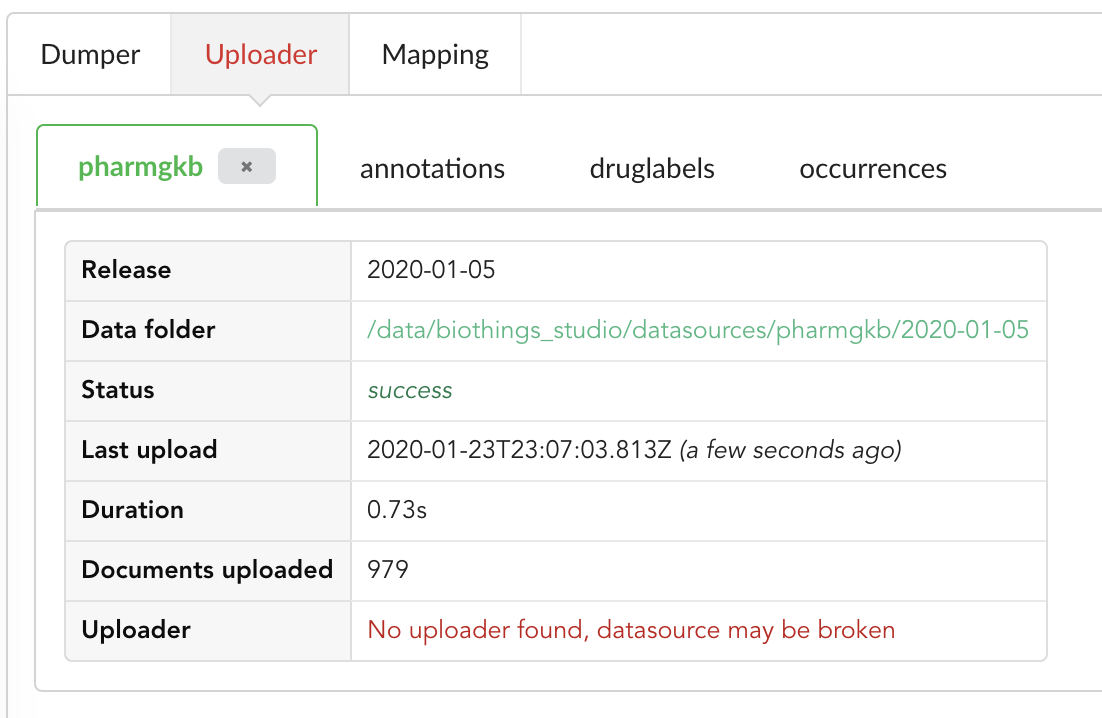
We still have an uploader named pharmgkb, but that component has been deleted! Hub indeed kept information within its internal database, but also detected that
the actual uploader class doesn’t exists anymore (see message No uploader found, datasource may be broken). In that specific case, an option to delete that internal information
is provided, let’s clock on the closing button on that tab to remove that information.
If we look at the other uploader tabs, we don’t see much information, that’s because they haven’t been launched yet. For each on them, let’s click on “Upload” button.
Note
Another way to trigger all uploaders at once is to click on to list all datasources, then click on for that datasource in particular.
After a while, all uploaders have run, data is populated, as shown in the different tabs.
5.4. More data inspection
Data is ready, it’s now time to inspect the data for the new uploaders. Indeed, if we check the “Mapping” tab, we still have the old mapping from the original pharmgkb uploader
(we can remove that “dead” mapping by clicking on the closing button of the tab), but nothing for uploaders druglabels and occurences.
Looking back at the uploaders’ code, get_mapping class method was defined such as it returns an empty mapping. That’s the reason why we don’t have anything shown here,
let’s fix that by click on . After few seconds, mappings are generated, we can review them, and click on to validate and register those mappings, for
each tab.
5.5. Modifying build configuration
All data is now ready, as well as mappings, it’s time to move forward and build the merged data. We now have three differents source for documents, and we need to merge them
together. Hub¨ will do so according to field _id: if two documents from different sources share the same _id, they are merged together (think about dictionary merge).
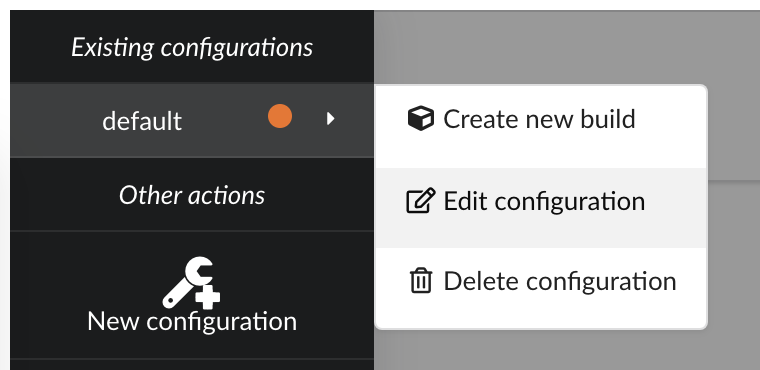
In order to proceed further, we need to update our build configuration, as there’s currently
only datasource involved in the merge. Clicking on , then we can edit existing configuration.
There several parameters we need to adjust:
first, since original
pharmgkbuploader doesn’t anymore, that datasource isn’t listed anymorein the other hand, we now have our three new datasources, and we need to select all of them
our main data is coming from
annotations, and we want to enrich this data with druglabels and litterature occurrences. But only if data first exists inannotations. Behing this requirement is the notion of root documents. When selectionannotationsas a source for root documents, we tell the Hub to first merge that data, then merge the other sources only if a document fromannotationswith the same _id exists. If not, documents are silently ignored.finally, we were previously using a
LinkDataBuilderbecause we only had one datasource (data wasn’t copied, but refered, or linked to the original datasource collection). We now have three datasources involved in the merge so we can’t use that builder anymore and need to switch to the defaultDataBuilderone. If not, Hub will complain and deactivate the build configuration until it’s fixed. Since we already had a previous build, we want to specify an incremental builddiff.
The next configuration is summarized in the following picture:
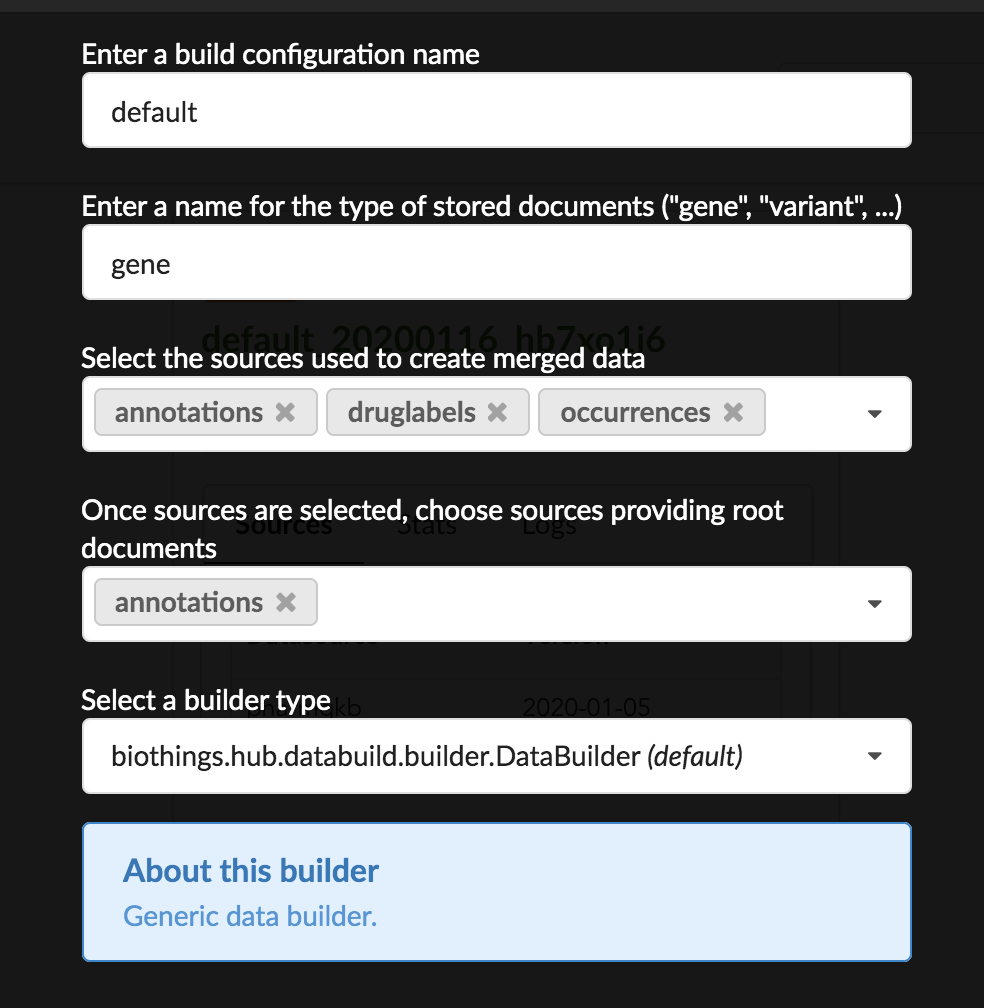
Upon validation, build configuration is ready to be used.
5.6. Incremental release
Configuration reflects our changes and is up-to-date, let’s create a new build. Click on if not already open, then “Create a new build”
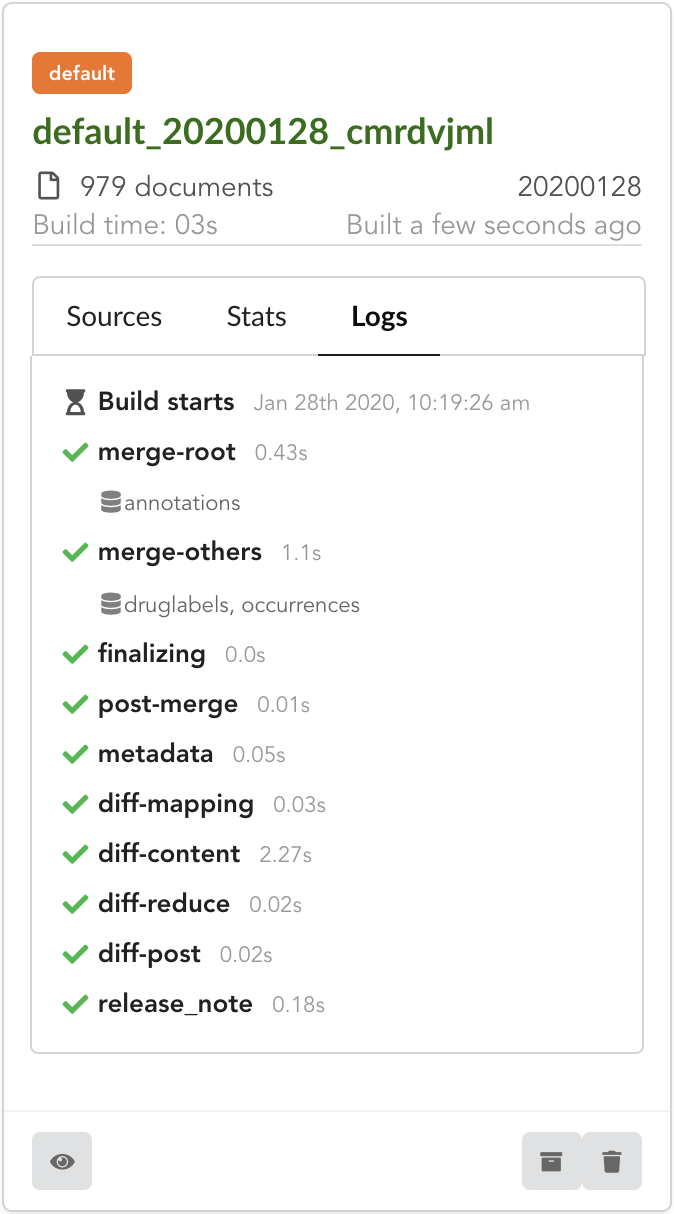
After few seconds, we have a new build listed. Clicking on “Logs” will show how the Hub created it. We can see it first merged annotations
in the “merge-root” step (for root documents), then druglabels and occurrences sources. The remaining steps, (diff, release note) were
automatically triggered by the Hub. Let’s explore these further.
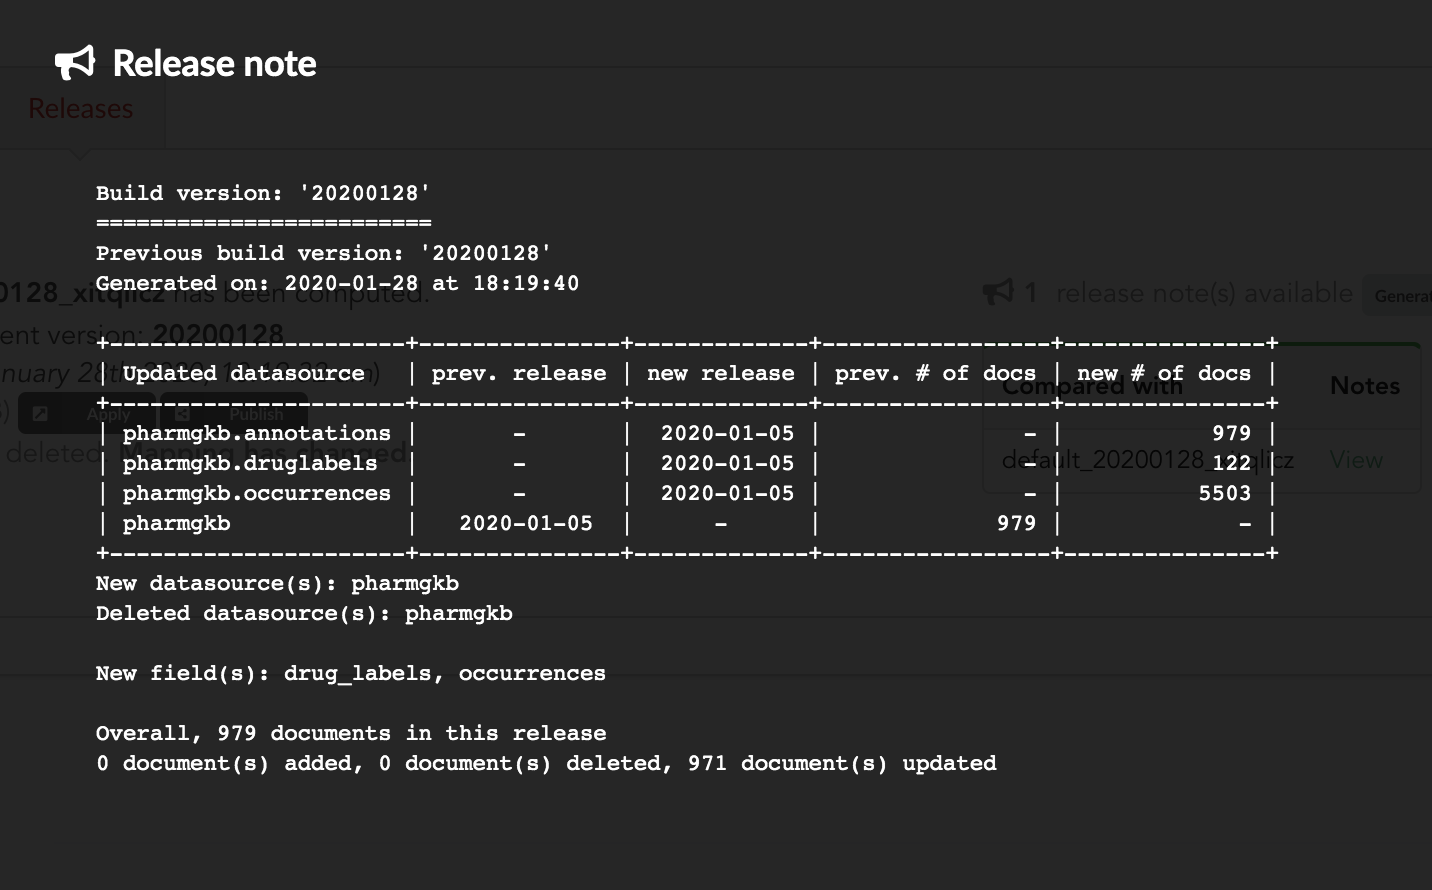
If we open the build and click on “Releases” tab, we have a diff release, or incremental release, as mentioned in the “Logs”. Because a previous release existed for that build configuration (the one we did in part one), the Hub tries to compute an release comparing the two together, identifying new, deleted and updated documents. The result is a diff release, based on json diff format.
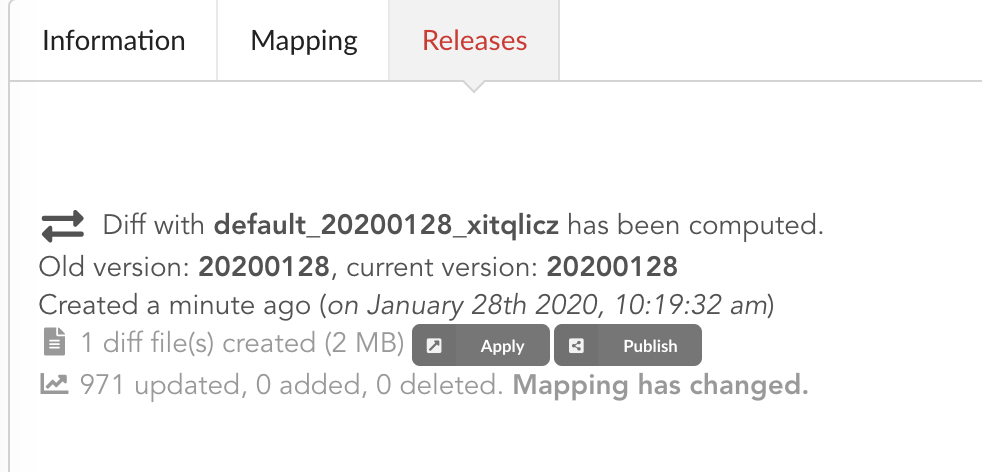
In our case, one diff file has been generated, its size is 2 MiB, and contains information to update 971 documents. This is expected since we enriched our existing data. Hub also mention the mapping has been changed, and these will be reported to the index as we “apply” that diff release.
Note
Because we added new datasources, without modifying existing mapping in the first annotations source, the differences between previous and new mappings correspond to
“add” json-diff operations. This means we strictly only add more information to the existing mapping. If we’d removed, and modify existing mapping fields, the Hub would
have reported an error and aborted the generation of that diff release, to prevent an error during the update of the ElasticSearch index, or to avoid data inconsistency.
The other document that has been automatically generated is a release note.
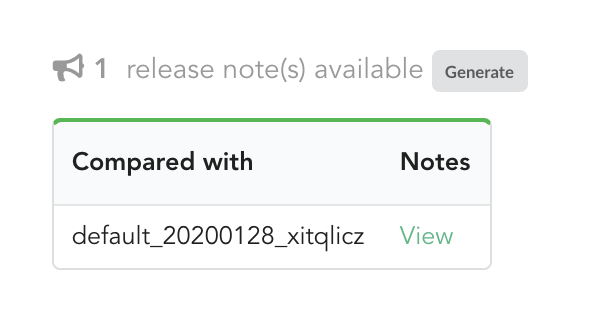
If we click on “View”, we can see the results: the Hub compared previous data versions and counts, deleted and added datasources and field, etc… In other words, a “change log” summarizing what happened betwen previous and new releases. These release notes are informative, but also can be published when deploying data releases (see part 3).
Let’s apply that diff release, by clicking on 
We can select which index to update, from a dropdown list. We only have index, the one we created earlier in part 1. That said, Hub will do its best to filter out any incompatible indices, such those not coming from the same build configuration, or not having the same document type.

Once confirmed, the synchronization process begins, diff files are applied to the index, just as if we were “patching” data. We can track the command execution from the command list, and also from the notification popups when it’s done.
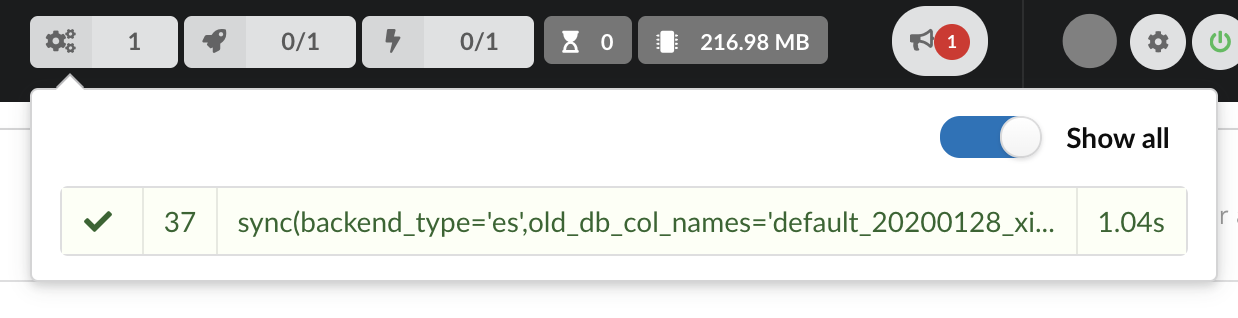

Our index, currently served by our API defined in the part 1, has been updated, using a diff, or incremental, release. It’s time to have a look at the data.
5.7. Testing final API
Because we directly apply a diff, or patch our data, on ElasticSearch index, we don’t need to re-create an API. Querying the API should just transparently reflect that “live” update.
Time to try our new enriched API. We’ll use curl again, here few query examples:
$ curl localhost:8000/metadata
{
"biothing_type": "gene",
"build_date": "2020-01-24T00:14:28.112289",
"build_version": "20200124",
"src": {
  "pharmgkb": {
    "stats": {
      "annotations": 979,
      "druglabels": 122,
      "occurrences": 5503
    },
    "version": "2020-01-05"
  }
},
"stats": {
  "total": 979
}
Metadata has changed, as expected. If we compare this result with previous one, we now have three different sources: annotations, druglabels and occurrences,
reflecting our new uploaders. For each of them, we have the total number of documents involved during the merge. Interestingly, the total number of documents is in our case 979 but,
for instance, occurrences shows 5503 documents. Remember, we set annotations as a root documents source, meaning documents from others are merged only if they matched (based on _id field)
an existing documents in this root document source. In other words, with this specific build configuration, we can’t have more documents in the final API than the number of documents in
root document sources.
Let’s query by symbol name, just as before:
$ curl localhost:8000/query?q=ABL1
{
"max_score": 7.544187,
"took": 2,
"total": 1,
"hits": [
  {
    "_id": "PA24413",
    "_score": 7.544187,
    "annotations": [
      {
        "alleles": "T",
        "annotation_id": 1447814556,
        "chemical": "homoharringtonine (PA166114929)",
        "chromosome": "chr9",
        "gene": "ABL1 (PA24413)",
        "notes": "Patient received received omacetaxine, treatment had been stopped after two cycles because of clinical intolerance, but a major molecular response and total disappearance of theT315I clone was obtained. Treatment with dasatinib was then started and after 34-month follow-up the patient is still in major molecular response.",
        "phenotype_category": "efficacy",
        "pmid": 25950190,
        "sentence": "Allele T is associated with response to homoharringtonine in people with Leukemia, Myelogenous, Chronic, BCR-ABL Positive as compared to allele C.",
        "significance": "no",
        "studyparameters": "1447814558",
        "variant": "rs121913459"
      },
      ...
          ],
      "drug_labels": [
          {
            "id": "PA166117941",
            "name": "Annotation of EMA Label for bosutinib and ABL1,BCR"
          },
          {
            "id": "PA166104914",
            "name": "Annotation of EMA Label for dasatinib and ABL1,BCR"
          },
          {
            "id": "PA166104926",
            "name": "Annotation of EMA Label for imatinib and ABL1,BCR,FIP1L1,KIT,PDGFRA,PDGFRB"
          },
          ...
          ]
      "occurrences": [
          {
            "object_id": "PA24413",
            "object_name": "ABL1",
            "object_type": "Gene",
            "source_id": "PMID:18385728",
            "source_name": "The cancer biomarker problem.",
            "source_type": "Literature"
          },
          {
            "object_id": "PA24413",
            "object_name": "ABL1",
            "object_type": "Gene",
            "source_id": "PMC443563",
            "source_name": "Two different point mutations in ABL gene ATP-binding domain conferring Primary Imatinib resistance in a Chronic Myeloid Leukemia (CML) patient: A case report.",
            "source_type": "Literature"
          },
          ...
          ]
  }
We new have much information associated (much have been remove for clarity), including keys drug_labels and occurrences coming the two new uploaders.
5.8. Conclusions
Moving from a single datasource based API, previously defined as a data plugin, we’ve been able to export this data plugin code. This code was used as a base to extend our API, specifically:
we implemented two more parsers, and their counter-part uploaders.
we updated the build configuration to add these new datasources
we created a new index (full release) and created a new API serving this new data.
So far APIs are running from within BioThings Studio, and data still isn’t exposed to the public. The next step to publish this data and make the API available for everyone.
Note
BioThings Studio is a backend service, aimed to be used internally to prepare, test and release APIs. It is not inteneded to be facing public internet, in other words, it’s not recommended to expose any ports, including API ports, to public-facing internet.
6. Data Plugins
In our last section, we learned how to create a Regular Data Source. Now that we have learned how to dynamically generate code for our plugin, we can discuss the different classes that we can use for our dumpers. Using these classes, we can have an easier time creating dumpers to fit our needs when downloading different types of data on the interweb. Here is a short summary of some of the important classes that you may typically use.
APIDumper: This will run API calls in a clean process and write its results in one or more NDJSON documents.
DockerContainerDumper: Starts a docker container (typically runs on a different server) to prepare the data file on the remote container, and then download this file to the local data source folder.
LastModifiedFTPDumper: SRC_URLS containing a list of URLs pointing to files to download, uses FTP’s MDTM command to check whether files should be downloaded.
LastModifiedHTTPDumper: Given a list of URLs, check Last-Modified header to see whether the file should be downloaded.
All of data plugin types can all be reviewed in our biothings.api on github https://github.com/biothings/biothings.api/blob/master/biothings/hub/dataload/dumper.py.
6.1. DockerContainer Plugin
Note
For this section, you will need to know how to use our Biothings CLI, as our docker compose is not built to handle this type of plugin. Please refer back to our Biothings CLI tutorial before starting this section.
The DockerContainer plugin allows us to remotely start and control a docker container from another server, using our Biothings Hub. Using another server to run the bulk process of our dumper can have many different use cases. For example, if we are using a public api to create a source, we may need to call their api multiple times for testing. This may inadvertantly cause an accidental ban. Even if we follow their rate limiting, the api may flag our IP address as a bot. By using another server, we can minimize this issue by setting a different IP address separate from the Scripps Network, so if there is a ban it only be contained to our one server instead of our whole network.
The steps to the DockerContainerDumper Plugin look like this:
It boots up a container from provided parameters: image, tag, container_name.
Runs the dump_command inside this container. This command MUST block the dumper until the data file is completely prepared. This will guarantee that the remote file is ready for downloading.
Optional: runs the get_version_cmd inside this container. Set this command out put as self.release.
Download the remote file via Docker API, extract the downloaded .tar file.
- When the downloading is complete:
if keep_container=false: Remove the above container after.
if keep_container=true: leave this container running.
If there are any errors during the data dump, the remote container and volumes won’t be removed.
There are additional parameters that can also be added. All of them will be listed here with a short summary, but we will not be using all of the parameters for this tutorial:
image: (Optional) the Docker image name
tag: (Optional) the image tag
container_name: (Required) Boots up an existing container. If the container does not exist, it will create a new container using the image and tag parameters.
volumes: (Optional) Used specifally for local bind mounts. If used without a named_volume, the volume will not automatically be removed once the data finishes dumping.
named_volumes: (Optional) Creates a named volume to be removed when the data finishes dumping.
path: (Required) path to the remote file inside the Docker container.
dump_command: (Required) This command will be run inside the Docker container in order to create the remote file.
- keep_container: (Optional) accepted values: true/false, default: false.
If keep_container=true, the remote container will be persisted.
If keep_container=false, the remote container will be removed in the end of dump step.
get_version_cmd: (Optional) The custom command for checking release version of local and remote file.
Now we will need to clone the tutorial onto your local computer and switch to pharmgkb_v7.
Now we will need to install the requirements to run our Biothings CLI. We will first create a virtual environment and then install a Biothings Hub dev environemt.
Just like our original pharmgkb plugin, we have a manifest and a parser file with the new addition of a Dockerfile. Lets have a quick look at the manifest file.
Note
If you notice, the manifest file is in a yaml format while the previous manifest files have all been in a json format. This is because our Hub can parse both yaml and json formatted files!
As you can see, the manifest file is in a very similar format as the manifest file in our Data Plugin <studio.html#id1>`_ section. The only difference is we have included a new data_url section within the dumper. The data_url should match the following format:
docker://CONNECTION_NAME?image=DOCKER_IMAGE&tag=TAG&path=/path/to/remote_file&dump_command="this is custom command"&container_name=CONTAINER_NAME&keep_container=true&get_version_cmd="cmd"&volumes=VOLUMES&named_volumes=NAMED_VOLUMES
There seems to be an issue though looking at our listed parameters, the dump_command, path, and countainer_name are all required, but they seem to be missing from the data_url. Lets try to dump using this manifest file to see what happens!
Lets first build our docker file. As shown in our manifest, the data url has image=annotations so when we build we have to make sure to name our image accordingly.
Now we can finally test our source using the Biothings CLI. Since our document size is small we can directly use the dump_and_upload.
If you are working with a larger source you will need need to use them separately and specify the --batch-limit flag when uploading:
We have now successfully dumped and uploaded our source. Why did we not see any of the expected errors for missing parameters?
To answer this question, we have to take a look at the Dockerfile.
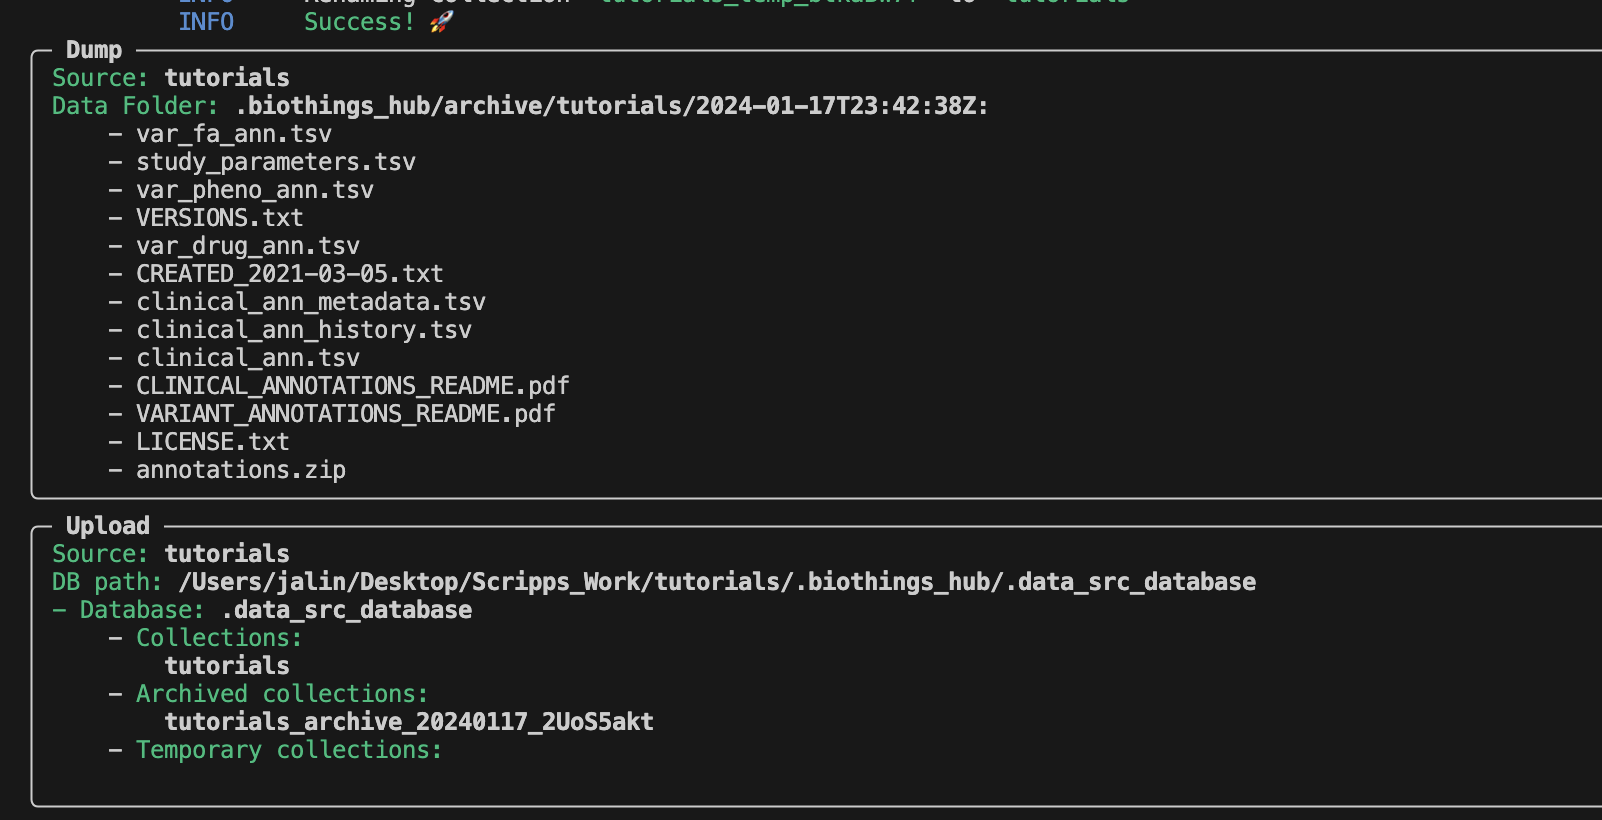
To keep the data url from becoming too difficult to read, we can directly set the paramters into a Docker LABEL object. This is why we are able to run the dump and upload process without encountering any errors. A new directory has been created by the CLI. Lets take a look at it.
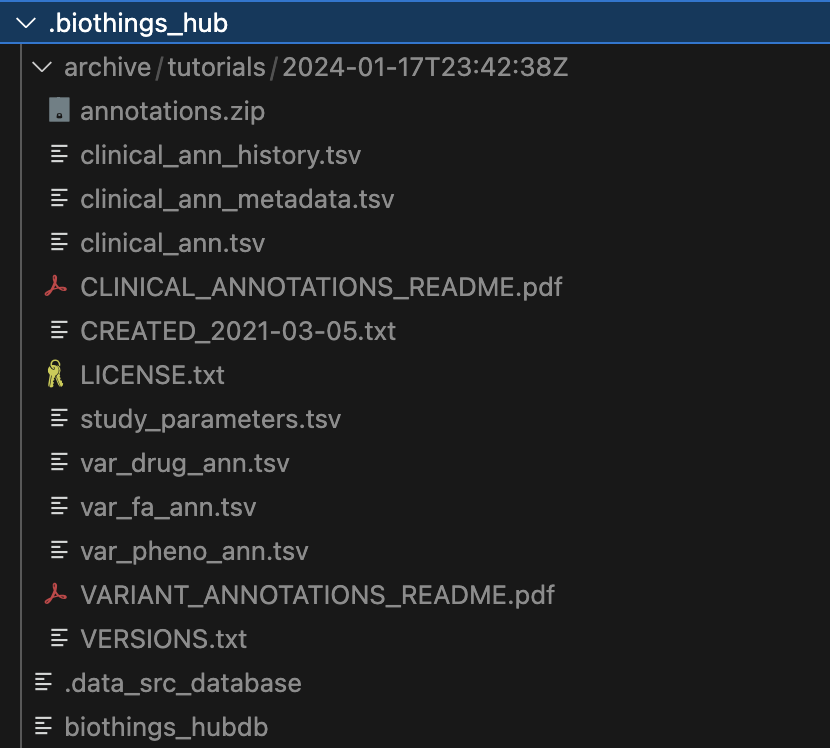
Within the .biothings_hub/archive/tutorials/2024-01-17T23:42:38Z directory, there is an annotations.zip that was dumped along with the uncompressed contents
that we specified in the manifest. Since we did not specify a version, the current datetime is automatically used for the directory name .biothings_hub/archive/tutorials/2024-01-17T23:42:38Z
The .biothings_hub/biothings_hubdb and .biothings_hub/.data_src_database are both sqlite databases that
hold the information that would normally be held in the mongodb. The former being the datasource settings and
the latter holding our uploaded data.
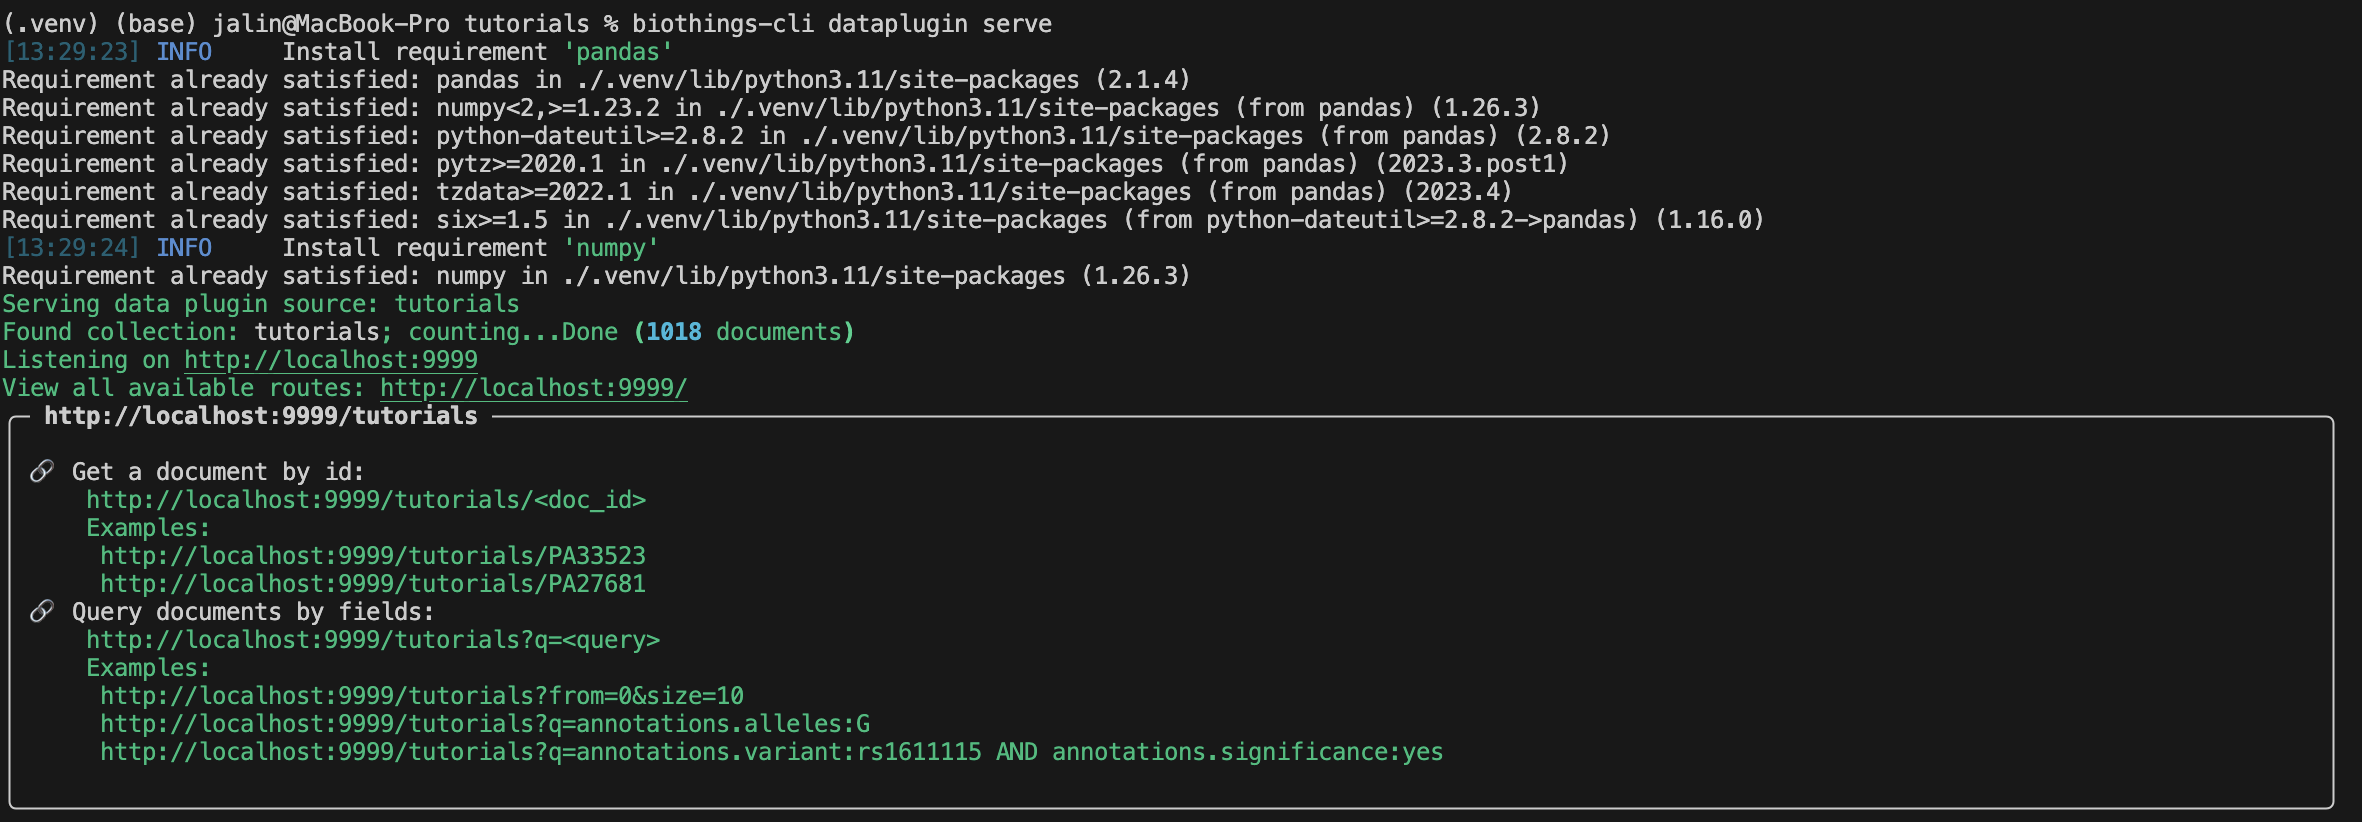
With our uploaded data in our database, we can finally serve this data on our localhost.
The result should look something similar to this:
Congratulations you have learned how to build a Docker based plugin! Remember to make sure to always test out some of the queries before submitting your plugin.
1. API cloud deployments and hosting
This part is still under development… Stay tuned and join Biothings Google Groups (https://groups.google.com/forum/#!forum/biothings) for more.
8. Troubleshooting
We test and make sure, as much as we can, that the BioThings Studio image is up-to-date and running properly. But things can still go wrong…
A good starting point investigating an issue is to look at the logs from the BioThings Studio. Make sure it’s connected (green power button on the top right), then click “Logs” button, on the bottom right. You will see logs in real-time (if not connected, it will complain about a disconnected websocket). As you click and perform actions throughout the web application, you will see log message in that window, and potentially errors not displayed (or with less details) in the application.
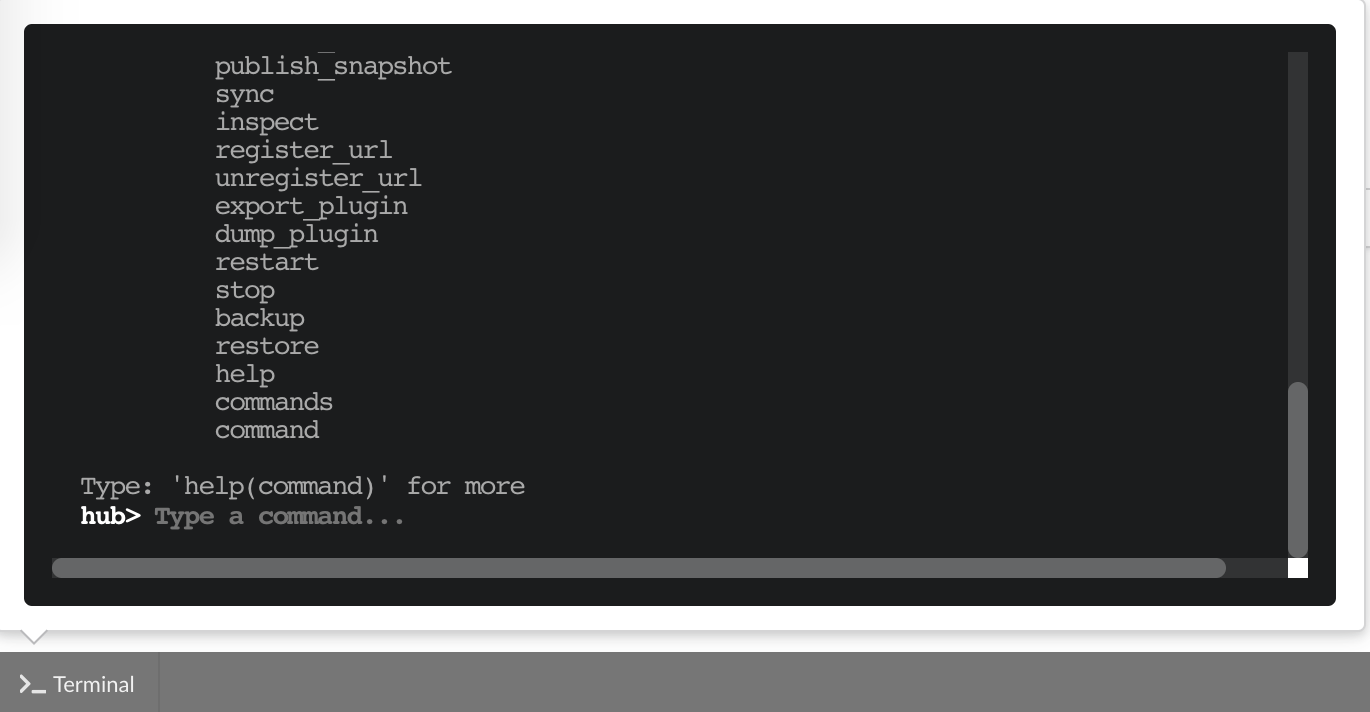
The “Terminal” (click on the bottom left button) gives access to commands you can manually type from the web application. Basically, any action performed clicking on the application
is converted into a command call. You can even see what commands were launched and which ones are running. This terminal also gives access to more commands, and advanced options that may
be useful to troubleshoot an issue. Typing help(), or even passing a command name such as help(dump) will print documentation on available commands and how to use them.
On a lower level, make sure all services are running in the docker container. Enter the container with
docker exec -ti studio /bin/bash and type netstat -tnlp, you should see services running on ports
(see usual running services). If services on ports 7080 and 7022 aren’t running, it means the
Hub has not started. If you just started the instance, wait a little more as services may take a while
before they’re fully started and ready.
If after ~1 min, you still don’t see the Hub running, log in as user biothings and check the starting sequence.
Note
Hub is running in a tmux session, under user biothings.
# sudo su - biothings
$ tmux a # recall tmux session

$ python bin/hub.py
DEBUG:asyncio:Using selector: EpollSelector
INFO:root:Hub DB backend: {'uri': 'mongodb://localhost:27017', 'module': 'biothings.utils.mongo'}
INFO:root:Hub database: biothings_src
DEBUG:hub:Last launched command ID: 14
INFO:root:Found sources: []
INFO:hub:Loading data plugin 'https://github.com/sirloon/mvcgi.git' (type: github)
DEBUG:hub:Creating new GithubAssistant instance
DEBUG:hub:Loading manifest: {'dumper': {'data_url': 'https://www.cancergenomeinterpreter.org/data/cgi_biomarkers_latest.zip',
            'uncompress': True},
 'uploader': {'ignore_duplicates': False, 'parser': 'parser:load_data'},
 'version': '0.1'}
INFO:indexmanager:{}
INFO:indexmanager:{'test': {'max_retries': 10, 'retry_on_timeout': True, 'es_host': 'localhost:9200', 'timeout': 300}}
DEBUG:hub:for managers [<SourceManager [0 registered]: []>, <AssistantManager [1 registered]: ['github']>]
INFO:root:route: ['GET'] /job_manager => <class 'biothings.hub.api.job_manager_handler'>
INFO:root:route: ['GET'] /command/([\w\.]+)? => <class 'biothings.hub.api.command_handler'>
...
INFO:root:route: ['GET'] /api/list => <class 'biothings.hub.api.api/list_handler'>
INFO:root:route: ['PUT'] /restart => <class 'biothings.hub.api.restart_handler'>
INFO:root:route: ['GET'] /status => <class 'biothings.hub.api.status_handler'>
DEBUG:tornado.general:sockjs.tornado will use json module
INFO:hub:Monitoring source code in, ['/home/biothings/biothings_studio/hub/dataload/sources', '/home/biothings/biothings_studio/plugins']:
['/home/biothings/biothings_studio/hub/dataload/sources',
 '/home/biothings/biothings_studio/plugins']
You should see something like above. If not, you should see the actual error, and depending on the error, you may be able to
fix it (not enough disk space, etc…). BioThings Hub can be started again using python bin/hub.py from within the application
directory (in our case, /home/biothings/biothings_studio)
Note
Press Control-B then D to dettach the tmux session and let the Hub run in background.
By default, logs are available in /data/biothings_studio/logs/.
Finally, you can report issues and request for help, by joining Biothings Google Groups (https://groups.google.com/forum/#!forum/biothings).